iOS Revisited: iOS11

Hot

Post Top Ad

Showing posts with label iOS11. Show all posts

8 Oct 2017

Storing/Downloading/Deleting images or videos Using Firebase Cloud Storage

10/08/2017 10:07:00 am 9
Cloud Storage for Firebase is a powerful, simple, and cost-effective object storage service built for Google scale. Firebase SDK adds Google security to file uploads and downloads for your Firebase apps, either if connectivity is slow or fast.

Storing/Downloading images or videos Using Firebase Cloud Storage


If the network connection is poor, the client is able to retry the operation right where it left off, saving your users time and bandwidth. Everything will be done asynchronously in background threads, so that UI won't hang.

We can store images, videos, files, audio in cloud storage by using Firebase SDK. For accessing those files we can use same Google cloud storage.

Uploads and downloads are robust, meaning they restart where they stopped, saving your users time and bandwidth.

Google provides strong security, so that only authenticated users can upload or download files.

Before getting in to Sample Project, Integrate your project with Firebase.

Add the following dependency to podfile:
pod 'Firebase/Storage'

Run pod install and open the created .xcworkspace file.

Configure Firebase Storage Rules:

The Firebase Storage provides a set rules so that files can structure according to the rules.

By default, only authenticated users can access to the Firebase Storage for uploading & downloading files.

There are different authenticated methods choose any one of them.

Using Facebook Login
Using Email & Password
Anonymous Login

In this project we are going to start without setting up Authentication, you can configure your rules for public access.

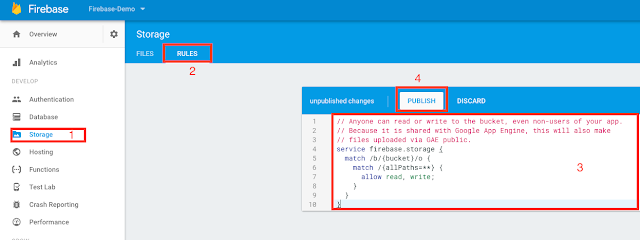
Go to Firebase console -> Storage -> Rules

Add the following rule and publish:
// Anyone can read or write to the bucket, even non-users of your app.
// Because it is shared with Google App Engine, this will also make
// files uploaded via GAE public.
service firebase.storage {
  match /b/{bucket}/o {
    match /{allPaths=**} {
      allow read, write;
    }
  }
}


 Firebase console -> Storage -> Rules


Set up Firebase Storage To iOS Project :

We need to initialize Firebase.

First import the Firebase SDK in AppDelegate.swift file:
import Firebase

Then, in the application:didFinishLaunchingWithOptions: method, initialize the FirebaseApp object:
// Use Firebase library to configure APIs
FirebaseApp.configure()

Open ViewController.swift file add the following code inside viewDidLoad() method:
let storage = Storage.storage()

Create a Reference To upload, download, or delete:

References are created using the FirebaseStorage service and calling its reference method.
// Create a storage reference from our storage service
let storageRef = storage.reference()

You can create a reference to a location lower in the tree, say 'images/car.jpg', by using the child method on an existing reference.
var carRef = storageRef.child("images/car.jpg")

Uploading To Cloud Storage :

For uploading a file firstly we need a reference, we can use the one which created earlier.

We can upload files to storage using two ways:

1. Upload from data in memory
2. Upload from a URL representing a file on device

Here we will show using memory.

Before doing that drag one image to the project and name its as 'car.jpg'.

Add the following method and call in viewDidLoad() method:
func uploadImageToStorage() {
    let storage = Storage.storage()
    var storageRef = storage.reference()
    
    if let image = UIImage(named: "car.jpg") {
        let data = UIImagePNGRepresentation(image)
        print("data \(String(describing: data))")
        
        
        // Create the file metadata
        let metadata = StorageMetadata()
        metadata.contentType = "image/jpeg"
        
        storageRef = storageRef.child("images/car.jpg")
        
        let uploadTask = storageRef.putData(data!, metadata: metadata)
        
        // Listen for state changes, errors, and completion of the upload.
        uploadTask.observe(.resume) { snapshot in
            // Upload resumed, also fires when the upload starts
        }
        
        uploadTask.observe(.pause) { snapshot in
            // Upload paused
        }
        
        uploadTask.observe(.progress) { snapshot in
            // Upload reported progress
            let percentComplete = 100.0 * Double(snapshot.progress!.completedUnitCount)
                / Double(snapshot.progress!.totalUnitCount)
            
            print("Upload Percentage == \(percentComplete)")
        }
        
        uploadTask.observe(.success) { snapshot in
            // Upload completed successfully
            print("Upload completed successfully")
        }
        
        uploadTask.observe(.failure) { snapshot in
            if let error = snapshot.error as? NSError {
                switch (StorageErrorCode(rawValue: error.code)!) {
                case .objectNotFound:
                    // File doesn't exist
                    break
                case .unauthorized:
                    // User doesn't have permission to access file
                    break
                case .cancelled:
                    // User canceled the upload
                    break
                    
                    /* ... */
                    
                case .unknown:
                    // Unknown error occurred, inspect the server response
                    break
                default:
                    // A separate error occurred. This is a good place to retry the upload.
                    break
                }
            }
        }
    }
}

Above method will give percentage of upload done,failures causes, pause, resume and success observer.

Build and Run,if everything is correct then we will see 'Upload completed successfully' message in the console.

Then open Firebase console check inside storage -> images -> car.jpg should be there like below:
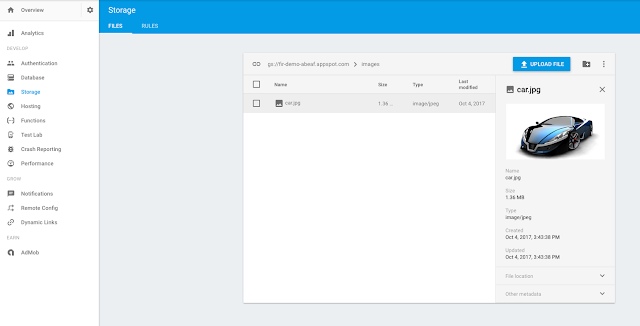
 storage -> images -> car.jpg


Downloading Image From Cloud Storage:

Now we will download the car image what we uploaded before.

Add the following code and call in viewDidLoad() method:
func downloadImageFromStorage() {
    let storage = Storage.storage()
    var storageRef = storage.reference()
    
    // Create a reference to the file we want to download
    storageRef = storageRef.child("images/car.jpg")
    
    // Start the download (in this case writing to a file)
    let downloadTask = storageRef.getData(maxSize: 5 * 1024 * 1024) { data, error in
        if let error = error {
            // Uh-oh, an error occurred!
        } else {
            // Data for "images/island.jpg" is returned
            let image = UIImage(data: data!)
            
            print("image succesfully downloaded \(image!)")
        }
    }
    
    
    // Observe changes in status
    downloadTask.observe(.resume) { snapshot in
        // Download resumed, also fires when the download starts
    }
    
    downloadTask.observe(.pause) { snapshot in
        // Download paused
    }
    
    downloadTask.observe(.progress) { snapshot in
        // Download reported progress
        let percentComplete = 100.0 * Double(snapshot.progress!.completedUnitCount)
            / Double(snapshot.progress!.totalUnitCount)
    }
    
    downloadTask.observe(.success) { snapshot in
        // Download completed successfully
    }
    
    // Errors only occur in the "Failure" case
    downloadTask.observe(.failure) { snapshot in
        guard let errorCode = (snapshot.error as? NSError)?.code else {
            return
        }
        guard let error = StorageErrorCode(rawValue: errorCode) else {
            return
        }
        switch (error) {
        case .objectNotFound:
            // File doesn't exist
            break
        case .unauthorized:
            // User doesn't have permission to access file
            break
        case .cancelled:
            // User cancelled the download
            break
            
            /* ... */
            
        case .unknown:
            // Unknown error occurred, inspect the server response
            break
        default:
            // Another error occurred. This is a good place to retry the download.
            break
        }
    }
}

Above method will give percentage of download done,failures causes, pause, resume and success observer.

Build and Run,if everything is correct then we will see 'image successfully downloaded with file' message in the console.


Deleting Image From Firebase Storage:

We will delete the car image from Firebase storage.

Add the following code and call in viewDidLoad() method:
func deletingImageFromStorage(){
    let storage = Storage.storage()
    var storageRef = storage.reference()
    
    // Create a reference to the file we want to download
    storageRef = storageRef.child("images/car.jpg")
    
    storageRef.delete { error in
        if let error = error {
            // Uh-oh, an error occurred!
        } else {
            print("File deleted successfully")
        }
    }
    
}

Build and Run,if everything is correct then we will see 'File deleted successfully' message in the console.

Open the Firebase console and check whether image deleted or not.

Read More

17 Sept 2017

Scan BarCode & QRCode With iPhone Camera Using Swift 4(AVFoundation) - iOS 11

9/17/2017 03:42:00 am 2
Hello Guys! In this article we will dive in to Bar Code & Qr Code Scanner App. Here we doing both code scanning in single App.

Apple introduced Av Foundation from iOS 7 to support reading bar codes. Apple supports all types of following codes:

AVMetadataObjectTypeUPCECode
AVMetadataObjectTypeCode39Code
AVMetadataObjectTypeCode39Mod43Code
AVMetadataObjectTypeEAN13Code
AVMetadataObjectTypeEAN8Code
AVMetadataObjectTypeCode93Code
AVMetadataObjectTypeCode128Code
AVMetadataObjectTypePDF417Code
AVMetadataObjectTypeQRCode
AVMetadataObjectTypeAztecCode

This Article Covers Following Related questions  :

xcode barcode scanner tutorial
swift barcode scanner github
avfoundation barcode tutorial
ios barcode scanner sdk open source
barcode scanner ios github
swift barcode generator
swift qr code scanner
swift 3 qr code reader
Building a Barcode and QR Code Reader in Swift 3 and Xcode 8
Barcode Scanning in iOS8 With Swift AVFoundation Class


Getting Started :

Create a new project -> open Xcode -> File -> New -> Project -> Single View App, then tap next button. Type product name as 'BarCode&QRCode' then tap next and select the folder to save project.

Firstly for scanning code we need to access device camera's. For that open info.plist and add "Privacy - Camera Usage Description" key with a description "To read BarCode & QRCode".


Privacy - Camera Usage Description
Next import the following framework:
import AVFoundation

Add the following properties before viewDidLoad() function :
var videoCaptureDevice: AVCaptureDevice = AVCaptureDevice.defaultDevice(withMediaType: AVMediaTypeVideo)
var device = AVCaptureDevice.defaultDevice(withMediaType: AVMediaTypeVideo)
var output = AVCaptureMetadataOutput()
var previewLayer: AVCaptureVideoPreviewLayer?

var captureSession = AVCaptureSession()
var code: String?

var scannedCode = UILabel()

Add the following two methods:
private func setupCamera() {
    
    let input = try? AVCaptureDeviceInput(device: videoCaptureDevice)
    
    if self.captureSession.canAddInput(input) {
        self.captureSession.addInput(input)
    }
    
    self.previewLayer = AVCaptureVideoPreviewLayer(session: captureSession)
    
    if let videoPreviewLayer = self.previewLayer {
        videoPreviewLayer.videoGravity = AVLayerVideoGravityResizeAspectFill
        videoPreviewLayer.frame = self.view.bounds
        view.layer.addSublayer(videoPreviewLayer)
    }
    
    let metadataOutput = AVCaptureMetadataOutput()
    if self.captureSession.canAddOutput(metadataOutput) {
        self.captureSession.addOutput(metadataOutput)
        
        metadataOutput.setMetadataObjectsDelegate(self, queue: DispatchQueue.main)
        metadataOutput.metadataObjectTypes = [AVMetadataObjectTypeUPCECode, AVMetadataObjectTypeCode39Code, AVMetadataObjectTypeCode39Mod43Code, AVMetadataObjectTypeEAN13Code, AVMetadataObjectTypeEAN8Code, AVMetadataObjectTypeCode93Code, AVMetadataObjectTypeCode128Code, AVMetadataObjectTypePDF417Code, AVMetadataObjectTypeQRCode, AVMetadataObjectTypeAztecCode]
        
    } else {
        print("Could not add metadata output")
    }
}

private func addLabelForDisplayingCode() {
    view.addSubview(scannedCode)
    scannedCode.translatesAutoresizingMaskIntoConstraints = false
    scannedCode.bottomAnchor.constraint(equalTo: view.bottomAnchor, constant: -20.0).isActive = true
    scannedCode.leadingAnchor.constraint(equalTo: view.leadingAnchor, constant: 20.0).isActive = true
    scannedCode.trailingAnchor.constraint(equalTo: view.trailingAnchor, constant: -20.0).isActive = true
    scannedCode.heightAnchor.constraint(equalToConstant: 50).isActive = true
    scannedCode.font = UIFont.preferredFont(forTextStyle: .title2)
    scannedCode.backgroundColor = UIColor.black.withAlphaComponent(0.5)
    scannedCode.textAlignment = .center
    scannedCode.textColor = UIColor.white
    scannedCode.text = "Scanning...."
}

First method is for adding camera and second is for displaying scanned text.

Call the above methods in viewDidLoad() as follow :

self.setupCamera()
self.addLabelForDisplayingCode()

Add the following delegate to ViewController.swift.

AVCaptureMetadataOutputObjectsDelegate

Add the following methods for starting and stopping captureSession.

override func viewWillAppear(_ animated: Bool) {
    super.viewWillAppear(animated)
    
    if (captureSession.isRunning == false) {
        captureSession.startRunning();
    }
}

override func viewWillDisappear(_ animated: Bool) {
    super.viewWillDisappear(animated)
    
    if (captureSession.isRunning == true) {
        captureSession.stopRunning();
    }
}

Then finally add the delegate method as following:
func captureOutput(_ captureOutput: AVCaptureOutput!, didOutputMetadataObjects metadataObjects: [Any]!, from connection: AVCaptureConnection!) {
    // This is the delegate'smethod that is called when a code is readed
    
    print(metadataObjects)
    for metadata in metadataObjects {
        let readableObject = metadata as! AVMetadataMachineReadableCodeObject
        let code = readableObject.stringValue
        scannedCode.text = code
    }
}

The above method will perform scanning operation and generate the code from the BarCode & QRCodes.


Build and Run, we see camera. Then focus on the barcode, the scanned code will be at the bottom.

Scan BarCode & QRCode With iPhone Camera Using Swift 4(AVFoundation) - iOS 11


You can create your own barcode from here.

Download sample project with example :


Read More

13 Sept 2017

ARKit Tutorial iOS Example using Swift 4 - iOS 11.

9/13/2017 02:40:00 am 0
In this tutorial we are going to create Augmented Reality example by using ARKit released by apple in Swift 4.

We need to integrate iOS device camera and motion features to produce augmented reality experiences in the app. For that Apple introduced SceneKit, this will do all for us.
So we are going to start ARKit using SceneKit.


ARKit Tutorial

Requirements : 

Xcode 9 , Device with an A9 or later processor running with iOS11.

We are going to add a cube to real word. 

Getting Started :


First create a new project -> open Xcode -> File -> New -> Project -> Single View App, then tap next button. Type product name as 'ARKitAddingCube' then tap next and select the folder to save project.

We are going to use camera, So add 'NSCameraUsageDescription' to Info.plist.


NSCameraUsageDescription
Then open ViewController.swift add the following line next to 'import UIKit'.
import ARKit

For getting access to camera we are going to add ARSCNView() as subview. ARSCNView will provide camera to us.

Add the following property before viewDidLoad() method.

var sceneView = ARSCNView()

Add created property as subview. Write following code inside viewDidLoad() method.
sceneView.frame = view.frame
view.addSubview(sceneView)

Build and Run you nothing is there except white screen. No worries stop and follow next steps.

As we all know that camera is based on sessions. So for this also we need to create and maintain sessions. For ARKit we are going to create ARSession.

Every session is based on configuration. In ARKIt there are ARSessionConfiguration.

The good thing about using SceneKit is no need to create session by default ARSCNView() having a session. But the for running session we need ARSessionConfiguration. Then configuration as follow.

let configuration = ARWorldTrackingSessionConfiguration()

Then run the session with above configuration.
sceneView.session.run(configuration)
Build and Run, we see camera's permission . Allow camera and we see camera running on your device.
 

Now its time to add a cube to real world space.

Before that, add a Button to view. Add two methods next to viewDidLoad() method.

@IBAction func addCubeButtonTapped(sender: UIButton) {
    print("Cube Button Tapped")
}

func addButton() {
    let button = UIButton()
    view.addSubview(button)
    button.translatesAutoresizingMaskIntoConstraints = false
    button.setTitle("Add a CUBE", for: .normal)
    button.setTitleColor(UIColor.red, for: .normal)
    button.backgroundColor = UIColor.white.withAlphaComponent(0.4)
    button.addTarget(self, action: #selector(addCubeButtonTapped(sender:)) , for: .touchUpInside)
    
    // Contraints
    button.bottomAnchor.constraint(equalTo: view.bottomAnchor, constant: -8.0).isActive = true
    button.centerXAnchor.constraint(equalTo: view.centerXAnchor, constant: 0.0).isActive = true
    button.heightAnchor.constraint(equalToConstant: 50)
}

Then add 'addButton()' to the end of viewDidLoad() method.

Build and Run we will see Button at the bottom.


In this whole project we don't use StoryBoards. If you want to know why follow this link.

http://iosrevisited.blogspot.com/2017/08/11-reasons-why-not-to-use-storyboards.html

Now all set for adding Cube.

Providing 3D Virtual Content with SceneKit.

For adding any object to scene we need to create SCNNode and add that as a child node to SceneView.

let's create SCNNode as follow. Write the following code in @IBAction method.

let cubeNode = SCNNode(geometry: SCNBox(width: 0.1, height: 0.1, length: 0.1, chamferRadius: 0)) // SceneKit/AR coordinates are in meters

CubeNode created with a 0.1 meters of height, width and length.

Now where to position this cube ? In this for visualize we are going to place 0.2 metres in front of device. Give position to cubeNode as follow.

cubeNode.position = SCNVector3(0, 0, -0.2)

Then add cubeNode as child node to Scenview.
self.sceneView.scene.rootNode.addChildNode(cubeNode)

Great! Build and Run, Tap on Add a cube button, we see white cube. Move device around if can not see Cube.

ARKit adding a cube to real world


On tapping Add a Cube button multiple times it's adding cube again and again at same position so we can't see multiple cubes.

Next step, adding multiple cubes to real world space. 

For this nothing much to do. Simply we need to change cubes position according to cameras position.

To get camera relative postion add following method.

func getMyCameraCoordinates(sceneView: ARSCNView) -> MDLTransform {
    let cameraTransform = sceneView.session.currentFrame?.camera.transform
    let cameraCoordinates = MDLTransform(matrix: cameraTransform!)
    return cameraCoordinates
}

By using above method we get camera relative position. So we need give cube node postion as camera position.

Replace code inside 'addCubeButtonTapped' method with the following code.

DispatchQueue.main.async {
    print("cube button tapped")
    let cubeNode = SCNNode(geometry: SCNBox(width: 0.1, height: 0.1, length: 0.1, chamferRadius: 0))
    let cc = self.getMyCameraCoordinates(sceneView: self.sceneView)
    cubeNode.position = SCNVector3(cc.translation.x, cc.translation.y, cc.translation.z)
    self.sceneView.scene.rootNode.addChildNode(cubeNode)
}

In the above code we are assigning camera's position to cube node.

Done. Build and Run we will see camera with 'Add a Cube' button.

Now tap button and wait until cube appears. If not step back and see. Move your device as you like and observe the added cube, it won't change it's position. That's what Augmented Reality means.

Your final output for ARKit will be like the following Video.


ARKit adding a multiple cubes to real world - swift 4, iOS


Download sample project with examples :

Read More

25 Aug 2017

Dynamic type(Text and Image) & Image scaling Uisng Preserve Vector Data iOS11

8/25/2017 10:42:00 am 0
In this article we will discuss several common tips and tricks for supporting Dynamic Type.

Dynamic type means increasing text or images sizes dynamically based on device settings.

Dynamic type(Text and Image) & Image scaling Uisng Preserve Vector Data iOS11


Setting Up :

First create new project with single view and name it as "Dynamic Type".

For testing tap settings -> General -> Accessibility  -> Larger Test inside we can change preferred reading size.

While testing we need to change multiple times, that take too time for testing. No Worries we have alternate tool for testing for that tap on  Xcode -> Open Developer Tool -> Accessibility Inspector.

Accessibility Inspector. Beta

Change device to simulator and tap on settings icon we can see size inspector bottom, change sizes there it will update real time.

Accessibility Inspector. Settings Icon

 There are different techniques for dynamic type. We will go through step by step.

Text style fonts (UIFontTextStyle) :

By using UIFontTextStyle we can easily make UILabel dynamic.

First create UILabel object. Open ViewController.swift and add following line above viewDidLoad() method.
var textLabel = UILabel()

Add textLabel as subview to view. We are adding programmatically as follow.
func addTextLabelAsSubview() {
    view.addSubview(textLabel)
    textLabel.translatesAutoresizingMaskIntoConstraints = false
    textLabel.leadingAnchor.constraint(equalTo: view.leadingAnchor, constant: 8.0).isActive = true
    textLabel.topAnchor.constraint(equalTo: view.topAnchor, constant: 20.0).isActive = true
    textLabel.trailingAnchor.constraint(equalTo: view.trailingAnchor, constant: 8.0).isActive = true
    
    textLabel.text = "Hello World..!"
} 

We are using autoLayouts but not using storyboards.

Call addTextLabelAsSubview() method inside viewDidLoad().

Build and Run, we see Hello World..!. That's not we are looking for, open accessibility inspector then change size to largest. But nothing changed in simulator.

Accessibility Inspector. Default settings

Accessibility Inspector. Large fonts

No worries for that we need to add adjustsFontForContentSizeCategory property and set to true. It will change font size dynamically.

AdjustsFontForContentSizeCategory :

For this property to take effect, the element’s font must be one of the following:

     - a font vended using +preferredFontForTextStyle: or +preferredFontForTextStyle:compatibleWithTraitCollection: with a valid UIFontTextStyle
     - a font vended using - [UIFontMetrics scaledFontForFont:] or one of its variants


So we are using first one i.e, UIFontTextStyle.

Add following lines to the end of addTextLabelAsSubview() method.
textLabel.adjustsFontForContentSizeCategory = true
textLabel.font = UIFont.preferredFont(forTextStyle: UIFontTextStyle.title1)

Now Build and Run, change size, Bingo! size is changing real time.

Dynamic type change real time

Great, But the end is truncating for largest. So fix that by following technique.

Line wrapping (numberOfLines):

textLabel that appear multi line have numberOfLines set to a value other than the default of 1.

So for us we need dynamic . so simply add set numberOfLines to 0. It will wrap automatically based on size. Add following code at the end of addTextLabelAsSubview() method.
textLabel.numberOfLines = 0

Build and Run, Great now its working perfect.

There are different techniques we will update soon.

Read More

18 Aug 2017

Measuring Distance Using ARKit in iOS Swift 4. iPhone as a Measuring Tape. ARKit iOS Measuring Distance.

8/18/2017 10:40:00 am 0
In this article we are creating a Measuring Tape App using Apple's ARKit Framework. It' really a cool app. Without using any tape we are going to measure distance with iPhone/iPad.

AR made us to create excellent real world Apps. By using Augmented Reality we can create different Virtual Apps, out of those Measuring Distance App is one. 

Measuring Tape Using ARKit in Swift 4. iPhone as a Measuring Tape. ARKit iOS Measuring Distance.

Before starting this example ,first go through the basic sample example about How To Add Cube.


Getting Started:


Requirements :

Xcode 9 , Device with an A9 or later processor running with iOS11.  

First create a new project -> open Xcode -> File -> New -> Project -> Augmented Reality App, then tap next button. Type product name as 'ARKitMeasuringTape' then tap next and select the folder to save project.


Augmented Reality App
Build and Run, Move camera around we see space ship.

Great, Up to now everything working fine. But we don't need space Ship for measuring distance so remove unwanted files.

First delete 'art.scnassets' from project. Then open ViewController.swift, delete all methods after this pragma mark '// MARK: - ARSCNViewDelegate'.

From viewDidLoad() method delete the following lines of code.

// Create a new scene
let scene = SCNScene(named: "art.scnassets/ship.scn")!

// Set the scene to the view
sceneView.scene = scene
Build and Run, SpaceShip removed and we see regular camera.

All Good. We will get into target of this article.


Plane Detection :

First thing for measuring distance we need to detect plane surface. For that ARKit provides a great function but it detects only horizontal planes. For us it will work.

In ARKit you can specify that you want to detect horizontal planes by setting the planeDetection property to ARPlaneDetectionHorizontal on your session configuration object.

Replace the 'viewWillAppear' method with the following method.
override func viewWillAppear(_ animated: Bool) {
    super.viewWillAppear(animated)
    
    let configuration = ARWorldTrackingSessionConfiguration()
    
    configuration.planeDetection = .horizontal
    
    sceneView.session.run(configuration)
}
Everything set for horizontal plane detection.

Now, how can we know whether detected or not. No worries, for that we will draw a square over camera based on ARSCNViewDelegate methods.

We use the following delegate method. Calls exactly once per frame before any animation and actions are evaluated and any physics are simulated.
- (void)renderer:(id )renderer updateAtTime:(NSTimeInterval)time
For drawing a square we are going to use Apple's FocusSquare class.

Download all the required files.

Drag all files to the project.

Setting Up Square :

Create a global object for the FocusSquare class as following.
var focusSquare = FocusSquare()

var dragOnInfinitePlanesEnabled = false // for infinite Planes
For setting up square on the SceneView, we need to add as child node. Add the following method.
func setupFocusSquare() {
    focusSquare.unhide()
    focusSquare.removeFromParentNode()
    sceneView.scene.rootNode.addChildNode(focusSquare)
}
For detecting planes we need to do hitTest method. For that write following extension to the bottom of the class.
extension ViewController {
    
    
    func worldPositionFromScreenPosition(_ position: CGPoint,
                                         objectPos: SCNVector3?,
                                         infinitePlane: Bool = false) -> (position: SCNVector3?, planeAnchor: ARPlaneAnchor?, hitAPlane: Bool) {
        
        // -------------------------------------------------------------------------------
        // 1. Always do a hit test against exisiting plane anchors first.
        //    (If any such anchors exist & only within their extents.)
        
        let planeHitTestResults = sceneView.hitTest(position, types: .existingPlaneUsingExtent)
        if let result = planeHitTestResults.first {
            
            let planeHitTestPosition = SCNVector3.positionFromTransform(result.worldTransform)
            let planeAnchor = result.anchor
            
            // Return immediately - this is the best possible outcome.
            return (planeHitTestPosition, planeAnchor as? ARPlaneAnchor, true)
        }
        
        // -------------------------------------------------------------------------------
        // 2. Collect more information about the environment by hit testing against
        //    the feature point cloud, but do not return the result yet.
        
        var featureHitTestPosition: SCNVector3?
        var highQualityFeatureHitTestResult = false
        
        let highQualityfeatureHitTestResults = sceneView.hitTestWithFeatures(position, coneOpeningAngleInDegrees: 18, minDistance: 0.2, maxDistance: 2.0)
        
        if !highQualityfeatureHitTestResults.isEmpty {
            let result = highQualityfeatureHitTestResults[0]
            featureHitTestPosition = result.position
            highQualityFeatureHitTestResult = true
        }
        
        // -------------------------------------------------------------------------------
        // 3. If desired or necessary (no good feature hit test result): Hit test
        //    against an infinite, horizontal plane (ignoring the real world).
        
        if (infinitePlane && dragOnInfinitePlanesEnabled) || !highQualityFeatureHitTestResult {
            
            let pointOnPlane = objectPos ?? SCNVector3Zero
            
            let pointOnInfinitePlane = sceneView.hitTestWithInfiniteHorizontalPlane(position, pointOnPlane)
            if pointOnInfinitePlane != nil {
                return (pointOnInfinitePlane, nil, true)
            }
        }
        
        // -------------------------------------------------------------------------------
        // 4. If available, return the result of the hit test against high quality
        //    features if the hit tests against infinite planes were skipped or no
        //    infinite plane was hit.
        
        if highQualityFeatureHitTestResult {
            return (featureHitTestPosition, nil, false)
        }
        
        // -------------------------------------------------------------------------------
        // 5. As a last resort, perform a second, unfiltered hit test against features.
        //    If there are no features in the scene, the result returned here will be nil.
        
        let unfilteredFeatureHitTestResults = sceneView.hitTestWithFeatures(position)
        if !unfilteredFeatureHitTestResults.isEmpty {
            let result = unfilteredFeatureHitTestResults[0]
            return (result.position, nil, false)
        }
        
        return (nil, nil, false)
    }
    
}
The above method will tell whether a plane detected or not. If detected, it will return the position and planeAnchor. Position is an Vector3 and plane anchor is an ARPlaneAnchor.

For updating the square write the following method.
func updateFocusSquare() {
    let (worldPosition, planeAnchor, _) = worldPositionFromScreenPosition(view.center, objectPos: focusSquare.position)
    if let worldPosition = worldPosition {
        focusSquare.update(for: worldPosition, planeAnchor: planeAnchor, camera: sceneView.session.currentFrame?.camera)
    }
}
In above method we are calling extension method for checking whether a plane detected or not and updating the square.

Square should update whenever frame changes. For that we are using ARSCNViewDelegate method as we discussed before.

Write the following method after ARSCNViewDelegate pragma mark.
func renderer(_ renderer: SCNSceneRenderer, updateAtTime time: TimeInterval) {
    DispatchQueue.main.async {
        self.updateFocusSquare()
    }
}
Above delegate method calls once per frame and updates square based on frame.

Finally we need to call setupFocusSquare() method in viewDidLoad().

Build and Run, BINGO we see Focus square try to focus on plane surface we see as below image with Full Focus Square.

Plane detection using Ht test

Add Distance Label :

Now add a label as a subview to the SceneView. Create label as follow.
let distanceLabel = UILabel()
Add distanceLabel as Subview. Add the following method.
func addDistanceLabel() {
    let margins = sceneView.layoutMarginsGuide
    sceneView.addSubview(distanceLabel)
    distanceLabel.translatesAutoresizingMaskIntoConstraints = false
    distanceLabel.leadingAnchor.constraint(equalTo: margins.leadingAnchor, constant: 10.0).isActive = true
    distanceLabel.topAnchor.constraint(equalTo: margins.topAnchor, constant: 10.0).isActive = true
    distanceLabel.heightAnchor.constraint(equalToConstant: 50).isActive = true
    distanceLabel.textColor = UIColor.white
    distanceLabel.text = "Distance = ??"
}
And call this method in viewDidLoad().

Not using storyboard for adding label.

Build and Run, we see Distance at Top-Left corner.

Adding distance Label as subview

Calculating Distance :

For calculating distance we need two points. So add startPoint and endpoint to ViewController.swift.
var startPoint : SCNVector3? = nil
    
var endPoint : SCNVector3? = nil
we can measure distance between two points using following formula.

let point A = (x1,y1,z1) and point B = (x2,y2,z2)

Then distance will be

Distance formula Arkit ios

So create one method for calculating distance between two points. Add the following method.
func getDistanceBetween(startPoint: SCNVector3, endPoint: SCNVector3) -> Double? {
    var distance : Double? = nil
    let x = powf((endPoint.x - startPoint.x), 2.0)
    let y = powf((endPoint.y - startPoint.y), 2.0)
    let z = powf((endPoint.z - startPoint.z), 2.0)
    
    distance = sqrt(Double(x + y + z))
    return distance
}
From where to get these points?

We are going to get based on user tap on screen from where they want to start for measuring distance. First we do hitTest for checking whether a planeAnchors exists at tapped point, if exists then take first anchor position and store it to the startPoint.

In the same way user taps somewhere, up to where he wants to measure. And take same point and do hitTest for checking whether a planeAnchors exists at tapped point, if exists then take first anchor position and store it to the endPoint.

Create method for getting start and end points. So add touchesBegan() method to ViewController.swift.
override func touchesBegan(_ touches: Set, with event: UIEvent?) {
    if let touch = touches.first {
        let results = sceneView.hitTest(touch.location(in: sceneView), types: [ARHitTestResult.ResultType.featurePoint] )
        
        if let anchor = results.first {
            
            let hitPointPosition = SCNVector3.positionFromTransform(anchor.worldTransform)
            
            if startPoint == nil && endPoint == nil {
                for child in sceneView.scene.rootNode.childNodes {
                    if child.name == "Start" || child.name == "End" {
                        child.removeFromParentNode()
                        distanceLabel.text = "Distance = ??"
                    }
                }
            }
            
            if startPoint == nil {
                focusSquare.hide()
                startPoint = hitPointPosition
                let node = createCrossNode(size: 0.01, color:UIColor.blue, horizontal:false)
                node.position = startPoint!
                node.name = "Start"
                sceneView.scene.rootNode.addChildNode(node)
                
            }else {
                endPoint = hitPointPosition
                let node = createCrossNode(size: 0.01, color:UIColor.red, horizontal:false)
                node.position = endPoint!
                node.name = "End"
                sceneView.scene.rootNode.addChildNode(node)
            }
            
            if endPoint != nil {
                setupFocusSquare()
                let distance = self.getDistanceBetween(startPoint: startPoint!, endPoint: endPoint!)
                distanceLabel.text = String(format: "Distance(Approx) = %.2f cm",distance! * 100)
                
                startPoint = nil
                endPoint = nil
            }
            
        }
    }
}

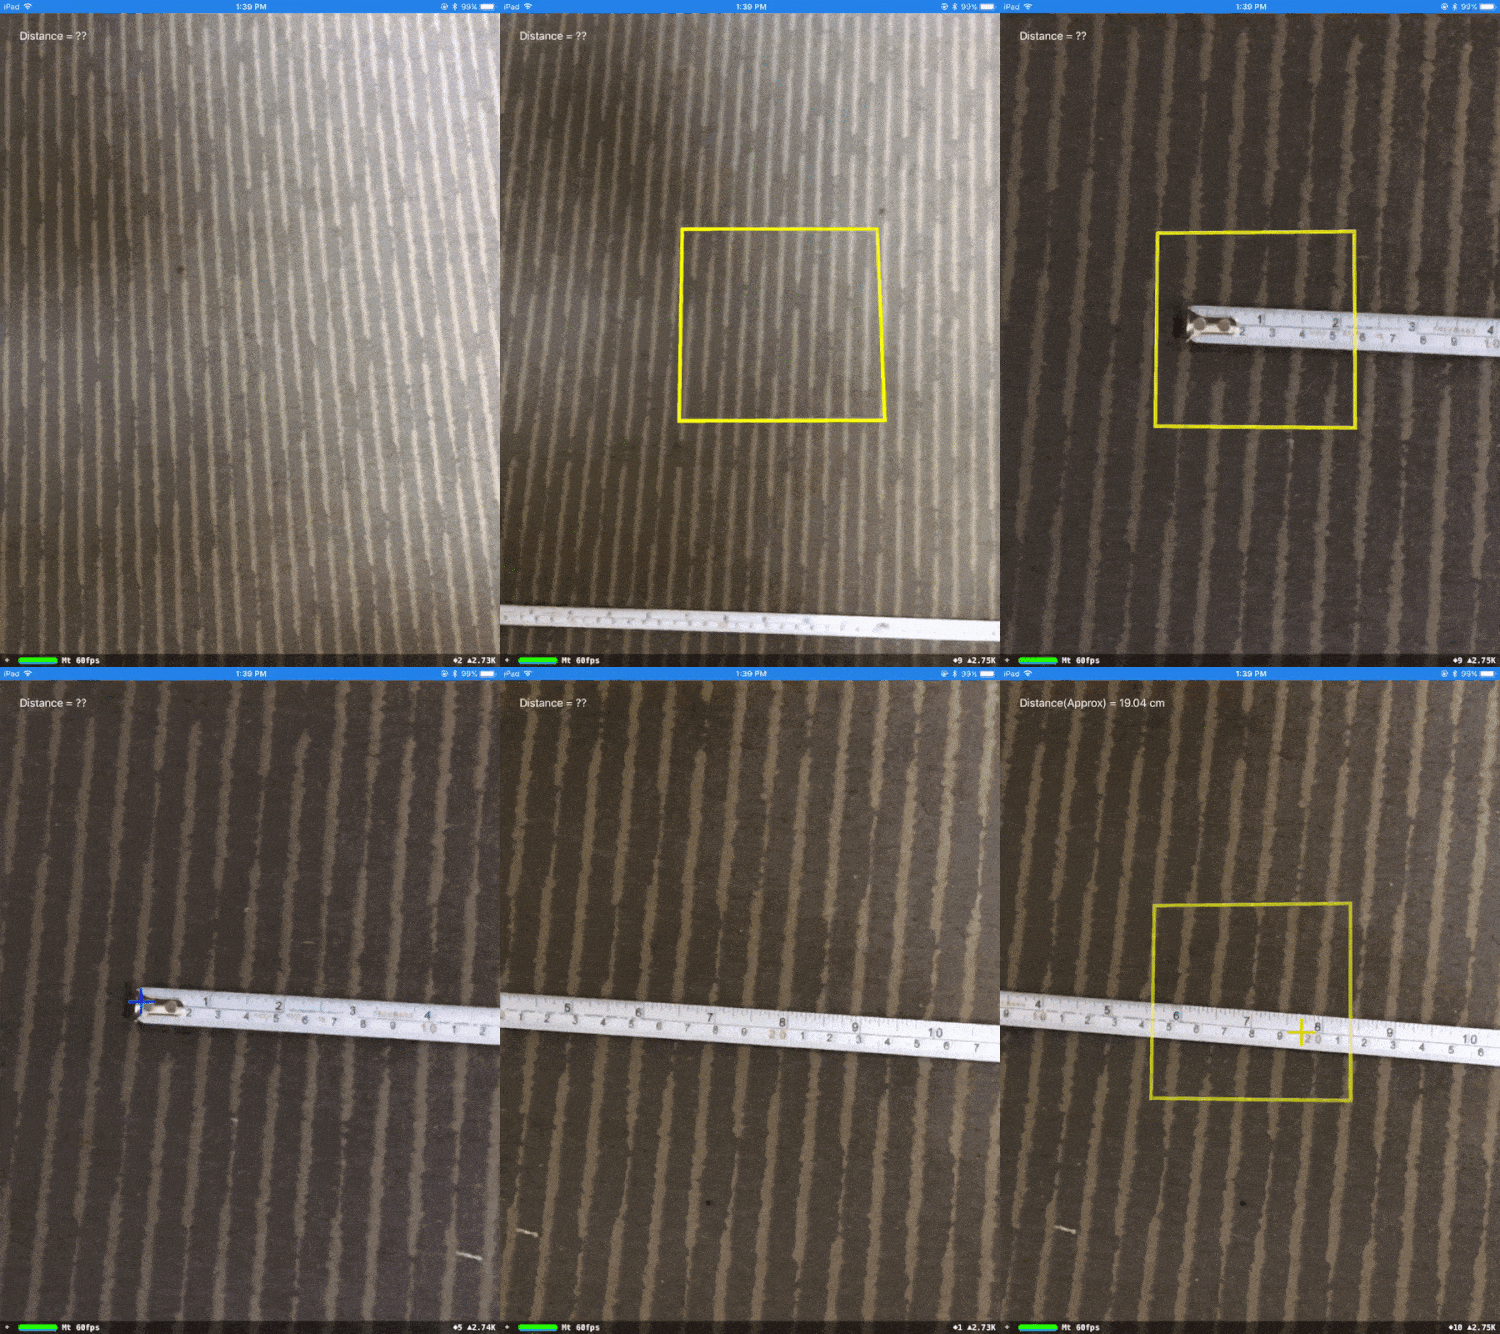
Great! All set. Build and Run we see camera, try to target on a plane surface then tap on the screen for the start point and again tap for endpoint.

you see a distance in centimeters at top right of screen.

I show two samples what tested.

Test Case 1 :

Original distance = 40 cm
Calculated distance = 38.25 cm (Approx)

Distance Measurment test with Arkit

Test Case 2 :

Original distance = 20 cm
Calculated distance = 19.04 cm (Approx)

Distance Measurment test with Arkit swif4 in ios


We are getting approximate results. Minor problem is that startPoint node is changing slightly its position. That's not exact behavior of Augmented Reality. Still it's in beta, surely Apple will do much more refinements for live release.

That's giving approximate results. Minor problem is that startPoint node is changing slightly its position. That's not exact behavior of Augmented Reality. Still it's in beta, surely Apple will do much more refinements for live release.

Download sample project with examples :

Read More

7 Aug 2017

Parsing JSON Using Decodable in Swift 4 became super easy - Swift 4, iOS 11

8/07/2017 08:18:00 am 1
Parsing JSON in Swift 4 using Decodable Protocol. Parsing a complicate JSON is difficult because of redoing whole process again and again. In swift 4 it's not like swift 2,3, parsing became super easy and fast by just using single line of code. In this tutorial we are diving into Decodable protocol for JSON Parsing.

Parsing JSON Using Decodable in Swift 4 became super easy - Swift 4, iOS 11

Getting Started:

Create new project -> open Xcode -> File -> New -> Project -> Single View App, then tap next button. Type product name as 'JSONParseSwift4' then tap next and select the folder to save project.

In this article we will discuss about struct. Structs are very helpful for storing heterogeneous data unlike Array. For example in struct we can store Int, String etc

Creating a simple Struct. Write the following struct next to 'import UIKit'.


struct Tutorials {
    let id : Int
    let name : String
    let link : String
    let imageUrl : String
}
Cool, we created structure . Then how to use these Struct? Let write code for testing. Inside viewDidLoad() method write the following code.

let myTutorial = Tutorials(id: 1, name: "my tutorial", link: "some link", imageUrl: "some image")
print(myTutorial)
Build and Run, See the logs in console. Log should like following image.

Real time objects detected list

First thing we need sample JSON for parsing. So we need sample url for that. This is our sample url :

https://gist.githubusercontent.com/iosRevisited/bf28f444c262591b1807949ff40a2222/raw/695b2de9bc364762377d64595bf2b25a8de69786/sample.json 


Now how to get data from that url?

Here we go with simple code using URLSession with completion handler. Here is code for getting data from url. Delete all code inside viewDidLoad() method and replace with following code.


let urlString = "https://gist.githubusercontent.com/iosRevisited/bf28f444c262591b1807949ff40a2222/raw/695b2de9bc364762377d64595bf2b25a8de69786/sample.json"
    
    guard let url = URL(string: urlString) else {
    return
    }
    
    URLSession.shared.dataTask(with: url) { (data, response, err) in
    guard let data = data else { return }
    
    
    // Old School method for parsing Swift 2/3/Objective-C
    do {
    let json = try JSONSerialization.jsonObject(with: data, options: .mutableContainers)
    print(json)
    } catch let jsonErr {
    print("error in parsing",jsonErr)
    }
    }.resume()
Now Build and Run we will see data as following.

Parsing JSON Using Decodable Protocol
Now store the data in struct. So need to initialize with dictionary. Replace old Struct with new Struct.

struct Tutorials {
    let id : Int
    let name : String
    let link : String
    let imageUrl : String
    
    init(json:[String: Any]) {
        id = json["id"] as? Int ?? 0
        name = json["name"] as? String ?? ""
        link = json["link"] as? String ?? ""
        imageUrl = json["imageUrl"] as? String ?? ""
    }
}
Then replace 'print(json)' line with following code.

let tutorial = Tutorials(json: json)
print(tutorial.name)
Build and Run we will see the name in the console.

Output

Up to now what we did is old methods we used in Swift 2/3/Objective-C.

Now step into the new method introduced by apple in iOS 11 is Decodable Protocol. Remove init method in structure and provide Decodable Protocol to struct.
Replace structure with new struct with protocol.


struct Tutorial: Decodable {
    let id : Int
    let name : String
    let link : String
    let imageUrl : String
}
 Replace the code inside do { } block with following code.

let tutorial = try JSONDecoder().decode(Tutorial.self, from: data)
print(tutorial.name)
console output
Now Build and Run we will get the name as before but we never initialized the structure as before.

Important - we should match the data keys with the structure properties.


Array of Dictionaries :


Now let see this JSON:

[
 {
  "id": 1,
  "name": "Face Detection",
  "link": "http://iosrevisited.blogspot.com/2017/08/face-detection-using-vision-framework.html",
  "imageUrl": "https://support.apple.com/library/content/dam/edam/applecare/images/en_US/iOS/move-to-ios-icon.png"
 },
 {
  "id": 2,
  "name": "Real Time Object Detection",
  "link": "http://iosrevisited.blogspot.com/2017/08/real-time-camera-object-detection-with.html",
  "imageUrl": "https://support.apple.com/library/content/dam/edam/applecare/images/en_US/iOS/move-to-ios-icon.png"
 }
]
This is a bit complex than before. No worries, using swift 4 this became super easy. That JSON contains array of tutorials.

Change url to https://gist.githubusercontent.com/iosRevisited/7e6cd23e2a267a2503698411a834fe6c/raw/890f5842181369b83c820b4a6702b42776a9aabf/tutorials.json

Replace old url with new url. Then it looks like this.


let urlString = "https://gist.githubusercontent.com/iosRevisited/7e6cd23e2a267a2503698411a834fe6c/raw/890f5842181369b83c820b4a6702b42776a9aabf/tutorials.json"
Then inside do block change decode code to array like this [Tutorial]. Replace do block with following code.

let tutorials = try JSONDecoder().decode([Tutorial].self, from: data)
print("\(tutorials)")
Build and Run, Array of data appears like this:

Array of Dictionaries parsing using Decodable Protocol

Great, array of dictionaries also parsed using decodable protocol.


Complex Data Parsing: 


Now we will parse the following data from url - https://gist.githubusercontent.com/iosRevisited/65fff3a78a684909a7b64761799a02d3/raw/0850d72db8315ff25d2a24219d6592fd404deb35/Complex.json

{
 "name": "iOS Revisited",
 "description": "Blog about,Objective c language and Swift language programming questions, Tutorials, Bugs solving ....",
 "tutorials": [
  {
   "id": 1,
   "name": "Face Detection",
   "link": "http://iosrevisited.blogspot.com/2017/08/face-detection-using-vision-framework.html",
   "imageUrl": "https://support.apple.com/library/content/dam/edam/applecare/images/en_US/iOS/move-to-ios-icon.png"
  },
  {
   "id": 2,
   "name": "Real Time Object Detection",
   "link": "http://iosrevisited.blogspot.com/2017/08/real-time-camera-object-detection-with.html",
   "imageUrl": "https://support.apple.com/library/content/dam/edam/applecare/images/en_US/iOS/move-to-ios-icon.png"
  }
 ]
}
This structure is totally different from our struct model. We need to create one more model as following.

struct siteDescription: Decodable {
    let name: String
    let description: String
    let tutorials: [Tutorial]
}
Here we reused Tutorial Struct.

Now change urString. It looks like following.

let urlString = "https://gist.githubusercontent.com/iosRevisited/65fff3a78a684909a7b64761799a02d3/raw/0850d72db8315ff25d2a24219d6592fd404deb35/Complex.json"
Then replace code inside do block.

let siteData = try JSONDecoder().decode(SiteDescription.self, from: data)

print("\nname = \(siteData.name)")
print("\ndescription = \(siteData.description)")
print("\ntutorials = \(siteData.tutorials)")
Complex Data Parsing output

Build and Run , we will see following as output in console.

Cool, we parsed data easily in a efficient way using Decodable Protocol.


Read More

Post Top Ad