October 2017 - Swift 4 Tutorials W3Schools

Hot

Post Top Ad

30 Oct 2017

Add Placeholder To UITextView in Swift 4 - iOS

10/30/2017 11:21:00 am 0
Swift provides default placeholder property to UITextField but not to UITextView.

So if you need a multi-line editable text view, you don’t get a pretty placeholder. Here you will learn how to add placeholder text to UItextView.


Here we will show step by step:

Step 1:

Firstly create new swift file and name it TextViewPlaceholder.swift and save it.

Next import UIKit and create extension to UITextView as follow:

import UIKit

extension UITextView: UITextViewDelegate {
// Code
}

Step 2:

Here we are going to add label as subview in order to show placeholder text. No worries it's quite simple.

Add the following code inside the extension:

override open var bounds: CGRect {
    didSet {
        self.resizePlaceholder()
    }
}

public var placeholder: String? {
    get {
        var placeholderText: String?
        
        if let placeholderLbl = self.viewWithTag(50) as? UILabel {
            placeholderText = placeholderLbl.text
        }
        
        return placeholderText
    }
    set {
        if let placeholderLbl = self.viewWithTag(50) as! UILabel? {
            placeholderLbl.text = newValue
            placeholderLbl.sizeToFit()
        } else {
            self.addPlaceholder(newValue!)
        }
    }
}

public func textViewDidChange(_ textView: UITextView) {
    if let placeholderLbl = self.viewWithTag(50) as? UILabel {
        placeholderLbl.isHidden = self.text.characters.count > 0
    }
}

private func resizePlaceholder() {
    if let placeholderLbl = self.viewWithTag(50) as! UILabel? {
        let x = self.textContainer.lineFragmentPadding
        let y = self.textContainerInset.top - 2
        let width = self.frame.width - (x * 2)
        let height = placeholderLbl.frame.height
        
        placeholderLbl.frame = CGRect(x: x, y: y, width: width, height: height)
    }
}

private func addPlaceholder(_ placeholderText: String) {
    let placeholderLbl = UILabel()
    
    placeholderLbl.text = placeholderText
    placeholderLbl.sizeToFit()
    
    placeholderLbl.font = self.font
    placeholderLbl.textColor = UIColor.lightGray
    placeholderLbl.tag = 50
    
    placeholderLbl.isHidden = self.text.characters.count > 0
    
    self.addSubview(placeholderLbl)
    self.resizePlaceholder()
    self.delegate = self
}

Above code will work in both orientations.

Step 3:

Here we will show how to use.

Simply add placeholder to UITextView as below:

let textView = UITextView()
textView.placeholder = "Start typing here"


Get the full code here.

Read More

28 Oct 2017

Argument of '#selector' refers to instance method that is not exposed to Objective-C | Add '@objc' to expose this instance method to Objective-C

10/28/2017 08:29:00 am 1
After installing Xcode 9 and migrating to Swift 4 from Swift 3 , @objc inference warning comes like below:

The use of Swift 3 @objc inference in Swift 4 mode is deprecated. Please address deprecated @objc inference warnings, test your code with “Use of deprecated Swift 3 @objc inference” logging enabled, and then disable inference by changing the “Swift 3 @objc Inference” build setting to “Default” for the “AppName” target.


If you introduce new methods or variables to a Swift class, marking them as @objc exposes them to the Objective-C run time. This is necessary when you have Objective-C code that uses your Swift class, or, if you are using Objective-C-type features like Selectors.

Fix compiler Errors:

We can fix this @objc inference warning by using two ways.

Solution 1:

One is to use @objc on each function or variable that needs to be exposed to the Objective-C run time as follow:

@objc func getSomeData() {

}

This is the best way for converting your code so that compiler doesn't complain.

Solution 2:

Second one is to add @objcMembers by a Class declaration as follow:

@objcMembers
class Photo {

}

This will automatically add @objc to ALL the functions and variables in the class.

This is a easy way but it increases the application size by exposing functions that did not need to be exposed.

Official Documentation

Read More

27 Oct 2017

Passing Data Using NotificationCenter in Swift 4

10/27/2017 11:21:00 am 0
Passing data from one view controller to another view controller using Notification Center is an easy way when compared to delegate protocols.

Here we need add observer or listeners for getting new data to load. First we need to send data using post notification method.


Let's take an example, Imagine an object X calls an object Y to perform an action. Once the action is complete, object X should know that Y has completed the task and take necessary action, this can be achieved with the help of Notification Center!

Follow step by step for better understanding.

Here we will pass data from second view controller to first view controller.

Sending Data - Post Notification:

First put some data as follow:

let dataToSend = ["name" : "John", "age" : 25] as [String : Any]

Add the following method for sending above data:

NotificationCenter.default.post(name: NSNotification.Name(rawValue: "newDataToLoad"), object: dataToSend)

Before sending data we need to listen for the above notification using NSNotification.Name.

Data Receiving - Add observer:

Add the following code for listening to new data:

NotificationCenter.default.addObserver(self, selector: #selector(notificationRecevied(notification:)), name: NSNotification.Name(rawValue: "newDataToLoad"), object: nil)

Add the following method to retrieve data:

@objc func notificationRecevied(notification: Notification) {
    let data = notification.object
}

Remove Observer:

Don't forgot to remove observer on viewWillDisappear() as follow:

NotificationCenter.default.removeObserver(self, name: NSNotification.Name(rawValue: "newDataToLoad"), object: nil)

Read More

26 Oct 2017

Store and Retrieve Image Locally Swift - Image Cache without Libraries

10/26/2017 11:47:00 am 1
Store images locally without using any other libraries. In this article we will store and retrieve images using our own code.

We are storing images in a Document Directory. It's different for each app, so we can store image inside Document Directory.

Save and Get Image from Document Directory in Swift ?Best practice to save Images locally ios,swift image cache library,How To Save An Image Locally In Xcode,Persisting Image Data Locally swift 4

Create sample Xcode project.

Storing Images:

First create new swift file and import UIKit as follow:

import UIKit

class SSCache: NSObject {

/..........

}

Add the following method for getting the current document directory:

private func getDocumentsDirectory() -> URL {
    let paths = FileManager.default.urls(for: .documentDirectory, in: .userDomainMask)
    return paths[0]
}

Next create method for saving image locally, add following method:

func saveImage(image: UIImage, Key: String) {
    if let data = UIImagePNGRepresentation(image) {
        let filename = getDocumentsDirectory().appendingPathComponent("\(Key).png")
        print(filename)
        try? data.write(to: filename)
    }
}

In above method we are passing image and key for storing image.

Next add the following Singleton object:

static let sharedInstance = SSCache()

Usage:

We can use as follow for storing image.

Open ViewController.swift file and add the following code:

let image = UIImage(named: "bg.jpg")
SSCache.sharedInstance.saveImage(image: image!, Key: "backgroundImage")

Build and Run, now image stored locally.

So we can easily use in any class as above.

Get Image:

For getting image from document directory, add the following method inside SSCache class:

func getImage(Key: String) -> UIImage?{
    let fileManager = FileManager.default
    let filename = getDocumentsDirectory().appendingPathComponent("\(Key).png")
    if fileManager.fileExists(atPath: filename.path) {
        return UIImage(contentsOfFile: filename.path)
    }
    return nil
}

Here we need the image name for retrieving.

Usage:

Simple we can add the following line for getting image:

if let image = SSCache.sharedInstance.getImage(Key: "backgroundImage") {
    print("we got image \(image)")
}

Build and Run, we will get above message.

Download sample project with examples :
Read More

25 Oct 2017

Adaptive Autolayout Programmatically For iPhone X Using SafeAreaLayoutGuide - Swift 4

10/25/2017 10:46:00 am 0
Adaptive Autolayout mainly used to choose various layouts in different devices with orientations. Here in this article we create two layouts, one is for Portrait orientation and second on is for Landscape orientation. Here we are doing mainly for iPhone 10, so we have to use SafeAreaLayoutGuide.

Adaptive Autolayout Programmatically For iPhone X Using SafeAreaLayoutGuide - Swift 4


Create Project:

Firstly create new Xcode project.

Open ViewController.swift file and add the following properties:

let imgView : UIImageView = {
    let imageView = UIImageView()
    imageView.translatesAutoresizingMaskIntoConstraints = false
    imageView.image = UIImage(named: "kitten.jpg")
    imageView.contentMode = .scaleAspectFill
    imageView.clipsToBounds = true
    return imageView
}()

let sampleLabel : UILabel = {
    let label = UILabel()
    label.translatesAutoresizingMaskIntoConstraints = false
    label.numberOfLines = 0
    label.font = UIFont.systemFont(ofSize: 30.0)
    label.textAlignment = .center
    label.adjustsFontSizeToFitWidth = true
    label.text = "The Ragdoll is a cat breed with blue eyes and a distinct colourpoint coat. It is a large and muscular semi-longhair cat with a soft and silky coat. Like all long haired cats, Ragdolls need grooming to ensure their fur does not mat."
    label.textColor = UIColor.darkGray
    return label
}()

Here we are use kitten.jpg, replace that with your image.

ImageView Constraints:

The imageview should look like above image. So first add imageView to View then create constraints for imageView relatively to view.

Add the following method:

func addUIElements() {
    let guide = view.safeAreaLayoutGuide
    
    // imgView Layouts
    view.addSubview(imgView)
    let defaultImgTop = imgView.topAnchor.constraint(equalTo: guide.topAnchor, constant: 0.0)
    let defaultImgLeading = imgView.leadingAnchor.constraint(equalTo: guide.leadingAnchor, constant: 0.0)
    
    // portrait
    let portraitImgTrailing = imgView.trailingAnchor.constraint(equalTo: guide.trailingAnchor, constant: 0.0)
    let portraitImgHeight = imgView.heightAnchor.constraint(equalTo: view.heightAnchor, multiplier: 0.5)

    // .....
}
Here we are using view's safeAreaLayoutGuide as base layout guide.

Label Constraints:

Label also should look like above image. So first add label to View then create constraints for label relatively to view.

Then add the following code to the end of addUIElements() method:

// sampleLabel Layouts
view.addSubview(sampleLabel)
let defaultLblTrailing = sampleLabel.trailingAnchor.constraint(equalTo: guide.trailingAnchor, constant: -10.0)
let defaultLblBottom = sampleLabel.bottomAnchor.constraint(equalTo: guide.bottomAnchor, constant: 0.0)

// portrait
let portraitLblBottom = sampleLabel.topAnchor.constraint(equalTo: imgView.bottomAnchor, constant: 0.0)
let portraitLblLeading = sampleLabel.leadingAnchor.constraint(equalTo: guide.leadingAnchor, constant: 10.0)

So we successfully created layouts for imageview and label.

Next step is adding constraints to view. To do add the following line next to the constraints.

let defaultConstraints = [defaultImgTop, defaultImgLeading, defaultLblBottom, defaultLblTrailing, portraitImgHeight, portraitImgTrailing, portraitLblBottom, portraitLblLeading]
view.addConstraints(defaultConstraints)

Then finally call the addUIElements() method in viewDidLoad() and Run the project, we will output as follow:

Adaptive Autolayout Programmatically For iPhone X Portrait

That's Great! What about landscape?

Let's check, that's was bad layout in landscape.

Landscape Constraints:

So for Landscape create new layouts.

Add following code just before defaultConstraints creation:

// ImageView Landscape Constraints
let landscapeImgBottom = imgView.bottomAnchor.constraint(equalTo: guide.bottomAnchor, constant: 0.0)
let landscapeImgWidth = imgView.widthAnchor.constraint(equalTo: view.widthAnchor, multiplier: 0.5)

// Label Landscape Constraints
let landscapeLblTop = sampleLabel.topAnchor.constraint(equalTo: guide.topAnchor, constant: 0.0)
let landscapeLblTrailing = sampleLabel.leadingAnchor.constraint(equalTo: imgView.trailingAnchor, constant: 10.0)

Next create two NSLayoutConstraint arrays, for that add the following properties:

var portraitConstraints: [NSLayoutConstraint] = []
var landscapeConstraints: [NSLayoutConstraint] = []

portraitConstraints is to store all constraints required for portrait orientation.
landscapeConstraints is to store all constraints required for landscape orientation.

Then replace defaultConstraints with the following code:

let defaultConstraints = [defaultImgTop, defaultImgLeading, defaultLblBottom, defaultLblTrailing]
portraitConstraints = [portraitImgHeight, portraitImgTrailing, portraitLblBottom, portraitLblLeading]
landscapeConstraints = [landscapeImgWidth, landscapeImgBottom, landscapeLblTop, landscapeLblTrailing]

Next add the observer to listen to orientation changes, add the following code in viewDidLoad() method:

NotificationCenter.default.addObserver(self, selector: #selector(self.toggleConstraints), name: NSNotification.Name.UIDeviceOrientationDidChange, object: nil)

Next add the method for toggle the constraints, add the following method:

@objc func toggleConstraints() {
    if UIDevice.current.orientation.isLandscape {
        view.removeConstraints(portraitConstraints)
        view.addConstraints(landscapeConstraints)
    }else {
        view.removeConstraints(landscapeConstraints)
        view.addConstraints(portraitConstraints)
    }
}

Next call the above method at the end of addUIElements() methods.

Now Build and Run, change the orientation we will see the following screen in landscape orientation.

Adaptive Autolayout Programmatically For iPhone X Landscape

Download sample project with examples :

Read More

23 Oct 2017

Premium Login UI/UX Design using Swift 4 Programmatically With Autolayouts

10/23/2017 11:16:00 am 7
Now a days mobile apps are using premium UI/UX designs. Login screen UI/UX design itself says how the app is gonna look further.

In this article we are going to create following login screen. We are not gonna use storyboard.

The whole screen developed programmatically using swift 4.

Premium Login UI/UX Design using Swift 4 Programmatically

You can download the whole code in the bottom of this article.

Getting Started:

Here we created new Xcode project and rename  ViewController.swift name to LoginVC.swift and changed the subclass in storyboard.

First we need create all required sub views. In the above picture we are having different sub views. So we create as follow:

let bgImageView : UIImageView = {
    let imageView = UIImageView()
    imageView.translatesAutoresizingMaskIntoConstraints = false
    imageView.image = UIImage(named: "bg.jpg")
    imageView.contentMode = .scaleAspectFill
    return imageView
}()

let logoImageView : UIImageView = {
    let imageView = UIImageView()
    imageView.translatesAutoresizingMaskIntoConstraints = false
    imageView.alpha = 0.8
    imageView.image = UIImage(named: "skull.png")
    imageView.contentMode = .scaleAspectFit
    return imageView
}()

// ............

Like above we created all subviews. Download & see the completed project for creating remaining subviews.

Next we are adding all created subviews to the main view. For that we created addingUIElements() method as follow:

func addingUIElements() {
    let padding: CGFloat = 40.0
    let signInButtonHeight: CGFloat = 50.0
    let textFieldViewHeight: CGFloat = 60.0
    
    // Background imageview
    self.view.addSubview(bgImageView)
    bgImageView.leadingAnchor.constraint(equalTo: view.leadingAnchor, constant: 0.0).isActive = true
    bgImageView.trailingAnchor.constraint(equalTo: view.trailingAnchor, constant: 0.0).isActive = true
    bgImageView.bottomAnchor.constraint(equalTo: view.bottomAnchor, constant: 0.0).isActive = true
    bgImageView.topAnchor.constraint(equalTo: view.topAnchor, constant: 0.0).isActive = true
    
    // Background layer view
    view.insertSubview(bgView, aboveSubview: bgImageView)
    bgView.leadingAnchor.constraint(equalTo: view.leadingAnchor, constant: 0.0).isActive = true
    bgView.trailingAnchor.constraint(equalTo: view.trailingAnchor, constant: 0.0).isActive = true
    bgView.bottomAnchor.constraint(equalTo: view.bottomAnchor, constant: 0.0).isActive = true
    bgView.topAnchor.constraint(equalTo: view.topAnchor, constant: 0.0).isActive = true
    
    // Logo at top
    view.insertSubview(logoImageView, aboveSubview: bgView)
    logoImageView.topAnchor.constraint(equalTo: view.topAnchor, constant: 60.0).isActive = true
    logoImageView.centerXAnchor.constraint(equalTo: view.centerXAnchor, constant: 0.0).isActive = true
    logoImageView.heightAnchor.constraint(equalTo: view.widthAnchor, multiplier: 0.4).isActive = true
    logoImageView.widthAnchor.constraint(equalTo: logoImageView.heightAnchor, constant: 0.0).isActive = true

    //.......

} 

In the above code we added three views as subview to main view. For more download project in the bottom of this article.

Here we created new class named TextFieldView subview of UIView. This view is for the textField,mailLogo and Line. So that we can reuse for multiple TextFields.

textField,mailLogo and Line

This example we shown here doesn't have any functionality yet, it's only design created programmatically.

Download sample project with examples :

Read More

22 Oct 2017

Latest iOS Interview Questions & Answers 2018

10/22/2017 02:58:00 am 10

Top 15 2017 2018 Swift Interview Questions & Answers pdf,10 Basic Swift Interview Questions to Practice with,25 ios interview questions and answers for junior developers,ios developer interview questions for experienced,swift 3.0 interview questions,swift technical questions,advanced swift interview questions,swift 4 interview questions

Question 1:

class Person {
    var name: String
    var age: Int
    init(name: String, age: Int) {
        self.name = name
        self.age = age
    }
}

let person1 = Person(name: "John", age: 26)
var person2 = person1
person2.name = "Mike"

What's the value of person1.name and person2.name Would this be any different if Person was a class? Why?

Answer:

Both person1.name and person2.name are Mike.

Classes in Swift are reference types, and they are copied by reference rather than value. The following line creates a copy of person1 and assigns it to person2:

var person2 = person1

From this line on, any change to person1 will reflected in person2.

If Person were a structure, person1.name will be John, whereas person2.name will be Mike.
Structures in Swift are value types. Any change to a property of person1 would not be reflected into person2 and vice versa.

Question 2:

What is an optional in Swift and How it helps?

Answer:

An optional is used to let a variable of any type represent the lack of value. In Objective-C, the absence of value is available in reference types only, and it uses the nil special value. Value types, such as int or float, do not have such ability.

Swift extends the lack of value concept to both reference and value types with optionals. An optional variable can hold either a value or nil any time.

Question 3:

What is the difference between let and var in Swift?

Answer:

let kConstant = 10
var stringVariable : String

Here, we used the : string to explicitly declare that stringVariable will hold a string. In practice, it's rarely necessary — especially if the variable is given an initial value — as Swift will infer the type for you. It is a compile-time error trying to use a variable declared as a constant through let and later modifying that variable.

Question 4:

What is Completion Handler?

Answer:

Completion handlers are super convenient when our app is making an API call, and we need to do something when that task is done, like updating the UI to show the data from the API call. We’ll see completion handlers in Apple’s APIs like dataTaskWithRequest and they can be pretty handy in your own code.

The completion handler takes a chunk of code with 3 arguments:(NSData?, NSURLResponse?, NSError?) that returns nothing: Void. It’s a closure.

The completion handlers have to marked @escaping since they are executed some point after the enclosing function has been executed.

Question 5:

What is Singleton Pattern ?

Answer:

The Singleton design pattern ensures that only one instance exists for a given class and that there’s a global access point to that instance. It usually uses lazy loading to create the single instance when it’s needed the first time.

Question 6:

Closures  - value or reference types?

Answer:

Closures are reference types. If a closure is assigned to a variable and the variable is copied into another variable, a reference to the same closure and its capture list is also copied.

Question 7:

What are SQLite limits ?

Answer:

We need to define the relations between the tables. Define the schema of all the tables.

We have to manually write queries to fetch data.

We need to query results and then map those to models.

Queries are very fast.

Question 8:

What is CoreData ?

Answer:

Core data is an object graph manager which also has the ability to persist object graphs to the persistent store on a disk. An object graph is like a map of all the different model objects in a typical model view controller iOS application.

Question 9:

What are the execution states in iOS app?

Answer:

Not Running: The app is completely switched off, no code is being executed.

Inactive: The app is running in the foreground without receiving any events.

Active: The app is running in the foreground and receiving events.

Background: The app is executing code in the background.

Suspended: The app is in the background but is not executing any code.

Question 10:

What is AutoLayout?

Answer:

AutoLayout provides a flexible and powerful layout system that describes how views and the UI controls calculates the size and position in the hierarchy.

Auto Layout dynamically calculates the size and position of all the views in your view hierarchy, based on constraints placed on those views

Read More

19 Oct 2017

Delegates Example in swift 4 | Pass Data with Delegation

10/19/2017 02:54:00 am 1
Delegates are a design pattern that allows one object to send messages to another object when a specific event happens.

Delegate helps in passing data back from presented view controller(SecondVC) to presenting view controller(FirstVC).

How Delegates Work?  Swift

Imagine an object X calls an object Y to perform an action. Once the action is complete, object X should know that Y has completed the task and take necessary action, this can be achieved with the help of delegates!

For better understanding of delegate we will go through sample application in swift, download or clone the starter project.

Build and Run we will see the following:

Delegates Example in swift 4 Starter

Here we are having FirstVC and SecondVC. FirstVC having quote and SecondVC is for changing the quote in FirstVC.

But now on tapping save button in SecondVC, the quote in FirstVC is not changing.

The problem is that this views are part of class Y and have no idea about class X, so we need to find a way to communicate between this two classes, and that’s where delegation helps.

We will follow step by step procedure to achieve delegation.

Step 1:

Open SecondVC and add the following protocol:

protocol SecondVCDelegate: class {
    func changeQuote(_ text: String?)
}

Here we are declaring only one method that accepts an optional String as an argument based on our requirement.

Step 2:

Create delegate property as follow:

weak var delegate: SecondVCDelegate?

Here we created a delegate property of protocol type and it should be optional.

Step 3:

Add the following line of code in saveQuote() method:

delegate?.changeQuote(textView.text)

Step 4:

Now open FirstVC and conform the protocol as following:

class FirstVC: UIViewController,SecondVCDelegate {

/......

Step 5:

Add the following method:

override func prepare(for segue: UIStoryboardSegue, sender: Any?) {
    if let nav = segue.destination as? UINavigationController, let secondVC = nav.topViewController as? SecondVC {
        secondVC.delegate = self
    }
}

Here we are just creating an instance of SecondVC and assign its delegate to self, but what is self here? well, self is the FirstVC which has been delegated!

Step 6:

Finally add the function of the SecondVCDelegate protocol:

func changeQuote(_ text: String?) {
    quoteLabel.text = text
}

Build and Run , now we can change quote by using delegation.

 Delegates Example in swift 4 Final

Great you just completed delegations in swift.

Download sample project with examples :


Read More

18 Oct 2017

Convert String To Int, Float, Double in Swift 4

10/18/2017 05:48:00 am 0
We can easily convert String to Int, Float, Double using swift language.

Convert String To Int, Float, Double in Swift 4

String to Int:

By using Int constructor we can convert as follow:

let ageString = "25"

if let age = Int(ageString) {
    print(age)
} else {
    print("Not a valid string for conversion")
}

String to Float:

Same as Int, here we use Float constructor as follow:

let distanceString = "4.54" //in miles

if let distance = Float(distanceString) {
    print(distance)
} else {
    print("Not a valid string for conversion")
}

The string must contain a number as above, otherwise it will throw an error.

String to Double:

Same as Float, here we use Double constructor as follow:

let distanceString = "4.8765878" //in miles

if let distance = Double(distanceString) {
    print(distance)
} else {
    print("Not a valid string for conversion")
}

The string must contain a number as above, otherwise it will throw an error.
Read More

17 Oct 2017

How to add TextField to Alert View in swift 4?

10/17/2017 03:19:00 am 0
Adding UITextField to alertview became easy from swift 3 by using UIAlertController.

Here we will show step by step.

How to add UITextField to Alert View in swift 4?

Step 1:

First create UIAlertController object with title and message as follow:

let alertVC = UIAlertController(title: "Enter credentials", message: "Provide Email & Password", preferredStyle: .alert)

Step 2:

Next add UITextField's to alertVC using addTextField() method as follow:

alertVC.addTextField { (textField) in
    textField.placeholder = "Email"
}
alertVC.addTextField { (textField) in
    textField.placeholder = "Password"
    textField.isSecureTextEntry = true
}

Step 3:

Then add the UIAlertAction with title and completion handler as follow:

let submitAction = UIAlertAction(title: "Submit", style: .default, handler: {
    (alert) -> Void in
    
    let emailTextField = alertVC.textFields![0] as UITextField
    let passwordTextField = alertVC.textFields![1] as UITextField
    
    print("Email -- \(emailTextField.text!), Password -- \(passwordTextField.text!)")
})

Step 4:

Finally add the UIAlertAction to alertVC and present alertVC as follow:

alertVC.addAction(submitAction)
alertVC.view.tintColor = UIColor.black
present(alertVC, animated: true)

The final output will looks like following image:

uialertcontroller with textfield swift 4

Read More

16 Oct 2017

Concatenate/Merge Two Arrays into One Array in Swift 4

10/16/2017 08:46:00 am 0
Append two arrays into a new array with Swift standard library's.

There are 5 different ways for merging arrays in swift. We may choose one of the five following ways according to your needs and requirements.

Sorting Arrays in Swift

Concatenate/Merge Two Arrays into One Array in Swift 4

1. +(_:_:) generic operator:

The following piece of code shows how to merge two arrays of type [Int] into a new array using +(_:_:) generic operator:

var arr1 = [1, 2, 3]
let arr2 = [4, 5, 6]
let finalArray = arr1 + arr2
print(finalArray)
// output will be '[1, 2, 3, 4, 5, 6]'


2. append(contentsOf:):

The following piece of code shows how to append two arrays of type [Int] into a new array using append(contentsOf:) method:

var arr1 = [1, 2, 3]
let arr2 = [4, 5, 6]
arr1.append(contentsOf: arr2)
print(arr1)
// output will be '[1, 2, 3, 4, 5, 6]'


3. flatMap(_:):

The following piece of code shows how to concatenate two arrays of type [Int] into a new array using flatMap(_:) method:

var arr1 = [1, 2, 3]
let arr2 = [4, 5, 6]
let finalArray = [arr1, arr2].flatMap({ (element: [Int]) -> [Int] in
    return element
})
print(finalArray)
// output will be '[1, 2, 3, 4, 5, 6]'

4. joined():

Swift provides a joined() method for all types that conform to Sequence protocol (including Array).

So, following piece of code shows how to join two arrays of type [Int] into a new array using Sequence's joined() method:

var arr1 = [1, 2, 3]
let arr2 = [4, 5, 6]
let flattenCollection = [arr1, arr2].joined()
let finalArray = Array(flattenCollection)
print(finalArray)
// output will be '[1, 2, 3, 4, 5, 6]'

5. reduce(_:_:):

The following piece of code shows how to merge two arrays of type [Int] into a new array using reduce(_:_:) method:

var arr1 = [1, 2, 3]
let arr2 = [4, 5, 6]
let finalArray = [arr1, arr2].reduce([], { (result: [Int], element: [Int]) -> [Int] in
    return result + element
})
print(finalArray)
// output will be '[1, 2, 3, 4, 5, 6]'

Use any one of above methods based on your requirement.

Read More

14 Oct 2017

Sorting Arrays in Swift 4 - iOS 11

10/14/2017 10:10:00 am 0
Sorting Arrays using swift 4 is a simple using sorted() built-in method.

Sorting Arrays in Swift 4 - iOS 11

Here is a example for sorting an simple array containing string objects.
let friends = ["Sophia", "James", "Olivia", "Mike", "Nina"]
print(friends.sorted())

//output is '["James", "Mike", "Nina", "Olivia", "Sophia"]'

We can sort complex arrays also easily using same built-in method sorted().

Creating an array with custom struct:

struct friendStruct {
    var name: String
    var age: Int
}

let array = [
    friendStruct(name: "Sophia", age: 23),
    friendStruct(name: "Olivia", age: 25),
    friendStruct(name: "James", age: 21),
    friendStruct(name: "Nina", age: 26),
    friendStruct(name: "Mike", age: 23)
]

Sort by name:

let sortedArray = array.sorted { (firstStruct, secondStruct) -> Bool in
    if firstStruct.name < secondStruct.name {
        return true
    }
    return false
}

Sort by age:

let sortedArray = array.sorted { (firstStruct, secondStruct) -> Bool in
    if firstStruct.age < secondStruct.age {
        return true
    }
    return false
}


We can sort Date also like above.

5 Ways To Concatenate/Merge Two Arrays into One Array in Swift 4
Read More

12 Oct 2017

Convert One Date Format To Another Date Format Swift 4 - iOS

10/12/2017 03:07:00 am 0
Converting a date string from one date format to another date format is an easy by using the following method:

Convert One Date Format To Another Date Format Swift 4 - iOS


Date Formats:

Following are the some Date Formats:

Thursday, Oct 12, 2017 - EEEE, MMM d, yyyy
10/12/2017 - MM/dd/yyyy
10-12-2017 09:48 - MM-dd-yyyy HH:mm
Oct 12, 9:48 AM - MMM d, h:mm a
October 2017 - MMMM yyyy
Oct 12, 2017 - MMM d, yyyy
Thu, 12 Oct 2017 09:48:59 +0000 - E, d MMM yyyy HH:mm:ss Z
2017-10-12T09:48:59+0000 - yyyy-MM-dd'T'HH:mm:ssZ
12.10.17 - dd.MM.yy

For more check here.

One Date Format To Another:

For converting we are going to create String extension as follow:
extension String
{
    func toDateString( inputDateFormat inputFormat  : String,  ouputDateFormat outputFormat  : String ) -> String
    {
        let dateFormatter = DateFormatter()
        dateFormatter.dateFormat = inputFormat
        let date = dateFormatter.date(from: self)
        dateFormatter.dateFormat = outputFormat
        return dateFormatter.string(from: date!)
    }
}

Usage:

Add the following lines of code for usage:
let dateString = "2017-10-10 15:56:25"
let requiredFormat = dateString.toDateString(inputDateFormat: "yyyy-MM-dd HH:mm:ss", ouputDateFormat: "dd 'at' hh:mm:ss")
print(requiredFormat)

//output will be '10 at 03:56:25'

The inputDateFormat should be same as dateString, but the ouputDateFormat can be different as we required.
Read More

11 Oct 2017

Convert Date To String & Vice-Versa Swift 4 - iOS

10/11/2017 05:54:00 am 0
Convert Date To String & Vice-Versa Swift 4 - iOS

Date To String:


For converting Date to String we are going to create extension for Date as follow:
extension Date
{
    func toString( dateFormat format  : String ) -> String
    {
        let dateFormatter = DateFormatter()
        dateFormatter.dateFormat = format
        return dateFormatter.string(from: self)
    }
}

In above method we can set the required output date format.

Usage:

Add the following lines of code for usage:

let dateString = Date().toString(dateFormat: "yyyy/MMM/dd HH:mm:ss")
print("dateString is \(dateString)")

// output will be 'dateString is 2017/Oct/11 17:16:23'

String To Date:


For converting string to date, we have to give the date format as the string.

Add the following extension to String:
extension String
{
    func toDate( dateFormat format  : String) -> Date
    {
        let dateFormatter = DateFormatter()
        dateFormatter.dateFormat = format
        dateFormatter.timeZone = NSTimeZone(name: "UTC") as TimeZone!
        return dateFormatter.date(from: self)!
    }
    
}

Usage:

Add the following lines of code for usage:
let dateString = "2017-10-10 15:56:25"
let date = dateString.toDate(dateFormat: "yyyy-MM-dd HH:mm:ss")
print("Date is \(date)")

// output is 'Date is 2017-10-10 15:56:25 +0000'
Read More

10 Oct 2017

Convert UTC Timezone To Local/Device Current Timezone and Vice-Versa Swift 4 - iOS

10/10/2017 11:01:00 am 0
In this article we are going to convert UTC Date format to Current device date format.

UTC is the time standard commonly used across the world. The world's timing centers have agreed to keep their time scales closely synchronized - or coordinated - therefore the name Coordinated Universal Time.

Convert UTC Timezone To Local/Device Current Timezone and Vice-Versa Swift 4 - iOS

I know that you guys are totally confused of this date Timezone conversions.

Here we simply use following method to convert UTC to local.

UTC to Local:

Use the following method for converting:
func UTCToLocal(UTCDateString: String) -> String {
    let dateFormatter = DateFormatter()
    dateFormatter.dateFormat = "yyyy-MM-dd HH:mm:ss" //Input Format
    dateFormatter.timeZone = NSTimeZone(name: "UTC") as TimeZone!
    let UTCDate = dateFormatter.date(from: UTCDateString)
    dateFormatter.dateFormat = "yyyy-MMM-dd hh:mm:ss" // Output Format
    dateFormatter.timeZone = TimeZone.current
    let UTCToCurrentFormat = dateFormatter.string(from: UTCDate!)
    return UTCToCurrentFormat
}

Usage:

Call above method as follow:
let dateString = "2017-10-10 9:56:25"

let date = self.UTCToLocal(UTCDateString: dateString)

//output date should be '2017-10-10 15:26:25'

In above method we can customize date formats as per our usage. But the input date format must be same format as input date string.

Local to UTC:

Use the following method for converting:
func localToUTC(date:String) -> String {
    let dateFormatter = DateFormatter()
    dateFormatter.dateFormat = "yyyy-MM-dd HH:mm:ss"
    dateFormatter.calendar = NSCalendar.current
    dateFormatter.timeZone = TimeZone.current
    
    let dt = dateFormatter.date(from: date)
    dateFormatter.timeZone = TimeZone(abbreviation: "UTC")
    dateFormatter.dateFormat = "yyyy-MMM-dd hh:mm:ss"
    
    return dateFormatter.string(from: dt!)
}

Usage:

Call above method as follow:
let dateString = "2017-10-10 15:56:25"

let date = self.localToUTC(date: dateString)

//output date should be '2017-10-10 09:26:25'

Read More

8 Oct 2017

Storing/Downloading/Deleting images or videos Using Firebase Cloud Storage

10/08/2017 10:07:00 am 8
Cloud Storage for Firebase is a powerful, simple, and cost-effective object storage service built for Google scale. Firebase SDK adds Google security to file uploads and downloads for your Firebase apps, either if connectivity is slow or fast.

Storing/Downloading images or videos Using Firebase Cloud Storage


If the network connection is poor, the client is able to retry the operation right where it left off, saving your users time and bandwidth. Everything will be done asynchronously in background threads, so that UI won't hang.

We can store images, videos, files, audio in cloud storage by using Firebase SDK. For accessing those files we can use same Google cloud storage.

Uploads and downloads are robust, meaning they restart where they stopped, saving your users time and bandwidth.

Google provides strong security, so that only authenticated users can upload or download files.

Before getting in to Sample Project, Integrate your project with Firebase.

Add the following dependency to podfile:
pod 'Firebase/Storage'

Run pod install and open the created .xcworkspace file.

Configure Firebase Storage Rules:

The Firebase Storage provides a set rules so that files can structure according to the rules.

By default, only authenticated users can access to the Firebase Storage for uploading & downloading files.

There are different authenticated methods choose any one of them.

Using Facebook Login
Using Email & Password
Anonymous Login

In this project we are going to start without setting up Authentication, you can configure your rules for public access.

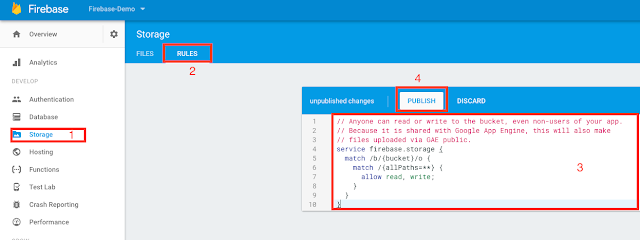
Go to Firebase console -> Storage -> Rules

Add the following rule and publish:
// Anyone can read or write to the bucket, even non-users of your app.
// Because it is shared with Google App Engine, this will also make
// files uploaded via GAE public.
service firebase.storage {
  match /b/{bucket}/o {
    match /{allPaths=**} {
      allow read, write;
    }
  }
}


 Firebase console -> Storage -> Rules


Set up Firebase Storage To iOS Project :

We need to initialize Firebase.

First import the Firebase SDK in AppDelegate.swift file:
import Firebase

Then, in the application:didFinishLaunchingWithOptions: method, initialize the FirebaseApp object:
// Use Firebase library to configure APIs
FirebaseApp.configure()

Open ViewController.swift file add the following code inside viewDidLoad() method:
let storage = Storage.storage()

Create a Reference To upload, download, or delete:

References are created using the FirebaseStorage service and calling its reference method.
// Create a storage reference from our storage service
let storageRef = storage.reference()

You can create a reference to a location lower in the tree, say 'images/car.jpg', by using the child method on an existing reference.
var carRef = storageRef.child("images/car.jpg")

Uploading To Cloud Storage :

For uploading a file firstly we need a reference, we can use the one which created earlier.

We can upload files to storage using two ways:

1. Upload from data in memory
2. Upload from a URL representing a file on device

Here we will show using memory.

Before doing that drag one image to the project and name its as 'car.jpg'.

Add the following method and call in viewDidLoad() method:
func uploadImageToStorage() {
    let storage = Storage.storage()
    var storageRef = storage.reference()
    
    if let image = UIImage(named: "car.jpg") {
        let data = UIImagePNGRepresentation(image)
        print("data \(String(describing: data))")
        
        
        // Create the file metadata
        let metadata = StorageMetadata()
        metadata.contentType = "image/jpeg"
        
        storageRef = storageRef.child("images/car.jpg")
        
        let uploadTask = storageRef.putData(data!, metadata: metadata)
        
        // Listen for state changes, errors, and completion of the upload.
        uploadTask.observe(.resume) { snapshot in
            // Upload resumed, also fires when the upload starts
        }
        
        uploadTask.observe(.pause) { snapshot in
            // Upload paused
        }
        
        uploadTask.observe(.progress) { snapshot in
            // Upload reported progress
            let percentComplete = 100.0 * Double(snapshot.progress!.completedUnitCount)
                / Double(snapshot.progress!.totalUnitCount)
            
            print("Upload Percentage == \(percentComplete)")
        }
        
        uploadTask.observe(.success) { snapshot in
            // Upload completed successfully
            print("Upload completed successfully")
        }
        
        uploadTask.observe(.failure) { snapshot in
            if let error = snapshot.error as? NSError {
                switch (StorageErrorCode(rawValue: error.code)!) {
                case .objectNotFound:
                    // File doesn't exist
                    break
                case .unauthorized:
                    // User doesn't have permission to access file
                    break
                case .cancelled:
                    // User canceled the upload
                    break
                    
                    /* ... */
                    
                case .unknown:
                    // Unknown error occurred, inspect the server response
                    break
                default:
                    // A separate error occurred. This is a good place to retry the upload.
                    break
                }
            }
        }
    }
}

Above method will give percentage of upload done,failures causes, pause, resume and success observer.

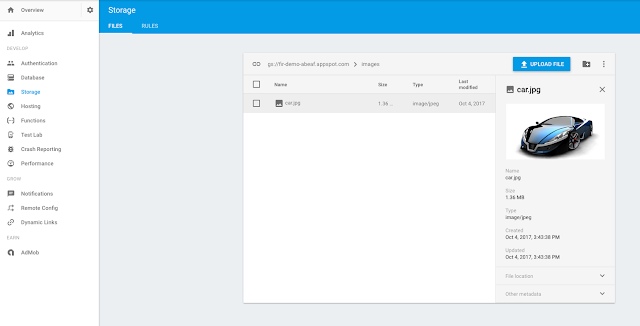
Build and Run,if everything is correct then we will see 'Upload completed successfully' message in the console.

Then open Firebase console check inside storage -> images -> car.jpg should be there like below:

 storage -> images -> car.jpg


Downloading Image From Cloud Storage:

Now we will download the car image what we uploaded before.
Add the following code and call in viewDidLoad() method:
func downloadImageFromStorage() {
    let storage = Storage.storage()
    var storageRef = storage.reference()
    
    // Create a reference to the file we want to download
    storageRef = storageRef.child("images/car.jpg")
    
    // Start the download (in this case writing to a file)
    let downloadTask = storageRef.getData(maxSize: 5 * 1024 * 1024) { data, error in
        if let error = error {
            // Uh-oh, an error occurred!
        } else {
            // Data for "images/island.jpg" is returned
            let image = UIImage(data: data!)
            
            print("image succesfully downloaded \(image!)")
        }
    }
    
    
    // Observe changes in status
    downloadTask.observe(.resume) { snapshot in
        // Download resumed, also fires when the download starts
    }
    
    downloadTask.observe(.pause) { snapshot in
        // Download paused
    }
    
    downloadTask.observe(.progress) { snapshot in
        // Download reported progress
        let percentComplete = 100.0 * Double(snapshot.progress!.completedUnitCount)
            / Double(snapshot.progress!.totalUnitCount)
    }
    
    downloadTask.observe(.success) { snapshot in
        // Download completed successfully
    }
    
    // Errors only occur in the "Failure" case
    downloadTask.observe(.failure) { snapshot in
        guard let errorCode = (snapshot.error as? NSError)?.code else {
            return
        }
        guard let error = StorageErrorCode(rawValue: errorCode) else {
            return
        }
        switch (error) {
        case .objectNotFound:
            // File doesn't exist
            break
        case .unauthorized:
            // User doesn't have permission to access file
            break
        case .cancelled:
            // User cancelled the download
            break
            
            /* ... */
            
        case .unknown:
            // Unknown error occurred, inspect the server response
            break
        default:
            // Another error occurred. This is a good place to retry the download.
            break
        }
    }
}

Above method will give percentage of download done,failures causes, pause, resume and success observer.

Build and Run,if everything is correct then we will see 'image successfully downloaded with file' message in the console.


Deleting Image From Firebase Storage:

We will delete the car image from Firebase storage.

Add the following code and call in viewDidLoad() method:
func deletingImageFromStorage(){
    let storage = Storage.storage()
    var storageRef = storage.reference()
    
    // Create a reference to the file we want to download
    storageRef = storageRef.child("images/car.jpg")
    
    storageRef.delete { error in
        if let error = error {
            // Uh-oh, an error occurred!
        } else {
            print("File deleted successfully")
        }
    }
    
}

Build and Run,if everything is correct then we will see 'File deleted successfully' message in the console.

Open the Firebase console and check whether image deleted or not.

Read More

7 Oct 2017

Safe Area Layout Guides Tutorial iOS 11

10/07/2017 03:39:00 am 0
The layout guide representing the portion of your view that is unobscured by bars and other content. In iOS 11, Apple is deprecating the top and bottom layout guides and replacing them with a single safe area layout guide.

Safe Area Layout Guides Tutorial iOS 11

  • Bottom layout guide & top layout guide are deprecated from iOS 11.
  • We can change safeArea layout insets by using a safeAreaInsets property.
  • safeAreaInsetsDidChange() method will call when the safe area of the view changes.
In iPhone X we have to use safe area layout otherwise in landscape mode the top notch will cut some content as below:

iPone X top notch will cut some content in landscape

Safe area layout guide Using Storyboards:

It's easy by using storyboard, just go to storyboard and select any one of controller.

Left side go to File inspector there simple check mark the use Safe Area Layout Guides.

File inspector there simple check mark the use Safe Area Layout Guides.

We can migrate old projects to Safe area layout guide.

The Storyboard automatically replaces the top and bottom layout guides with a safe area and updates the constraints:

Safe area layout guide Programmatically:

Create your constraints in code use the safeAreaLayoutGuide property of UIView to get the relevant layout anchors.

Now unless you are targeting iOS 11 only you will need to wrap the safe area layout guide constraints with #available and fall back to top and bottom layout guides for earlier iOS versions:

Code:

if #available(iOS 11, *) {
    let guide = view.safeAreaLayoutGuide
    label.topAnchor.constraint(equalTo: guide.topAnchor).isActive = true
    label.leadingAnchor.constraint(equalTo: view.leadingAnchor).isActive = true
    label.trailingAnchor.constraint(equalTo: view.trailingAnchor).isActive = true
   
} else {
    label.topAnchor.constraint(equalTo: topLayoutGuide.topAnchor).isActive = true
    label.leadingAnchor.constraint(equalTo: view.leadingAnchor).isActive = true
    label.trailingAnchor.constraint(equalTo: view.trailingAnchor).isActive = true
}

Conclusion:

  • The safeAreaLayoutGuide is a property of UIView where topLayoutGuide and bottomLayoutGuide are properties of UIViewController
  • The constraintEqualToSystemSpacingBelow method is new in iOS 11 and removes the need to hard code standard spacing. There are also less than and greater than versions. For horizontal spacing there is also constraintEqualToSystemSpacingAfter.
  • We can increase or decrease of safe area size using safeAreaInsets property.

Next Steps :

iOS 11[Swift 4] Navigation Bar With Large Titles and LargeTitleTextAttributes

Read More

5 Oct 2017

Firebase Cloud Firestore Example Project in iOS - Swift

10/05/2017 06:43:00 am 1
Cloud Firestore is a scalable database like Firebase Realtime Database, it keeps your data in sync across client apps through real time listeners and offers offline support for mobile and web so you can build responsive apps that work regardless of network latency or Internet connectivity.

The advantage of using Cloud Firestore is Expressive querying. You can use queries to retrieve individual, specific documents or to retrieve all the documents in a collection that match your query parameters. Your queries can include multiple, chained filters and combine filtering and sorting.

Data Structure:

Cloud Storage data structure will be like following image:

Firebase Cloud Firestore Data Structure
Here we store data in Documents. Documents are like Dictionaries a key value pair which support many different data types, from simple strings and numbers, to complex, nested objects.

Firebase Cloud Firestore Documents

These documents are stored in collections, which are containers for your documents that you can use to organize your data and build queries.

Firebase Cloud Firestore Collection of Documents
Querying in Cloud Firestore is expressive, efficient, and flexible. We can do query to retrieve data at the document level without needing to retrieve the entire collection, or any nested subcollections.

We can do pagination by adding sorting, filtering, and limits to queries. Adding realtime listeners to your app notifies you with a data snapshot whenever the data your client apps are listening to changes, retrieving only the new changes.

Getting Started:

First create sample project in Xcode and add one UILabel, two UITextField's and one UIButton and give outlets. Build and Run that should look like as below:

Sample Demo

Next open Firebase Console -> Database -> Cloud Firestore, next pop up will come with two options, select start in test mode then enable.

Set up Firebase Cloud Firestore To iOS Project :

Next getting into Sample Project,First Integrate your project with Firebase.

Add the following dependencies to podfile:
pod 'Firebase/Core'
pod 'Firebase/Firestore'

Save the file, Run 'pod install' and open the created .xcworkspace file.

Next, We need to initialize Firebase.

Open Xcode project.

First import the Firebase SDK in AppDelegate.swift file:
import Firebase

Then, in the application:didFinishLaunchingWithOptions: method, initialize the FirebaseApp object:
// Use Firebase library to configure APIs
FirebaseApp.configure()

Saving/Adding data to Cloud Firestore:

Open ViewController.swift, add the docRef property.
var docRef : DocumentReference!

Add the following code in viewDidLoad() method:
docRef = Firestore.firestore().document("friends/profile")

By the way, here we are storing friends name and his/her profession. Above reference is the path where we are going to store our data as a Document.

Next add the code for saving data. Add the following code in save button action method:
@IBAction func saveButtonTapped(_ sender: UIButton) {
    guard let name = nameField.text, !name.isEmpty else { return }
    guard let profession = professionField.text, !profession.isEmpty else { return }
    
    let dataToSave : [String: Any] = ["name": name, "profession": profession]
    docRef.setData(dataToSave) { (error) in
        if let error = error {
            print("Oh no! Some error \(error.localizedDescription)")
        }else {
            print("Data has been saved")
        }
    }
}

Run and enter the data in text fields, then tap save button. We will see message as 'Data has been saved'.

Next open Firebase console -> Database -> Cloud Storage:

Firebase console -> Database -> Cloud Storage:

Fetching/Getting data From Cloud Firestore:


Fetching is very simple, we need to get the data from same docRef.

Before that add fetch button to the view and give action outlet.

Adding Button

Add the following code inside fetch button action method:
@IBAction func fetchButtonTapped(_ sender: Any) {
    docRef.getDocument { (docSnapshot, error) in
        guard let docSnapshot = docSnapshot, docSnapshot.exists else { return }
        let data = docSnapshot.data()
        let name = data["name"] as? String ?? ""
        let profession = data["profession"] as? String ?? ""
        self.titleLabel.text = "\(name) is a \(profession)"
    }
}

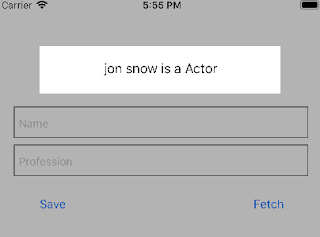
Run and tap Fetch button, we will see the data at the top like follow:

Fetching/Getting data From Cloud Firestore:


Listening for RealTime in Cloud Firestore:

First add the following listener property.
var dataListener : FIRListenerRegistration!

Next add the viewWillAppear() method as following:
override func viewWillAppear(_ animated: Bool) {
    super.viewWillAppear(animated)
    dataListener =  docRef.addSnapshotListener { (docSnapshot, error) in
        guard let docSnapshot = docSnapshot, docSnapshot.exists else { return }
        let data = docSnapshot.data()
        let name = data["name"] as? String ?? ""
        let profession = data["profession"] as? String ?? ""
        self.titleLabel.text = "\(name) is a \(profession)"
    }
}

Above listener will keep on calling every time the data changes. So we need to remove the observer on viewWillDisappear. So that we can avoid memory problems.

Add the following method:
override func viewWillDisappear(_ animated: Bool) {
    super.viewWillDisappear(animated)
    dataListener.remove()
}

Run the project, we can see the title without tapping fetch button. That's good.

Next step is update data in real time. Now add some text in text field then tap save button.

On saving only we can see the title changes in real time without fetch action.

Listening for RealTime in Cloud Firestore:


Conclusion:

Cloud Firestore offers robust access management,Expressive querying and authentication. Secure data by using authentication and rules.


Download sample project with examples :

Read More

Post Top Ad