iOS Revisited: Navigation Bar

Hot

Post Top Ad

Showing posts with label Navigation Bar. Show all posts

10 Nov 2017

Add Search Bar in Navigation Bar swift | Customize Search Bar

11/10/2017 03:35:00 am 5
In this article we will learn how to add search controller in navigation bar. Customizing search bar like placeholder text, title text, clear button.

Here we are going to use Large Title Navigation bar.
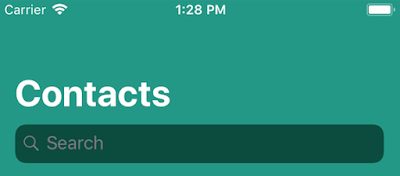
Adding Search Bar In Navigation Bar:

Add the following code in viewDidLoad() method for adding search bar:

if #available(iOS 11.0, *) {
    navigationController?.navigationBar.prefersLargeTitles = true // Navigation bar large titles
    navigationItem.title = "Contacts"
    navigationController?.navigationBar.largeTitleTextAttributes = [NSAttributedStringKey.foregroundColor : UIColor.white]
    navigationController?.navigationBar.barTintColor = UIColor(displayP3Red: 0/255, green: 150/255, blue: 136/255, alpha: 1.0)
    
    let searchController = UISearchController(searchResultsController: nil) // Search Controller
    navigationItem.hidesSearchBarWhenScrolling = false
    navigationItem.searchController = searchController
}

Adding Search Bar In Navigation Bar:

Customizing Search Bar:

Change Search Bar Placeholder text & color:

Add the following line of code to change placeholder text and color:

UITextField.appearance(whenContainedInInstancesOf: [UISearchBar.self]).attributedPlaceholder = NSAttributedString(string: "Search contacts", attributes: [NSAttributedStringKey.foregroundColor: UIColor.orange])


Change search bar text color:

Add the following line for chaning the text color of search bar:

UITextField.appearance(whenContainedInInstancesOf: [UISearchBar.self]).defaultTextAttributes = [NSAttributedStringKey.foregroundColor.rawValue: UIColor.white]


Change cancel button title & color:

For changing cancel button text & color add the following code:

searchController.searchBar.tintColor = UIColor.white
UIBarButtonItem.appearance(whenContainedInInstancesOf: [UISearchBar.self]).title = "Dismiss"


Change clear icon:

Add the following code for changing the clear icon:

searchController.searchBar.setImage(UIImage(named: "delete_icon"), for: UISearchBarIcon.clear, state: .normal)


Change search icon:

Add the following code for changing the search icon:

searchController.searchBar.setImage(UIImage(named: "search_icon"), for: UISearchBarIcon.search, state: .normal)


Change Search Bar background color:

For changing the background color add the following code:

if let textfield = searchController.searchBar.value(forKey: "searchField") as? UITextField {
    if let backgroundview = textfield.subviews.first {
        backgroundview.backgroundColor = UIColor.white
        backgroundview.layer.cornerRadius = 10
        backgroundview.clipsToBounds = true
    }
}


Read More

3 Nov 2017

Custom Navigation Bar like Twitter in Swift 4

11/03/2017 10:35:00 am 0
Hello guys, in this article we will show how to create custom navigation bar as below:

First create Xcode project an save it. Then embed view controller into navigation controller.

Then add the following method, and call in viewsDidLoad() method:
func setupNavItems() {
    let titleImageView = UIImageView(image: #imageLiteral(resourceName: "title_icon"))
    titleImageView.frame = CGRect(x: 0, y: 0, width: 34, height: 34)
    titleImageView.contentMode = .scaleAspectFit
    navigationItem.titleView = titleImageView
    
    let followButton = UIButton(type: .system)
    followButton.setImage(#imageLiteral(resourceName: "follow"), for: .normal)
    followButton.frame = CGRect(x: 0, y: 0, width: 34, height: 34)
    navigationItem.leftBarButtonItem = UIBarButtonItem(customView: followButton)
    
    let searchButton = UIButton(type: .system)
    searchButton.setImage(#imageLiteral(resourceName: "search"), for: .normal)
    searchButton.frame = CGRect(x: 0, y: 0, width: 34, height: 34)
    
    let composeButton = UIButton(type: .system)
    composeButton.setImage(#imageLiteral(resourceName: "compose"), for: .normal)
    composeButton.frame = CGRect(x: 0, y: 0, width: 34, height: 34)
    navigationItem.rightBarButtonItems = [UIBarButtonItem(customView: composeButton),UIBarButtonItem(customView: searchButton)]   
}

iOS 11[Swift 4] Navigation Bar With Large Titles and LargeTitleTextAttributes - Color & Font Customization
Read More

21 Sept 2017

iOS 11[Swift 4] Navigation Bar With Large Titles and LargeTitleTextAttributes - Color & Font Customization

9/21/2017 05:33:00 am 2
From iOS 11, Apple has changed Navigation Bar Titles to Large text.
   
Use a large title when you need to provide extra emphasis on context.

See Music app in iOS 11 Devices. Music uses large titles to differentiate content areas like albums, artists, playlists, and radio.

Large titles don't make sense in all apps and should never compete with content.

Navigation Bar With Large Titles and LargeTitleTextAttributes color & font change - Swift 4, iOS 11


Getting Started :

First create single View Application.

Open Main.storyboard, then tap on ViewController and go to Editor -> Embed In -> Navigation Controller.

Editor -> Embed In -> Navigation Controller.

It will add navigation Controller.

Next open ViewController.swift file.

PrefersLargeTitles :

For setting Large Text as title to the navigation bar we need to use prefersLargeTitles property.

When set to YES, the navigation bar will use a larger out-of-line title view when requested by the current navigation item.

Before that we need to tell to navigation item about LargeTitleDisplayMode. Use automatic mode it will set automatically based on parent View Controller.

Add the following code inside ViewDidLoad() method :
navigationController?.navigationBar.prefersLargeTitles = true
navigationController?.navigationBar.topItem?.title = "Hello"
navigationController?.navigationItem.largeTitleDisplayMode = .automatic

Build and Run, Great we see Large title 'Hello'.

prefersLargeTitles = true

Good, how to change title color and font etc.. For that we have LargeTitleTextAttributes.

LargeTitleTextAttributes :

For changing the color of the Title and Font size we need to set Attributes.

So add the following code next to previous code :
let attributes = [
    NSAttributedStringKey.foregroundColor : UIColor.red
]

navigationController?.navigationBar.largeTitleTextAttributes = attributes

Build and Run, we see title with Red Color.

Navigation large title with Red Color.


For changing the font add font attribute to the attribute dictionary like follow :
NSAttributedStringKey.font : UIFont.preferredFont(forTextStyle: .title1)

Download sample project with examples :


Read More

Post Top Ad