iOS Revisited: ARKit

Hot

Post Top Ad

Showing posts with label ARKit. Show all posts

13 Sept 2017

ARKit Tutorial iOS Example using Swift 4 - iOS 11.

9/13/2017 02:40:00 am 0
In this tutorial we are going to create Augmented Reality example by using ARKit released by apple in Swift 4.

We need to integrate iOS device camera and motion features to produce augmented reality experiences in the app. For that Apple introduced SceneKit, this will do all for us.
So we are going to start ARKit using SceneKit.


ARKit Tutorial

Requirements : 

Xcode 9 , Device with an A9 or later processor running with iOS11.

We are going to add a cube to real word. 

Getting Started :


First create a new project -> open Xcode -> File -> New -> Project -> Single View App, then tap next button. Type product name as 'ARKitAddingCube' then tap next and select the folder to save project.

We are going to use camera, So add 'NSCameraUsageDescription' to Info.plist.


NSCameraUsageDescription
Then open ViewController.swift add the following line next to 'import UIKit'.
import ARKit

For getting access to camera we are going to add ARSCNView() as subview. ARSCNView will provide camera to us.

Add the following property before viewDidLoad() method.

var sceneView = ARSCNView()

Add created property as subview. Write following code inside viewDidLoad() method.
sceneView.frame = view.frame
view.addSubview(sceneView)

Build and Run you nothing is there except white screen. No worries stop and follow next steps.

As we all know that camera is based on sessions. So for this also we need to create and maintain sessions. For ARKit we are going to create ARSession.

Every session is based on configuration. In ARKIt there are ARSessionConfiguration.

The good thing about using SceneKit is no need to create session by default ARSCNView() having a session. But the for running session we need ARSessionConfiguration. Then configuration as follow.

let configuration = ARWorldTrackingSessionConfiguration()

Then run the session with above configuration.
sceneView.session.run(configuration)
Build and Run, we see camera's permission . Allow camera and we see camera running on your device.
 

Now its time to add a cube to real world space.

Before that, add a Button to view. Add two methods next to viewDidLoad() method.

@IBAction func addCubeButtonTapped(sender: UIButton) {
    print("Cube Button Tapped")
}

func addButton() {
    let button = UIButton()
    view.addSubview(button)
    button.translatesAutoresizingMaskIntoConstraints = false
    button.setTitle("Add a CUBE", for: .normal)
    button.setTitleColor(UIColor.red, for: .normal)
    button.backgroundColor = UIColor.white.withAlphaComponent(0.4)
    button.addTarget(self, action: #selector(addCubeButtonTapped(sender:)) , for: .touchUpInside)
    
    // Contraints
    button.bottomAnchor.constraint(equalTo: view.bottomAnchor, constant: -8.0).isActive = true
    button.centerXAnchor.constraint(equalTo: view.centerXAnchor, constant: 0.0).isActive = true
    button.heightAnchor.constraint(equalToConstant: 50)
}

Then add 'addButton()' to the end of viewDidLoad() method.

Build and Run we will see Button at the bottom.


In this whole project we don't use StoryBoards. If you want to know why follow this link.

http://iosrevisited.blogspot.com/2017/08/11-reasons-why-not-to-use-storyboards.html

Now all set for adding Cube.

Providing 3D Virtual Content with SceneKit.

For adding any object to scene we need to create SCNNode and add that as a child node to SceneView.

let's create SCNNode as follow. Write the following code in @IBAction method.

let cubeNode = SCNNode(geometry: SCNBox(width: 0.1, height: 0.1, length: 0.1, chamferRadius: 0)) // SceneKit/AR coordinates are in meters

CubeNode created with a 0.1 meters of height, width and length.

Now where to position this cube ? In this for visualize we are going to place 0.2 metres in front of device. Give position to cubeNode as follow.

cubeNode.position = SCNVector3(0, 0, -0.2)

Then add cubeNode as child node to Scenview.
self.sceneView.scene.rootNode.addChildNode(cubeNode)

Great! Build and Run, Tap on Add a cube button, we see white cube. Move device around if can not see Cube.

ARKit adding a cube to real world


On tapping Add a Cube button multiple times it's adding cube again and again at same position so we can't see multiple cubes.

Next step, adding multiple cubes to real world space. 

For this nothing much to do. Simply we need to change cubes position according to cameras position.

To get camera relative postion add following method.

func getMyCameraCoordinates(sceneView: ARSCNView) -> MDLTransform {
    let cameraTransform = sceneView.session.currentFrame?.camera.transform
    let cameraCoordinates = MDLTransform(matrix: cameraTransform!)
    return cameraCoordinates
}

By using above method we get camera relative position. So we need give cube node postion as camera position.

Replace code inside 'addCubeButtonTapped' method with the following code.

DispatchQueue.main.async {
    print("cube button tapped")
    let cubeNode = SCNNode(geometry: SCNBox(width: 0.1, height: 0.1, length: 0.1, chamferRadius: 0))
    let cc = self.getMyCameraCoordinates(sceneView: self.sceneView)
    cubeNode.position = SCNVector3(cc.translation.x, cc.translation.y, cc.translation.z)
    self.sceneView.scene.rootNode.addChildNode(cubeNode)
}

In the above code we are assigning camera's position to cube node.

Done. Build and Run we will see camera with 'Add a Cube' button.

Now tap button and wait until cube appears. If not step back and see. Move your device as you like and observe the added cube, it won't change it's position. That's what Augmented Reality means.

Your final output for ARKit will be like the following Video.


ARKit adding a multiple cubes to real world - swift 4, iOS


Download sample project with examples :

Read More

18 Aug 2017

Measuring Distance Using ARKit in iOS Swift 4. iPhone as a Measuring Tape. ARKit iOS Measuring Distance.

8/18/2017 10:40:00 am 0
In this article we are creating a Measuring Tape App using Apple's ARKit Framework. It' really a cool app. Without using any tape we are going to measure distance with iPhone/iPad.

AR made us to create excellent real world Apps. By using Augmented Reality we can create different Virtual Apps, out of those Measuring Distance App is one. 

Measuring Tape Using ARKit in Swift 4. iPhone as a Measuring Tape. ARKit iOS Measuring Distance.

Before starting this example ,first go through the basic sample example about How To Add Cube.


Getting Started:


Requirements :

Xcode 9 , Device with an A9 or later processor running with iOS11.  

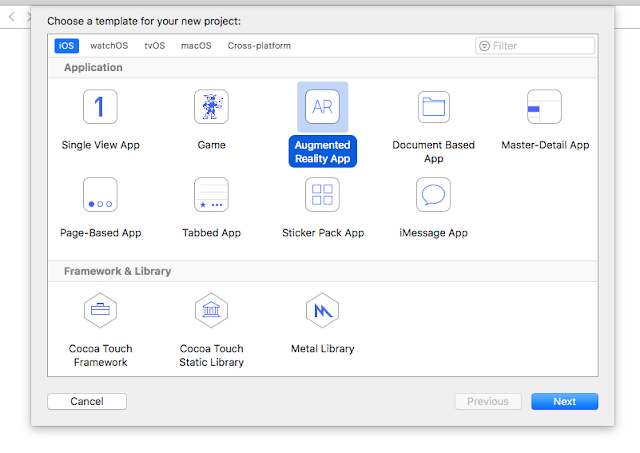
First create a new project -> open Xcode -> File -> New -> Project -> Augmented Reality App, then tap next button. Type product name as 'ARKitMeasuringTape' then tap next and select the folder to save project.


Augmented Reality App
Build and Run, Move camera around we see space ship.

Great, Up to now everything working fine. But we don't need space Ship for measuring distance so remove unwanted files.

First delete 'art.scnassets' from project. Then open ViewController.swift, delete all methods after this pragma mark '// MARK: - ARSCNViewDelegate'.

From viewDidLoad() method delete the following lines of code.

// Create a new scene
let scene = SCNScene(named: "art.scnassets/ship.scn")!

// Set the scene to the view
sceneView.scene = scene
Build and Run, SpaceShip removed and we see regular camera.

All Good. We will get into target of this article.


Plane Detection :

First thing for measuring distance we need to detect plane surface. For that ARKit provides a great function but it detects only horizontal planes. For us it will work.

In ARKit you can specify that you want to detect horizontal planes by setting the planeDetection property to ARPlaneDetectionHorizontal on your session configuration object.

Replace the 'viewWillAppear' method with the following method.
override func viewWillAppear(_ animated: Bool) {
    super.viewWillAppear(animated)
    
    let configuration = ARWorldTrackingSessionConfiguration()
    
    configuration.planeDetection = .horizontal
    
    sceneView.session.run(configuration)
}
Everything set for horizontal plane detection.

Now, how can we know whether detected or not. No worries, for that we will draw a square over camera based on ARSCNViewDelegate methods.

We use the following delegate method. Calls exactly once per frame before any animation and actions are evaluated and any physics are simulated.
- (void)renderer:(id )renderer updateAtTime:(NSTimeInterval)time
For drawing a square we are going to use Apple's FocusSquare class.

Download all the required files.

Drag all files to the project.

Setting Up Square :

Create a global object for the FocusSquare class as following.
var focusSquare = FocusSquare()

var dragOnInfinitePlanesEnabled = false // for infinite Planes
For setting up square on the SceneView, we need to add as child node. Add the following method.
func setupFocusSquare() {
    focusSquare.unhide()
    focusSquare.removeFromParentNode()
    sceneView.scene.rootNode.addChildNode(focusSquare)
}
For detecting planes we need to do hitTest method. For that write following extension to the bottom of the class.
extension ViewController {
    
    
    func worldPositionFromScreenPosition(_ position: CGPoint,
                                         objectPos: SCNVector3?,
                                         infinitePlane: Bool = false) -> (position: SCNVector3?, planeAnchor: ARPlaneAnchor?, hitAPlane: Bool) {
        
        // -------------------------------------------------------------------------------
        // 1. Always do a hit test against exisiting plane anchors first.
        //    (If any such anchors exist & only within their extents.)
        
        let planeHitTestResults = sceneView.hitTest(position, types: .existingPlaneUsingExtent)
        if let result = planeHitTestResults.first {
            
            let planeHitTestPosition = SCNVector3.positionFromTransform(result.worldTransform)
            let planeAnchor = result.anchor
            
            // Return immediately - this is the best possible outcome.
            return (planeHitTestPosition, planeAnchor as? ARPlaneAnchor, true)
        }
        
        // -------------------------------------------------------------------------------
        // 2. Collect more information about the environment by hit testing against
        //    the feature point cloud, but do not return the result yet.
        
        var featureHitTestPosition: SCNVector3?
        var highQualityFeatureHitTestResult = false
        
        let highQualityfeatureHitTestResults = sceneView.hitTestWithFeatures(position, coneOpeningAngleInDegrees: 18, minDistance: 0.2, maxDistance: 2.0)
        
        if !highQualityfeatureHitTestResults.isEmpty {
            let result = highQualityfeatureHitTestResults[0]
            featureHitTestPosition = result.position
            highQualityFeatureHitTestResult = true
        }
        
        // -------------------------------------------------------------------------------
        // 3. If desired or necessary (no good feature hit test result): Hit test
        //    against an infinite, horizontal plane (ignoring the real world).
        
        if (infinitePlane && dragOnInfinitePlanesEnabled) || !highQualityFeatureHitTestResult {
            
            let pointOnPlane = objectPos ?? SCNVector3Zero
            
            let pointOnInfinitePlane = sceneView.hitTestWithInfiniteHorizontalPlane(position, pointOnPlane)
            if pointOnInfinitePlane != nil {
                return (pointOnInfinitePlane, nil, true)
            }
        }
        
        // -------------------------------------------------------------------------------
        // 4. If available, return the result of the hit test against high quality
        //    features if the hit tests against infinite planes were skipped or no
        //    infinite plane was hit.
        
        if highQualityFeatureHitTestResult {
            return (featureHitTestPosition, nil, false)
        }
        
        // -------------------------------------------------------------------------------
        // 5. As a last resort, perform a second, unfiltered hit test against features.
        //    If there are no features in the scene, the result returned here will be nil.
        
        let unfilteredFeatureHitTestResults = sceneView.hitTestWithFeatures(position)
        if !unfilteredFeatureHitTestResults.isEmpty {
            let result = unfilteredFeatureHitTestResults[0]
            return (result.position, nil, false)
        }
        
        return (nil, nil, false)
    }
    
}
The above method will tell whether a plane detected or not. If detected, it will return the position and planeAnchor. Position is an Vector3 and plane anchor is an ARPlaneAnchor.

For updating the square write the following method.
func updateFocusSquare() {
    let (worldPosition, planeAnchor, _) = worldPositionFromScreenPosition(view.center, objectPos: focusSquare.position)
    if let worldPosition = worldPosition {
        focusSquare.update(for: worldPosition, planeAnchor: planeAnchor, camera: sceneView.session.currentFrame?.camera)
    }
}
In above method we are calling extension method for checking whether a plane detected or not and updating the square.

Square should update whenever frame changes. For that we are using ARSCNViewDelegate method as we discussed before.

Write the following method after ARSCNViewDelegate pragma mark.
func renderer(_ renderer: SCNSceneRenderer, updateAtTime time: TimeInterval) {
    DispatchQueue.main.async {
        self.updateFocusSquare()
    }
}
Above delegate method calls once per frame and updates square based on frame.

Finally we need to call setupFocusSquare() method in viewDidLoad().

Build and Run, BINGO we see Focus square try to focus on plane surface we see as below image with Full Focus Square.

Plane detection using Ht test

Add Distance Label :

Now add a label as a subview to the SceneView. Create label as follow.
let distanceLabel = UILabel()
Add distanceLabel as Subview. Add the following method.
func addDistanceLabel() {
    let margins = sceneView.layoutMarginsGuide
    sceneView.addSubview(distanceLabel)
    distanceLabel.translatesAutoresizingMaskIntoConstraints = false
    distanceLabel.leadingAnchor.constraint(equalTo: margins.leadingAnchor, constant: 10.0).isActive = true
    distanceLabel.topAnchor.constraint(equalTo: margins.topAnchor, constant: 10.0).isActive = true
    distanceLabel.heightAnchor.constraint(equalToConstant: 50).isActive = true
    distanceLabel.textColor = UIColor.white
    distanceLabel.text = "Distance = ??"
}
And call this method in viewDidLoad().

Not using storyboard for adding label.

Build and Run, we see Distance at Top-Left corner.

Adding distance Label as subview

Calculating Distance :

For calculating distance we need two points. So add startPoint and endpoint to ViewController.swift.
var startPoint : SCNVector3? = nil
    
var endPoint : SCNVector3? = nil
we can measure distance between two points using following formula.

let point A = (x1,y1,z1) and point B = (x2,y2,z2)

Then distance will be

Distance formula Arkit ios

So create one method for calculating distance between two points. Add the following method.
func getDistanceBetween(startPoint: SCNVector3, endPoint: SCNVector3) -> Double? {
    var distance : Double? = nil
    let x = powf((endPoint.x - startPoint.x), 2.0)
    let y = powf((endPoint.y - startPoint.y), 2.0)
    let z = powf((endPoint.z - startPoint.z), 2.0)
    
    distance = sqrt(Double(x + y + z))
    return distance
}
From where to get these points?

We are going to get based on user tap on screen from where they want to start for measuring distance. First we do hitTest for checking whether a planeAnchors exists at tapped point, if exists then take first anchor position and store it to the startPoint.

In the same way user taps somewhere, up to where he wants to measure. And take same point and do hitTest for checking whether a planeAnchors exists at tapped point, if exists then take first anchor position and store it to the endPoint.

Create method for getting start and end points. So add touchesBegan() method to ViewController.swift.
override func touchesBegan(_ touches: Set, with event: UIEvent?) {
    if let touch = touches.first {
        let results = sceneView.hitTest(touch.location(in: sceneView), types: [ARHitTestResult.ResultType.featurePoint] )
        
        if let anchor = results.first {
            
            let hitPointPosition = SCNVector3.positionFromTransform(anchor.worldTransform)
            
            if startPoint == nil && endPoint == nil {
                for child in sceneView.scene.rootNode.childNodes {
                    if child.name == "Start" || child.name == "End" {
                        child.removeFromParentNode()
                        distanceLabel.text = "Distance = ??"
                    }
                }
            }
            
            if startPoint == nil {
                focusSquare.hide()
                startPoint = hitPointPosition
                let node = createCrossNode(size: 0.01, color:UIColor.blue, horizontal:false)
                node.position = startPoint!
                node.name = "Start"
                sceneView.scene.rootNode.addChildNode(node)
                
            }else {
                endPoint = hitPointPosition
                let node = createCrossNode(size: 0.01, color:UIColor.red, horizontal:false)
                node.position = endPoint!
                node.name = "End"
                sceneView.scene.rootNode.addChildNode(node)
            }
            
            if endPoint != nil {
                setupFocusSquare()
                let distance = self.getDistanceBetween(startPoint: startPoint!, endPoint: endPoint!)
                distanceLabel.text = String(format: "Distance(Approx) = %.2f cm",distance! * 100)
                
                startPoint = nil
                endPoint = nil
            }
            
        }
    }
}

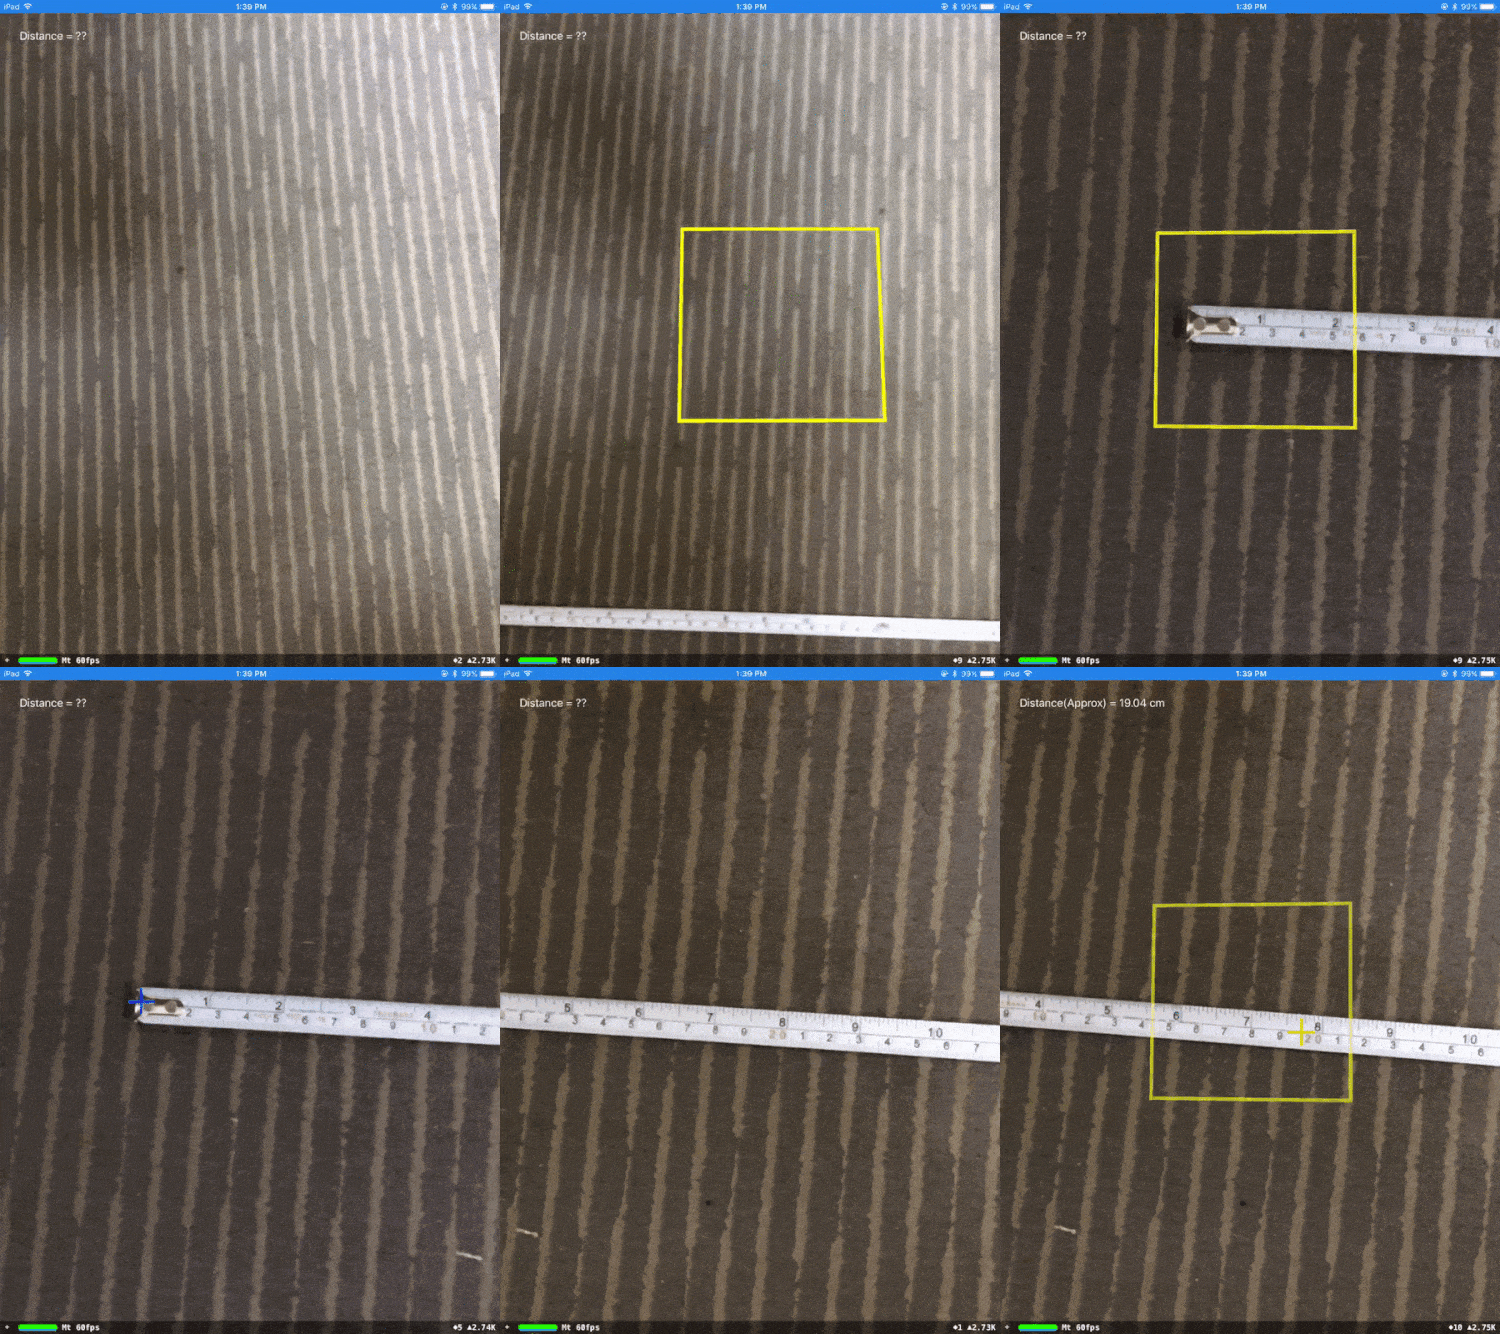
Great! All set. Build and Run we see camera, try to target on a plane surface then tap on the screen for the start point and again tap for endpoint.

you see a distance in centimeters at top right of screen.

I show two samples what tested.

Test Case 1 :

Original distance = 40 cm
Calculated distance = 38.25 cm (Approx)

Distance Measurment test with Arkit

Test Case 2 :

Original distance = 20 cm
Calculated distance = 19.04 cm (Approx)

Distance Measurment test with Arkit swif4 in ios


We are getting approximate results. Minor problem is that startPoint node is changing slightly its position. That's not exact behavior of Augmented Reality. Still it's in beta, surely Apple will do much more refinements for live release.

That's giving approximate results. Minor problem is that startPoint node is changing slightly its position. That's not exact behavior of Augmented Reality. Still it's in beta, surely Apple will do much more refinements for live release.

Download sample project with examples :

Read More

Post Top Ad