iOS Revisited

Hot

Post Top Ad

18 Aug 2017

Measuring Distance Using ARKit in iOS Swift 4. iPhone as a Measuring Tape. ARKit iOS Measuring Distance.

8/18/2017 10:40:00 am 0
In this article we are creating a Measuring Tape App using Apple's ARKit Framework. It' really a cool app. Without using any tape we are going to measure distance with iPhone/iPad.

AR made us to create excellent real world Apps. By using Augmented Reality we can create different Virtual Apps, out of those Measuring Distance App is one. 

Measuring Tape Using ARKit in Swift 4. iPhone as a Measuring Tape. ARKit iOS Measuring Distance.

Before starting this example ,first go through the basic sample example about How To Add Cube.


Getting Started:


Requirements :

Xcode 9 , Device with an A9 or later processor running with iOS11.  

First create a new project -> open Xcode -> File -> New -> Project -> Augmented Reality App, then tap next button. Type product name as 'ARKitMeasuringTape' then tap next and select the folder to save project.
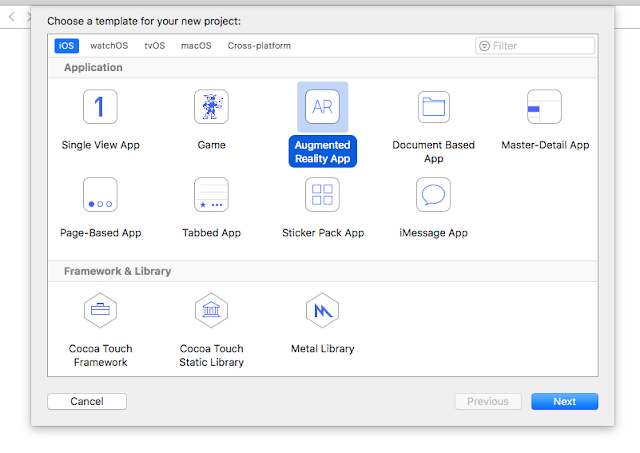

Augmented Reality App
Build and Run, Move camera around we see space ship.

Great, Up to now everything working fine. But we don't need space Ship for measuring distance so remove unwanted files.

First delete 'art.scnassets' from project. Then open ViewController.swift, delete all methods after this pragma mark '// MARK: - ARSCNViewDelegate'.

From viewDidLoad() method delete the following lines of code.

// Create a new scene
let scene = SCNScene(named: "art.scnassets/ship.scn")!

// Set the scene to the view
sceneView.scene = scene
Build and Run, SpaceShip removed and we see regular camera.

All Good. We will get into target of this article.


Plane Detection :

First thing for measuring distance we need to detect plane surface. For that ARKit provides a great function but it detects only horizontal planes. For us it will work.

In ARKit you can specify that you want to detect horizontal planes by setting the planeDetection property to ARPlaneDetectionHorizontal on your session configuration object.

Replace the 'viewWillAppear' method with the following method.
override func viewWillAppear(_ animated: Bool) {
    super.viewWillAppear(animated)
    
    let configuration = ARWorldTrackingSessionConfiguration()
    
    configuration.planeDetection = .horizontal
    
    sceneView.session.run(configuration)
}
Everything set for horizontal plane detection.

Now, how can we know whether detected or not. No worries, for that we will draw a square over camera based on ARSCNViewDelegate methods.

We use the following delegate method. Calls exactly once per frame before any animation and actions are evaluated and any physics are simulated.
- (void)renderer:(id )renderer updateAtTime:(NSTimeInterval)time
For drawing a square we are going to use Apple's FocusSquare class.

Download all the required files.

Drag all files to the project.

Setting Up Square :

Create a global object for the FocusSquare class as following.
var focusSquare = FocusSquare()

var dragOnInfinitePlanesEnabled = false // for infinite Planes
For setting up square on the SceneView, we need to add as child node. Add the following method.
func setupFocusSquare() {
    focusSquare.unhide()
    focusSquare.removeFromParentNode()
    sceneView.scene.rootNode.addChildNode(focusSquare)
}
For detecting planes we need to do hitTest method. For that write following extension to the bottom of the class.
extension ViewController {
    
    
    func worldPositionFromScreenPosition(_ position: CGPoint,
                                         objectPos: SCNVector3?,
                                         infinitePlane: Bool = false) -> (position: SCNVector3?, planeAnchor: ARPlaneAnchor?, hitAPlane: Bool) {
        
        // -------------------------------------------------------------------------------
        // 1. Always do a hit test against exisiting plane anchors first.
        //    (If any such anchors exist & only within their extents.)
        
        let planeHitTestResults = sceneView.hitTest(position, types: .existingPlaneUsingExtent)
        if let result = planeHitTestResults.first {
            
            let planeHitTestPosition = SCNVector3.positionFromTransform(result.worldTransform)
            let planeAnchor = result.anchor
            
            // Return immediately - this is the best possible outcome.
            return (planeHitTestPosition, planeAnchor as? ARPlaneAnchor, true)
        }
        
        // -------------------------------------------------------------------------------
        // 2. Collect more information about the environment by hit testing against
        //    the feature point cloud, but do not return the result yet.
        
        var featureHitTestPosition: SCNVector3?
        var highQualityFeatureHitTestResult = false
        
        let highQualityfeatureHitTestResults = sceneView.hitTestWithFeatures(position, coneOpeningAngleInDegrees: 18, minDistance: 0.2, maxDistance: 2.0)
        
        if !highQualityfeatureHitTestResults.isEmpty {
            let result = highQualityfeatureHitTestResults[0]
            featureHitTestPosition = result.position
            highQualityFeatureHitTestResult = true
        }
        
        // -------------------------------------------------------------------------------
        // 3. If desired or necessary (no good feature hit test result): Hit test
        //    against an infinite, horizontal plane (ignoring the real world).
        
        if (infinitePlane && dragOnInfinitePlanesEnabled) || !highQualityFeatureHitTestResult {
            
            let pointOnPlane = objectPos ?? SCNVector3Zero
            
            let pointOnInfinitePlane = sceneView.hitTestWithInfiniteHorizontalPlane(position, pointOnPlane)
            if pointOnInfinitePlane != nil {
                return (pointOnInfinitePlane, nil, true)
            }
        }
        
        // -------------------------------------------------------------------------------
        // 4. If available, return the result of the hit test against high quality
        //    features if the hit tests against infinite planes were skipped or no
        //    infinite plane was hit.
        
        if highQualityFeatureHitTestResult {
            return (featureHitTestPosition, nil, false)
        }
        
        // -------------------------------------------------------------------------------
        // 5. As a last resort, perform a second, unfiltered hit test against features.
        //    If there are no features in the scene, the result returned here will be nil.
        
        let unfilteredFeatureHitTestResults = sceneView.hitTestWithFeatures(position)
        if !unfilteredFeatureHitTestResults.isEmpty {
            let result = unfilteredFeatureHitTestResults[0]
            return (result.position, nil, false)
        }
        
        return (nil, nil, false)
    }
    
}
The above method will tell whether a plane detected or not. If detected, it will return the position and planeAnchor. Position is an Vector3 and plane anchor is an ARPlaneAnchor.

For updating the square write the following method.
func updateFocusSquare() {
    let (worldPosition, planeAnchor, _) = worldPositionFromScreenPosition(view.center, objectPos: focusSquare.position)
    if let worldPosition = worldPosition {
        focusSquare.update(for: worldPosition, planeAnchor: planeAnchor, camera: sceneView.session.currentFrame?.camera)
    }
}
In above method we are calling extension method for checking whether a plane detected or not and updating the square.

Square should update whenever frame changes. For that we are using ARSCNViewDelegate method as we discussed before.

Write the following method after ARSCNViewDelegate pragma mark.
func renderer(_ renderer: SCNSceneRenderer, updateAtTime time: TimeInterval) {
    DispatchQueue.main.async {
        self.updateFocusSquare()
    }
}
Above delegate method calls once per frame and updates square based on frame.

Finally we need to call setupFocusSquare() method in viewDidLoad().

Build and Run, BINGO we see Focus square try to focus on plane surface we see as below image with Full Focus Square.

Plane detection using Ht test

Add Distance Label :

Now add a label as a subview to the SceneView. Create label as follow.
let distanceLabel = UILabel()
Add distanceLabel as Subview. Add the following method.
func addDistanceLabel() {
    let margins = sceneView.layoutMarginsGuide
    sceneView.addSubview(distanceLabel)
    distanceLabel.translatesAutoresizingMaskIntoConstraints = false
    distanceLabel.leadingAnchor.constraint(equalTo: margins.leadingAnchor, constant: 10.0).isActive = true
    distanceLabel.topAnchor.constraint(equalTo: margins.topAnchor, constant: 10.0).isActive = true
    distanceLabel.heightAnchor.constraint(equalToConstant: 50).isActive = true
    distanceLabel.textColor = UIColor.white
    distanceLabel.text = "Distance = ??"
}
And call this method in viewDidLoad().

Not using storyboard for adding label.

Build and Run, we see Distance at Top-Left corner.

Adding distance Label as subview

Calculating Distance :

For calculating distance we need two points. So add startPoint and endpoint to ViewController.swift.
var startPoint : SCNVector3? = nil
    
var endPoint : SCNVector3? = nil
we can measure distance between two points using following formula.

let point A = (x1,y1,z1) and point B = (x2,y2,z2)

Then distance will be

Distance formula Arkit ios

So create one method for calculating distance between two points. Add the following method.
func getDistanceBetween(startPoint: SCNVector3, endPoint: SCNVector3) -> Double? {
    var distance : Double? = nil
    let x = powf((endPoint.x - startPoint.x), 2.0)
    let y = powf((endPoint.y - startPoint.y), 2.0)
    let z = powf((endPoint.z - startPoint.z), 2.0)
    
    distance = sqrt(Double(x + y + z))
    return distance
}
From where to get these points?

We are going to get based on user tap on screen from where they want to start for measuring distance. First we do hitTest for checking whether a planeAnchors exists at tapped point, if exists then take first anchor position and store it to the startPoint.

In the same way user taps somewhere, up to where he wants to measure. And take same point and do hitTest for checking whether a planeAnchors exists at tapped point, if exists then take first anchor position and store it to the endPoint.

Create method for getting start and end points. So add touchesBegan() method to ViewController.swift.
override func touchesBegan(_ touches: Set, with event: UIEvent?) {
    if let touch = touches.first {
        let results = sceneView.hitTest(touch.location(in: sceneView), types: [ARHitTestResult.ResultType.featurePoint] )
        
        if let anchor = results.first {
            
            let hitPointPosition = SCNVector3.positionFromTransform(anchor.worldTransform)
            
            if startPoint == nil && endPoint == nil {
                for child in sceneView.scene.rootNode.childNodes {
                    if child.name == "Start" || child.name == "End" {
                        child.removeFromParentNode()
                        distanceLabel.text = "Distance = ??"
                    }
                }
            }
            
            if startPoint == nil {
                focusSquare.hide()
                startPoint = hitPointPosition
                let node = createCrossNode(size: 0.01, color:UIColor.blue, horizontal:false)
                node.position = startPoint!
                node.name = "Start"
                sceneView.scene.rootNode.addChildNode(node)
                
            }else {
                endPoint = hitPointPosition
                let node = createCrossNode(size: 0.01, color:UIColor.red, horizontal:false)
                node.position = endPoint!
                node.name = "End"
                sceneView.scene.rootNode.addChildNode(node)
            }
            
            if endPoint != nil {
                setupFocusSquare()
                let distance = self.getDistanceBetween(startPoint: startPoint!, endPoint: endPoint!)
                distanceLabel.text = String(format: "Distance(Approx) = %.2f cm",distance! * 100)
                
                startPoint = nil
                endPoint = nil
            }
            
        }
    }
}

Great! All set. Build and Run we see camera, try to target on a plane surface then tap on the screen for the start point and again tap for endpoint.

you see a distance in centimeters at top right of screen.

I show two samples what tested.

Test Case 1 :

Original distance = 40 cm
Calculated distance = 38.25 cm (Approx)

Distance Measurment test with Arkit

Test Case 2 :

Original distance = 20 cm
Calculated distance = 19.04 cm (Approx)
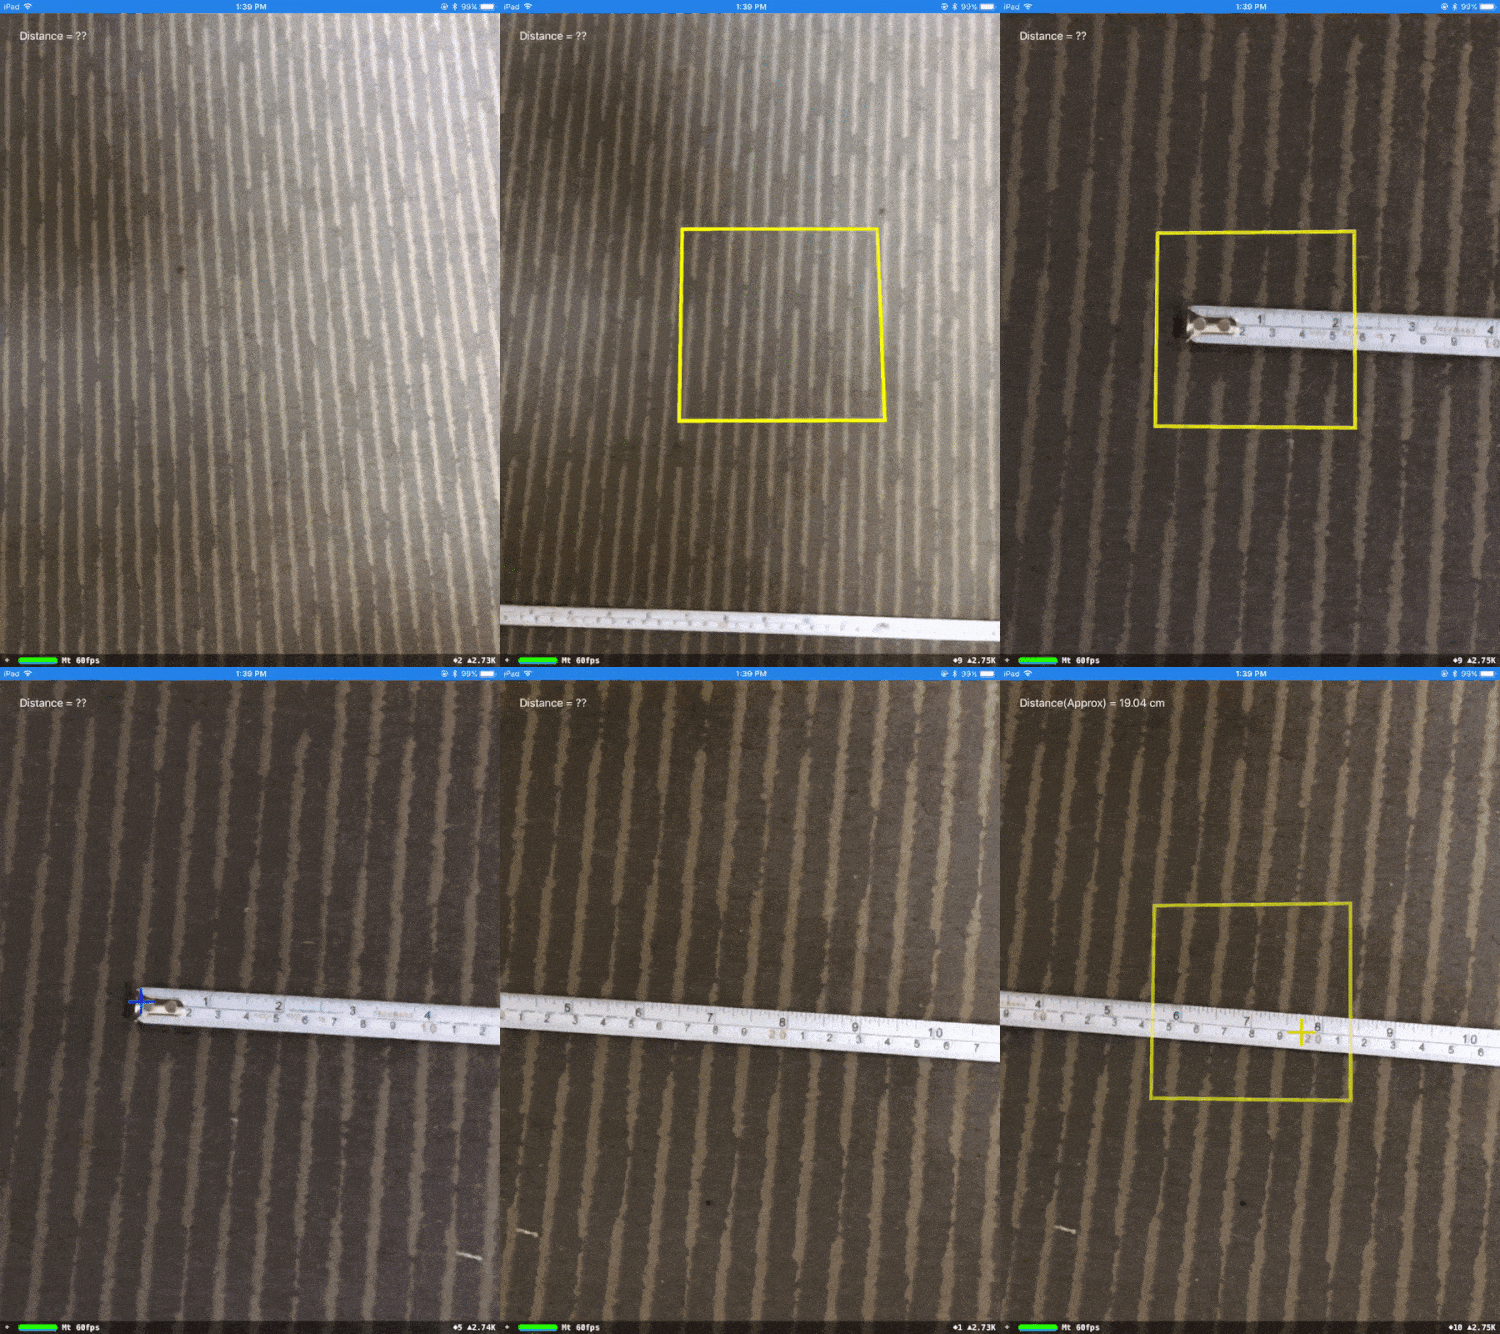
Distance Measurment test with Arkit swif4 in ios


We are getting approximate results. Minor problem is that startPoint node is changing slightly its position. That's not exact behavior of Augmented Reality. Still it's in beta, surely Apple will do much more refinements for live release.

That's giving approximate results. Minor problem is that startPoint node is changing slightly its position. That's not exact behavior of Augmented Reality. Still it's in beta, surely Apple will do much more refinements for live release.

Download sample project with examples :

Read More

16 Aug 2017

Arrays or Lists Tutorial With Examples in iOS using Swift 4 - Collection Types

8/16/2017 03:53:00 am 0
We mostly use Arrays and Dictionaries while developing apps. Sets also we will use but not as much as Arrays and Dictionaries.

In this tutorial we dive into Arrays using Swift 4. We are going to use Playgrounds for learning Arrays.


Array Tutoria In Swift, Objective c Ios


Arrays:

An Array is a list of ordered values of the same type. Array may contain same value at different indexes.

5 Ways To Concatenate/Merge Two Arrays into One Array in Swift 4
 

Initialization :

In swift arrays initialization like below. Copy and paste in Playground.
var userIds = Array()
print("userIds is of type [Int] with \(userIds.count) items.")
Output: userIds is of type [Int] with 0 items.

'userIds' is an Empty Array of type Int.  

     How to Create Empty Array ?

      We can create empty array using following line.
var emptyArray = [Any]()
       Any may be Int, Float, Double, String etc...


Adding/Inserting elements to Array :


In swift for adding elements to Array we use Append().
userIds.append(1)

userIds.append(3)

print(userIds)
Output: [1, 3]

userIds now contains 2 value of type Int

For getting the elements count from Array use 'count'.

print(userIds.count)
Great. By using Append element is adding to array at end. If we want to add at a particular index append won't work.

No worries it's easy.

Now for adding at starting we using 'insert'.

userIds.insert(20, at: 0)

print(userIds)
Output: [20, 1, 3]

We can add any element at any index between 0 to userIds.count.

Adding at second position follows as below.

userIds.insert(45, at: 1)

print(userIds)
Output: [20, 45, 1, 3]

Note: Index starts from 0. second position means index = 1.

Make userIds Array empty. So simply write following code.

userIds = []

print(userIds)
Output: [20, 45, 1, 3]

Array With Default Values:

create simple array with default values.

var defaultArray = [2, 4, 6, 8]
For adding same element multiple times swift made easy function.
var threeDoubles = Array(repeating: 0.0, count: 3)
// threeDoubles is of type [Double], and equals [0.0, 0.0, 0.0]

Creating an Array By Adding Two Arrays Together:

In swift we can create an array by adding two compatable arrays using an additional operator (+).

The new created array type is inferred from type of two arrays you add together.

var anotherThreeDoubles = Array(repeating: 2.5, count: 3)
// anotherThreeDoubles is of type [Double], and equals [2.5, 2.5, 2.5]
 
var sixDoubles = threeDoubles + anotherThreeDoubles
// sixDoubles is inferred as [Double], and equals [0.0, 0.0, 0.0, 2.5, 2.5, 2.5]
There are more we can do with Arrays. We will cover later.

Modifying & Accessing Arrays:

Subscripts :

We can modify or access arrays using Subscripts.
var whishList = ["juice", "biscuits", "fruits", "vegetables"] // Create array with string literals
Suppose we want to access first element simply we can use subscript as follow.
var firstItem = whishList[0]
To modify a element in an array we can use subscripts.

Modify second item with 'chocolates' as follow.

whishList[1] = "chocolates"

// the second item in the list is now equal to "chocolates" rather than "biscuits" var firstItem = whishList[0]

Using Array Methods And Properties :

We use array method to remove object from an array.
whishList.removeFirst()

// the first item in the array has just been removed
// whishList now contains 3 items, and no juice
We can remove from a specific index also.
whishList.remove(at: 1)

// the item at index 1 has just been removed
// now whishList contains only 2 item
We can insert an elemnt to an array as follow.
whishList.insert("milk", at: 0)

// whishList now contains 3 items
// "milk" is now the first item in the list

Iterate/Loop Over an Array :

We can get all values from an array by simply iterating over it using for-in loop.
for item in whishList {
    print(item)
}

// milk
// fruits
// vegetables
We can use old method also with index but not efficient.

For getting index we use a different method called enumerated(). Iterate using this method we will get both index and value. It's a great features and efficient for getting two things for single execution.

for (index, value) in whishList.enumerated() {
    print("item\(index+1): \(value)")
}

// Item 1: milk
// Item 2: fruits
// Item 3: vegetables

Summary:

What we learnt from this article.

1. An array is a collection of elements of same type in a sequential order.
2. Elements order won't change by itself.
3. Initializing an array using different methods.
4. Adding elements to an array using append() function.
5. Inserting an element using insert(at:) function.
6. Adding two array using additional operator (+) will give an New Array.
7. We can modify and access array items using subscripts.
8. In array index starts from 0.
9. Deleting or Removing item from array using Remove(at:) function.
10. Iterating over an array using for-in loops
.

Read More

Collection Types in Swift 4 - Arrays, Dictionaries, Sets.

8/16/2017 03:49:00 am 0
In iOS Collection Types are used for storing data based on required data structure. Mainly there are three types.


1. Arrays
2. Dictionaries
3. Sets


Collection Types in Swift 4, Swift 3 , Objective - C,iOS


Arrays:

Array is an collection of objects in a sequential order. Array is the most important data structure for storing objects.

The objects are in sequential order and the key for accessing these objects is their index, an integer specifying a value’s position in the sequence. Index starts from 0 to n-1. Where n is number of objects in an array.

Objects may be Int, Double, String etc..

Example:

var animals = ["Lion", "Tiger", "Elephant"] // Array with Strings As Objects

var userIds = [12, 16, 22] // Array with Ints As Objects


Array, NSArray, NSMutableArray, Lists in Swift 4, Swift 3, Objective - C, iOS


For more examples and detailed explanation on Arrays.

Dictionaries:

Dictionary is unordered collection of objects with a key value pair.

For accessing an object we use keys. Dictionaries also allow for fast insertion and deletion operations.

For example we create dictionary for elephant.

Example:

var dict = [
    "name"  : "Elephant",
    "color" : "Black",
    "gender": "Male",
    "Weight": "5500 Kgs"
]


Dictionaries, NSDictionary, NSMutableDictionary HashMaps in Swift 4, Swift 3, Objective - C, iOS

For more examples and detailed explanation on Dictionaries .

Sets:

Set is an unordered collection of unique elements. Sets are like same as Arrays. When we don't need any order and ensure that each element appears only once in a collection.

The main advantage of sets is that we can perform so many operation that array doesn't. We can perform union, intersection of array using sets.

Example:

var animals: Set = ["Lion", "Tiger", "Elephant"] // same as array but 'Set' type


Sets, Union, Intersection in Swift 4, Swift 3, Objective - C, iOS

Read More

7 Aug 2017

dispatch_after - GCD in swift? Swift 3, Swift 4.

8/07/2017 09:42:00 am 0

dispatch_after - GCD in swift? Swift 3, Swift 4.


Grand Central Dispatch :

It's used to distribute the computation across multiple cores dispatching any number of threads needed and it is optimized to work with devices with multi-core processors. Basically we use this in iOS for running background threads.

Swift 2 and Objective-C syntax : 

dispatch_after(dispatch_time_t when, dispatch_queue_t queue, dispatch_block_t block)

Method 1 :

let delayTime = dispatch_time(DISPATCH_TIME_NOW, Int64(1 * Double(NSEC_PER_SEC)))
dispatch_after(delayTime, dispatch_get_main_queue()) {
    print("Delayed by 4 Seconds")
}

Method 2 :

This is using closure, so we can easily reuse anywhere by simply as follow.

func delayAction(xSeconds:Double, closure:()->()) {
    dispatch_after(
        dispatch_time(
            DISPATCH_TIME_NOW,
            Int64(xSeconds * Double(NSEC_PER_SEC))
        ),
        dispatch_get_main_queue(), closure)
}
Simple call above method as following.

delayAction(0.5) {
    // do stuff here
    print("Delayed by 0.5 Seconds")
}
How to write dispatch_after GCD in Swift 3?
dispatch_after or asyncAfter in Swift 4.

Swift 3 and Swift 4 :

DispatchQueue.main.asyncAfter

Suppose if you want to execute a method after x amount of time then we can use 'dispatch_after' methods.

Let take a example. I want to execute a code after 4 seconds.

Method 1 :

let xSeconds = 4.0
DispatchQueue.main.asyncAfter(deadline: .now() + xSeconds) {
    print("Delayed by 4 Seconds")
}

Method 2 :

Using closure

func delayAction(_ xSeconds:Double, closure:@escaping ()->()) {
    let when = DispatchTime.now() + xSeconds
    DispatchQueue.main.asyncAfter(deadline: when, execute: closure)
}
Simple call above method as following.

delayAction(0.5) {
    // do stuff here
    print("Delayed by 0.5 Seconds")
}

For any queries please feel free to comment.

Read More

Parsing JSON Using Decodable in Swift 4 became super easy - Swift 4, iOS 11

8/07/2017 08:18:00 am 1
Parsing JSON in Swift 4 using Decodable Protocol. Parsing a complicate JSON is difficult because of redoing whole process again and again. In swift 4 it's not like swift 2,3, parsing became super easy and fast by just using single line of code. In this tutorial we are diving into Decodable protocol for JSON Parsing.

Parsing JSON Using Decodable in Swift 4 became super easy - Swift 4, iOS 11

Getting Started:

Create new project -> open Xcode -> File -> New -> Project -> Single View App, then tap next button. Type product name as 'JSONParseSwift4' then tap next and select the folder to save project.

In this article we will discuss about struct. Structs are very helpful for storing heterogeneous data unlike Array. For example in struct we can store Int, String etc

Creating a simple Struct. Write the following struct next to 'import UIKit'.


struct Tutorials {
    let id : Int
    let name : String
    let link : String
    let imageUrl : String
}
Cool, we created structure . Then how to use these Struct? Let write code for testing. Inside viewDidLoad() method write the following code.

let myTutorial = Tutorials(id: 1, name: "my tutorial", link: "some link", imageUrl: "some image")
print(myTutorial)
Build and Run, See the logs in console. Log should like following image.

Real time objects detected list

First thing we need sample JSON for parsing. So we need sample url for that. This is our sample url :

https://gist.githubusercontent.com/iosRevisited/bf28f444c262591b1807949ff40a2222/raw/695b2de9bc364762377d64595bf2b25a8de69786/sample.json 


Now how to get data from that url?

Here we go with simple code using URLSession with completion handler. Here is code for getting data from url. Delete all code inside viewDidLoad() method and replace with following code.


let urlString = "https://gist.githubusercontent.com/iosRevisited/bf28f444c262591b1807949ff40a2222/raw/695b2de9bc364762377d64595bf2b25a8de69786/sample.json"
    
    guard let url = URL(string: urlString) else {
    return
    }
    
    URLSession.shared.dataTask(with: url) { (data, response, err) in
    guard let data = data else { return }
    
    
    // Old School method for parsing Swift 2/3/Objective-C
    do {
    let json = try JSONSerialization.jsonObject(with: data, options: .mutableContainers)
    print(json)
    } catch let jsonErr {
    print("error in parsing",jsonErr)
    }
    }.resume()
Now Build and Run we will see data as following.

Parsing JSON Using Decodable Protocol
Now store the data in struct. So need to initialize with dictionary. Replace old Struct with new Struct.

struct Tutorials {
    let id : Int
    let name : String
    let link : String
    let imageUrl : String
    
    init(json:[String: Any]) {
        id = json["id"] as? Int ?? 0
        name = json["name"] as? String ?? ""
        link = json["link"] as? String ?? ""
        imageUrl = json["imageUrl"] as? String ?? ""
    }
}
Then replace 'print(json)' line with following code.

let tutorial = Tutorials(json: json)
print(tutorial.name)
Build and Run we will see the name in the console.

Output

Up to now what we did is old methods we used in Swift 2/3/Objective-C.

Now step into the new method introduced by apple in iOS 11 is Decodable Protocol. Remove init method in structure and provide Decodable Protocol to struct.
Replace structure with new struct with protocol.


struct Tutorial: Decodable {
    let id : Int
    let name : String
    let link : String
    let imageUrl : String
}
 Replace the code inside do { } block with following code.

let tutorial = try JSONDecoder().decode(Tutorial.self, from: data)
print(tutorial.name)
console output
Now Build and Run we will get the name as before but we never initialized the structure as before.

Important - we should match the data keys with the structure properties.


Array of Dictionaries :


Now let see this JSON:

[
 {
  "id": 1,
  "name": "Face Detection",
  "link": "http://iosrevisited.blogspot.com/2017/08/face-detection-using-vision-framework.html",
  "imageUrl": "https://support.apple.com/library/content/dam/edam/applecare/images/en_US/iOS/move-to-ios-icon.png"
 },
 {
  "id": 2,
  "name": "Real Time Object Detection",
  "link": "http://iosrevisited.blogspot.com/2017/08/real-time-camera-object-detection-with.html",
  "imageUrl": "https://support.apple.com/library/content/dam/edam/applecare/images/en_US/iOS/move-to-ios-icon.png"
 }
]
This is a bit complex than before. No worries, using swift 4 this became super easy. That JSON contains array of tutorials.

Change url to https://gist.githubusercontent.com/iosRevisited/7e6cd23e2a267a2503698411a834fe6c/raw/890f5842181369b83c820b4a6702b42776a9aabf/tutorials.json

Replace old url with new url. Then it looks like this.


let urlString = "https://gist.githubusercontent.com/iosRevisited/7e6cd23e2a267a2503698411a834fe6c/raw/890f5842181369b83c820b4a6702b42776a9aabf/tutorials.json"
Then inside do block change decode code to array like this [Tutorial]. Replace do block with following code.

let tutorials = try JSONDecoder().decode([Tutorial].self, from: data)
print("\(tutorials)")
Build and Run, Array of data appears like this:

Array of Dictionaries parsing using Decodable Protocol

Great, array of dictionaries also parsed using decodable protocol.


Complex Data Parsing: 


Now we will parse the following data from url - https://gist.githubusercontent.com/iosRevisited/65fff3a78a684909a7b64761799a02d3/raw/0850d72db8315ff25d2a24219d6592fd404deb35/Complex.json

{
 "name": "iOS Revisited",
 "description": "Blog about,Objective c language and Swift language programming questions, Tutorials, Bugs solving ....",
 "tutorials": [
  {
   "id": 1,
   "name": "Face Detection",
   "link": "http://iosrevisited.blogspot.com/2017/08/face-detection-using-vision-framework.html",
   "imageUrl": "https://support.apple.com/library/content/dam/edam/applecare/images/en_US/iOS/move-to-ios-icon.png"
  },
  {
   "id": 2,
   "name": "Real Time Object Detection",
   "link": "http://iosrevisited.blogspot.com/2017/08/real-time-camera-object-detection-with.html",
   "imageUrl": "https://support.apple.com/library/content/dam/edam/applecare/images/en_US/iOS/move-to-ios-icon.png"
  }
 ]
}
This structure is totally different from our struct model. We need to create one more model as following.

struct siteDescription: Decodable {
    let name: String
    let description: String
    let tutorials: [Tutorial]
}
Here we reused Tutorial Struct.

Now change urString. It looks like following.

let urlString = "https://gist.githubusercontent.com/iosRevisited/65fff3a78a684909a7b64761799a02d3/raw/0850d72db8315ff25d2a24219d6592fd404deb35/Complex.json"
Then replace code inside do block.

let siteData = try JSONDecoder().decode(SiteDescription.self, from: data)

print("\nname = \(siteData.name)")
print("\ndescription = \(siteData.description)")
print("\ntutorials = \(siteData.tutorials)")
Complex Data Parsing output

Build and Run , we will see following as output in console.

Cool, we parsed data easily in a efficient way using Decodable Protocol.


Read More

5 Aug 2017

Face Detection using Vision Framework - Swift, iOS11

8/05/2017 03:36:00 am 1

Face Detection using Vision Framework - Swift, iOS11


In iOS 11 Apple provide frameworks for specific areas. We will dive into Vision API. Using Vision framework tools we can process image or video to detect and recognize face, detect barcode, detect text, detect and track object, etc.

For detecting objects using Machine Learning Image Analysis follow this link - Real Time Camera Object Detection with Machine Learning - CoreML: Swift 4

In this article, we will bash out face detection. In vision API there are three roles.

Getting Started:

1. Request :

     Ex: VNDetectFaceRectanglesRequest to detect face in an image.

2. Request handler :

    Ex: VNImageRequestHandler, VNSequenceRequestHandler. VNImageRequestHandler for single image and VNSequenceRequestHandler is for a sequence of multiple images.

3. Observation :

     Provide informations like bounding box.


First create a new project -> open Xcode -> File -> New -> Project -> Single View App, then tap next button. Type product name as 'Face Recognization' then tap next and select the folder to save project.

Before start, download one sample image with faces and add to Assests.xcassets and name it as 'sample1'.

Now it's time to start writing a code. Open ViewController.swift add this line in viewDidLoad() method. 


 guard let image = UIImage(named: "sample1") else {
    return
}

Here image is an UIImage object used to detect faces. Then for displaying image add UIImageView as subview. Add the following code in viewDidLoad() method after else part.

 /........

let scaledHeight = view.frame.width / image.size.width * image.size.height
let imageView = UIImageView(image: image)
imageView.frame = CGRect(x: 0, y: 20, width: view.frame.width, height: scaledHeight)
view.addSubview(imageView)
Here scaledHeight is the imageView height calculated from ratio of device width and image size.

Now Build and Run , You will see image with aspect size based on device size.


We start with Vision API to detect face rectangles. For that we need to import vision add below 'import UIKit'.

 import Vision

As we mentioned earlier we are using three roles in this face detection. First we are going to create request using VNDetectFaceRectanglesRequest. Second step is to use request handler in this we are analyzing single image so we will use VNImageRequestHandler. This is an asynchronous so it's better to put VNImageRequestHandler in background thread. Third one Observations, we will use inside request completion handler. Let implement everything using code. Add the following code to the end  of viewDidLoad() method.

 /........

let request = VNDetectFaceRectanglesRequest { (req, error) in
    if let error = error  {
        print("Failed to detect faces",error)
        return
    }
    print(req.results)
}

guard let cgImage = image.cgImage else {
    return
}

DispatchQueue.global(qos: .background).async {
    let handler = VNImageRequestHandler(cgImage: cgImage, options: [:])
    
    do {
        try handler.perform([request])
    } catch let reqError {
        print("Error in req",reqError)
    }
}

Execution starts from VNDetectFaceRectanglesRequest after that it will not call completion handler. Then the flow goes to cgImage -> handler then we will perform request on handler. If the request succeded then it calls VNDetectFaceRectanglesRequest completion handler. It will analyze image and give results as array of VNFaceObservation.

Now Build and Run , Great You will see VNFaceObservation object in console.


Finally, we are getting rectangle. Parse VNFaceObservation to draw rectangles on detected faces in an image. For that copy the following lines of code and replace the line

'print(req.results)'.

guard let observations = req.results as? [VNFaceObservation]
    else { fatalError("unexpected result type") }


observations.forEach({ (observation) in
    DispatchQueue.main.async {
        print(observation.boundingBox)
        let x = self.view.frame.width * observation.boundingBox.origin.x
        let width = self.view.frame.width * observation.boundingBox.size.width
        let height = scaledHeight * observation.boundingBox.size.height
        let y = scaledHeight * (1 - observation.boundingBox.origin.y) - height
        let redSquare = UIView()
        redSquare.backgroundColor = UIColor.clear
        redSquare.layer.borderColor = UIColor.red.cgColor
        redSquare.layer.borderWidth = 2.0
        redSquare.frame = CGRect(x: x, y: y, width: width, height: height)
        self.view.addSubview(redSquare)
    }
})
Now Build and Run , Great detected faces in an image with red borders.


Download sample project with examples :

Read More

Post Top Ad