Adaptive Autolayout mainly used to choose various layouts in different devices with orientations. Here in this article we create two layouts, one is for Portrait orientation and second on is for Landscape orientation. Here we are doing mainly for iPhone 10, so we have to use SafeAreaLayoutGuide.
Open ViewController.swift file and add the following properties:
Here we are use kitten.jpg, replace that with your image.
Add the following method:
Then add the following code to the end of addUIElements() method:
So we successfully created layouts for imageview and label.
Next step is adding constraints to view. To do add the following line next to the constraints.
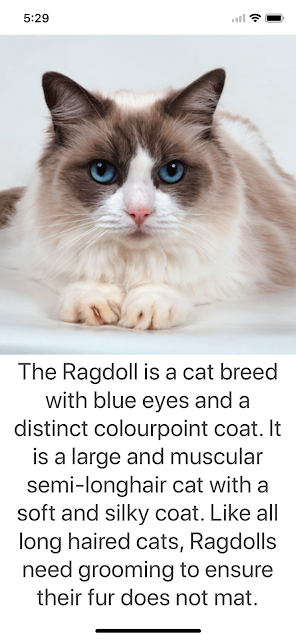
Then finally call the addUIElements() method in viewDidLoad() and Run the project, we will output as follow:
That's Great! What about landscape?
Let's check, that's was bad layout in landscape.
Add following code just before defaultConstraints creation:
Next create two NSLayoutConstraint arrays, for that add the following properties:
portraitConstraints is to store all constraints required for portrait orientation.
landscapeConstraints is to store all constraints required for landscape orientation.
Then replace defaultConstraints with the following code:
Next add the observer to listen to orientation changes, add the following code in viewDidLoad() method:
Next add the method for toggle the constraints, add the following method:
Next call the above method at the end of addUIElements() methods.
Now Build and Run, change the orientation we will see the following screen in landscape orientation.
Download sample project with examples :
Create Project:
Firstly create new Xcode project.Open ViewController.swift file and add the following properties:
let imgView : UIImageView = {
    let imageView = UIImageView()
    imageView.translatesAutoresizingMaskIntoConstraints = false
    imageView.image = UIImage(named: "kitten.jpg")
    imageView.contentMode = .scaleAspectFill
    imageView.clipsToBounds = true
    return imageView
}()

let sampleLabel : UILabel = {
    let label = UILabel()
    label.translatesAutoresizingMaskIntoConstraints = false
    label.numberOfLines = 0
    label.font = UIFont.systemFont(ofSize: 30.0)
    label.textAlignment = .center
    label.adjustsFontSizeToFitWidth = true
    label.text = "The Ragdoll is a cat breed with blue eyes and a distinct colourpoint coat. It is a large and muscular semi-longhair cat with a soft and silky coat. Like all long haired cats, Ragdolls need grooming to ensure their fur does not mat."
    label.textColor = UIColor.darkGray
    return label
}()
Here we are use kitten.jpg, replace that with your image.
ImageView Constraints:
The imageview should look like above image. So first add imageView to View then create constraints for imageView relatively to view.Add the following method:
func addUIElements() {
    let guide = view.safeAreaLayoutGuide

    // imgView Layouts
    view.addSubview(imgView)
    let defaultImgTop = imgView.topAnchor.constraint(equalTo: guide.topAnchor, constant: 0.0)
    let defaultImgLeading = imgView.leadingAnchor.constraint(equalTo: guide.leadingAnchor, constant: 0.0)

    // portrait
    let portraitImgTrailing = imgView.trailingAnchor.constraint(equalTo: guide.trailingAnchor, constant: 0.0)
    let portraitImgHeight = imgView.heightAnchor.constraint(equalTo: view.heightAnchor, multiplier: 0.5)

    // .....
}
Here we are using view's safeAreaLayoutGuide as base layout guide.Label Constraints:
Label also should look like above image. So first add label to View then create constraints for label relatively to view.Then add the following code to the end of addUIElements() method:
// sampleLabel Layouts
view.addSubview(sampleLabel)
let defaultLblTrailing = sampleLabel.trailingAnchor.constraint(equalTo: guide.trailingAnchor, constant: -10.0)
let defaultLblBottom = sampleLabel.bottomAnchor.constraint(equalTo: guide.bottomAnchor, constant: 0.0)

// portrait
let portraitLblBottom = sampleLabel.topAnchor.constraint(equalTo: imgView.bottomAnchor, constant: 0.0)
let portraitLblLeading = sampleLabel.leadingAnchor.constraint(equalTo: guide.leadingAnchor, constant: 10.0)
So we successfully created layouts for imageview and label.
Next step is adding constraints to view. To do add the following line next to the constraints.
let defaultConstraints = [defaultImgTop, defaultImgLeading, defaultLblBottom, defaultLblTrailing, portraitImgHeight, portraitImgTrailing, portraitLblBottom, portraitLblLeading]
view.addConstraints(defaultConstraints)
Then finally call the addUIElements() method in viewDidLoad() and Run the project, we will output as follow:
That's Great! What about landscape?
Let's check, that's was bad layout in landscape.
Landscape Constraints:
So for Landscape create new layouts.Add following code just before defaultConstraints creation:
// ImageView Landscape Constraints
let landscapeImgBottom = imgView.bottomAnchor.constraint(equalTo: guide.bottomAnchor, constant: 0.0)
let landscapeImgWidth = imgView.widthAnchor.constraint(equalTo: view.widthAnchor, multiplier: 0.5)

// Label Landscape Constraints
let landscapeLblTop = sampleLabel.topAnchor.constraint(equalTo: guide.topAnchor, constant: 0.0)
let landscapeLblTrailing = sampleLabel.leadingAnchor.constraint(equalTo: imgView.trailingAnchor, constant: 10.0)
Next create two NSLayoutConstraint arrays, for that add the following properties:
var portraitConstraints: [NSLayoutConstraint] = []
var landscapeConstraints: [NSLayoutConstraint] = []
portraitConstraints is to store all constraints required for portrait orientation.
landscapeConstraints is to store all constraints required for landscape orientation.
Then replace defaultConstraints with the following code:
let defaultConstraints = [defaultImgTop, defaultImgLeading, defaultLblBottom, defaultLblTrailing]
portraitConstraints = [portraitImgHeight, portraitImgTrailing, portraitLblBottom, portraitLblLeading]
landscapeConstraints = [landscapeImgWidth, landscapeImgBottom, landscapeLblTop, landscapeLblTrailing]
Next add the observer to listen to orientation changes, add the following code in viewDidLoad() method:
NotificationCenter.default.addObserver(self, selector: #selector(self.toggleConstraints), name: NSNotification.Name.UIDeviceOrientationDidChange, object: nil)
Next add the method for toggle the constraints, add the following method:
@objc func toggleConstraints() {
    if UIDevice.current.orientation.isLandscape {
        view.removeConstraints(portraitConstraints)
        view.addConstraints(landscapeConstraints)
    }else {
        view.removeConstraints(landscapeConstraints)
        view.addConstraints(portraitConstraints)
    }
}
Next call the above method at the end of addUIElements() methods.
Now Build and Run, change the orientation we will see the following screen in landscape orientation.
Download sample project with examples :


No comments:
Post a Comment