September 2017 - Swift 4 Tutorials W3Schools

Hot

Post Top Ad

29 Sept 2017

Authenticate with Firebase Anonymously on iOS | Convert Anonymous User to Permanent User in iOS - swift 4

9/29/2017 01:40:00 am 0
We can create and use temporary anonymous accounts to authenticate with Firebase using Firebase Authentication. By using this we can allow users without signed up to your app to work with data protected by security rules. If later these anonymous user wants to sign up you can convert and link their sign-in credentials to the anonymous account so that they can continue to work with their protected data in future sessions.

Authenticate with Firebase Anonymously on iOS | Convert Anonymous User to Permanent User in iOS - swift 4

This Article Covers Following Related questions  :

Swift iOS Anonymous Sign-In
firebase authentication ios swift
firebase email authentication ios
firebase authentication ios tutorial
firebase authentication example ios
firebase user authentication tutorial
firebase anonymous login iOS
email login firebase ios

Before get into this, there are some steps to be done:

  • Enable Facebook Login:
    • In the Firebase console, open the Auth section.
    • On the Sign-in Methods page, enable the Anonymous sign-in method.


Sign In to Firebase anonymously:

If an user uses an app feature that requires authentication with Firebase, sign in the user anonymously by completing the following steps:

First import the Firebase SDK in AppDelegate.swift file:
import Firebase

Then, in the application:didFinishLaunchingWithOptions: method, initialize the FirebaseApp object:
// Use Firebase library to configure APIs
FirebaseApp.configure()

Call signInAnonymouslyWithCompletion: method:
Auth.auth().signInAnonymously() { (user, error) in
  // ...
  if let error = error {
        // ...
        print(error.localizedDescription)
        return
    }
    // User is signed in
    if let user = user {
        let uid = user.uid
        let isAnonymous = user!.isAnonymous  // true
        // ...
    }
}

If the above method executes without an error, you can get the anonymous user's account data from the FIRUser object:

Convert an anonymous/guest account to a permanent account:

If an anonymous user wants to sign up to your app, to continue in app for further work we can use the following steps.

Example: you might want to make the items the user added to their shopping cart before they signed up available in their new account's shopping cart.


When the user signs up, complete the sign-in flow for the user's authentication provider up to, but not including, calling one of the FIRAuth.signInWith methods. For example, get the user's Google ID token, Facebook access token, or email address and password.

Get an FIRAuthCredential for the new authentication provider:

Link anonymous with Google Sign-In:

For converting anonymous user to permanent user using Google Sign-In, To do so, complete the following :
guard let authentication = user.authentication else { return }
let credential = GoogleAuthProvider.credential(withIDToken: authentication.idToken,
                                                  accessToken: authentication.accessToken) 

user.link(with: credential) { (user, error) in
  if let error = error {
        // ...
        print(error.localizedDescription)
        return
    }
    // User is signed in with google
    if let user = user {
        // The user's ID, unique to the Firebase project.
        // Do NOT use this value to authenticate with your backend server,
        // if you have one. Use getTokenWithCompletion:completion: instead.
        let uid = user.uid
        let email = user.email
        let photoURL = user.photoURL
        // ...
    }
}

Link anonymous with Facebook Login:

For converting anonymous user to permanent user using Facebook Login, To do so, complete the following :
let credential = FacebookAuthProvider.credential(withAccessToken: FBSDKAccessToken.current().tokenString)

user.link(with: credential) { (user, error) in
  if let error = error {
        // ...
        print(error.localizedDescription)
        return
    }
    // User is signed in with Facebook
    if let user = user {
        // The user's ID, unique to the Firebase project.
        // Do NOT use this value to authenticate with your backend server,
        // if you have one. Use getTokenWithCompletion:completion: instead.
        let uid = user.uid
        let email = user.email
        let photoURL = user.photoURL
        // ...
    }
}

Link anonymous with Email-password sign-in:

For converting anonymous user to permanent user using Email-password sign-in, To do so, complete the following :
let credential = EmailAuthProvider.credential(withEmail: email, password: password)

user.link(with: credential) { (user, error) in
  if let error = error {
        // ...
        print(error.localizedDescription)
        return
    }
    // User is signed in with Email-password
    if let user = user {
        // The user's ID, unique to the Firebase project.
        // Do NOT use this value to authenticate with your backend server,
        // if you have one. Use getTokenWithCompletion:completion: instead.
        let uid = user.uid
        let email = user.email
        let photoURL = user.photoURL
        // ...
    }
}

If the call to linkWithCredential:completion: succeeds, the user's new account can access the anonymous account's Firebase data.

Sign Out:

In order to sign out a user from Firebase write the following code:
let firebaseAuth = Auth.auth()
do {
    try firebaseAuth.signOut()
} catch let signOutError as NSError {
    print ("Error signing out: %@", signOutError)
}

It will sign Out a user from Firebase and no longer access to Firebase.

Next Steps:

Authenticate with Firebase using Facebook Login


Firebase Authentication using Email & Password

Read More

27 Sept 2017

Authenticate with Firebase using Facebook Login on iOS - Swift 4

9/27/2017 02:52:00 am 0
We can authenticate users with Firebase with their Facebook accounts by integrating Facebook Login.

Authenticate with Firebase using Facebook Login on iOS - Swift 4

This Article Covers Following Related questions  :

Using Firebase to Integrate Facebook Login in iOS Apps
Firebase Facebook Login and Authentication Tutorial
Firebase Authentication using facebook login in iOS
Add Facebook authentication to your apps, using Firebase
iOS App using facebook login with firebase auth
Firebase - Facebook Authentication


Before get into this, there are some steps to be done:

  • Enable Facebook Login:
    • In the Firebase console, open the Auth section.
    • On the Sign in method tab, enable the Facebook sign-in method and specify the App ID and App Secret you got from Facebook.
    • Then, make sure your OAuth redirect URI (e.g. demo-app-12345.firebaseapp.com/__/auth/handler) is listed as one of your OAuth redirect URIs in your Facebook app's settings page on the Facebook for Developers site in the Product Settings > Facebook Login config.

Enable Facebook Login in firebase console

Facebook Integration:

Firstly we need to integrate Facebook to Xcode project before Authenticate with Firebase.

Integrate Facebook Login into your app by following the developer's documentation.

Next initialize the FBSDKLoginButton object, and set delegate to receive login and logout events. For example:
let loginButton = FBSDKLoginButton()
loginButton.delegate = self

Implement delegate method didCompleteWithResult:error:
func loginButton(loginButton: FBSDKLoginButton!, didCompleteWithResult result: FBSDKLoginManagerLoginResult!, error: NSError?) {
  if let error = error {
    print(error.localizedDescription)
    return
  }
  // ... Successfully Logged in
}

Sign In To Firebase:

We need to initialize Firebase for Authentication.

First import the Firebase SDK in AppDelegate.swift file:
import Firebase

Then, in the application:didFinishLaunchingWithOptions: method, initialize the FirebaseApp object:
// Use Firebase library to configure APIs
FirebaseApp.configure()

After a user successfully signs in into Facebook the didCompleteWithResult:error:  method will call, there we get an access token for the signed-in user and exchange it for a Firebase credential:
let credential = FacebookAuthProvider.credential(withAccessToken: FBSDKAccessToken.current().tokenString)

Finally, authenticate with Firebase using the Firebase credential:
Auth.auth().signIn(with: credential) { (user, error) in
    if let error = error {
        // ...
        print(error.localizedDescription)
        return
    }
    // User is signed in
    if let user = user {
        // The user's ID, unique to the Firebase project.
        // Do NOT use this value to authenticate with your backend server,
        // if you have one. Use getTokenWithCompletion:completion: instead.
        let uid = user.uid
        let email = user.email
        let photoURL = user.photoURL
        // ...
    }
}

This new account is stored as part of your Firebase project, and can be used to identify a user across every app in your project, regardless of how the user signs in.

Sign Out:

In order to sign out a user from Firebase write the following code:
let firebaseAuth = Auth.auth()
do {
    try firebaseAuth.signOut()
} catch let signOutError as NSError {
    print ("Error signing out: %@", signOutError)
}

It will sign Out a user from Firebase and no longer access to Firebase.

Next Steps:


Firebase Authentication using Email & Password


Authenticate with Firebase Anonymously on iOS


Read More

26 Sept 2017

Firebase Authentication using Email & Password - iOS, Swift

9/26/2017 03:10:00 am 0
Now a days most of mobile developers are using Firebase in their projects.

For getting the data from Firebase we need to get authorization from Firebase. This can be done by Sign Up/Log In into Firebase.

Firebase Authentication using Email & Password

There are different Sign Up/Log In providers.

In this article we will go through Sign Up/Log In using Email & Password.

Before getting into Firebase Authentication, First we need to setup Firebase to our project.

If not, read setting up Firebase.

Next step is add the following pod file to our project.
pod 'Firebase/Auth'

Then, run pod install and open the created .xcworkspace file.

Initialize the Firebase SDK :

We need to initialize Firebase for Authentication.

First import the Firebase SDK in AppDelegate.swift file:
import Firebase

Then, in the application:didFinishLaunchingWithOptions: method, initialize the FirebaseApp object:
// Use Firebase library to configure APIs
FirebaseApp.configure()

Next go to Firebase console -> Authentication -> Sign-in Method there enable required logins.Here we enable Email/Password sign In provider.

 Firebase console -> Authentication -> Sign-in Method


Sign Up:

We need to collect user email and password for Firebase Authentication.

For creating new user, use the following method:
Auth.auth().createUser(withEmail: "test@email.com", password: "password") { (user, error) in
    if let error = error {
        print(error.localizedDescription)
        return
    }
    
    print("\(user!.email!) created")
}

After successful sign up we are printing user email from user object.

Sign In:

For signing in with email and password use the following code:
Auth.auth().signIn(withEmail: "test@email.com", password: "password") { (user, error) in
    if let error = error {
        print(error.localizedDescription)
        return
    }
    
    if let user = user {
        // The user's ID, unique to the Firebase project.
        // Do NOT use this value to authenticate with your backend server,
        // if you have one. Use getTokenWithCompletion:completion: instead.
        let uid = user.uid
        let email = user.email
        let photoURL = user.photoURL
        // ...
    }
}

After a user signs in successfully, you can get information about the user.

Sign Out:

In order to sign out from Firebase write the following code:
let firebaseAuth = Auth.auth()
do {
    try firebaseAuth.signOut()
} catch let signOutError as NSError {
    print ("Error signing out: %@", signOutError)
}

It will sign Out from Firebase and we can't access to Firebase.
Next Steps:

Authenticate with Firebase using Facebook Login


Authenticate with Firebase Anonymously on iOS

Read More

25 Sept 2017

could not find a valid GoogleService-Info.plist in your project - iOS, Swift, Objective-C

9/25/2017 11:38:00 pm 0

*** Terminating app due to uncaught exception 'com.firebase.core', reason: '`[FIRApp configure];` (`FirebaseApp.configure()` in Swift) could not find a valid GoogleService-Info.plist in your project. Please download one from https://console.firebase.google.com/.'
***

Solution 1:

Check the downloaded plist file name. The correct name should be 'GoogleService-Info.plist'.

Some names like GoogleService-Info(3).plist, GoogleService-Info(5).plist are invalid.

Firebase App configuration looks for the 'GoogleService-Info.plist' file. If the name is invalid and the app will crash with the above error.

So change name and Run, it should works without any error.

Solution 2:

Even though changing the name app still crashing then check the selected target for 'GoogleService-Info.plist'

For that first select 'GoogleService-Info.plist' file.

GoogleService-Info.plist'

Next in the right side panel of Xcode, select 'file inspector'. There we can see 'Target Membership' check our target.


Now try Build and Run,it should works without any error.
Read More

Firebase Tutorial - 1. Setting Up Google Firebase For iOS Projects

9/25/2017 03:53:00 am 0

Prerequisites :

  • Xcode
    • 7.0 or later for Objective-C
    • 8.0 or later for Swift 
  • Project targeting iOS 7 or above
  • Swift projects must use Swift 3.0 or later
  • CocoaPods 1.0.0 or later

Firebase :

Firebase helps you build better mobile apps and grow your business.

 Add &Integrate Firebase with iOS Project

Firebase products like Analytics, Real time Database, Messaging, and Crash Reporting let you move quickly and focus on your users.

Firebase is built on Google infrastructure and scales automatically, for even the largest apps.

Firebase products work great individually but share data and insights, so they work even better together.

In this tutorial we are going to know how to setup Firebase for mobile apps.

Getting Started :

Firstly we should have one gmail account for setting Up Firebase.

Go to https://firebase.google.com/.
Then tap on Sign In button at the top right corner of the page.

https://firebase.google.com/.

Enter your login credentials then tap sign in.

After successful login Firebase will show 'Welcome to Firebase' Screen with a Demo Project.

One more button is there 'IMPORT GOOGLE PROJECT'. If you have an existing project we can simply import from here.

But here we don't have any project to import.

Creating Project :

Create by tapping on Add Project button. It shows pop up like follow:

 Add Firebase Project Popup

Enter project name as 'Firebase-Demo'. then tap create project. It will go to inside project and looks like follow:


Left side we can see Authentication, Database, Storage, Hosting etc..

Firebase supports all those features with out our extra input. That's really cool.

In order to use all these features, firstly we need to create Xcode Project and then adding Firebase to the created Project.

Create Xcode Project :

Open Xcode -> File -> New -> Project -> Single View App, then tap next button. Type product name as 'Firebase-Demo' then tap next and select the folder to save project.

Cool that's it, next step is adding Firebase to our project.

Adding Firebase To iOS Project :

Go the Firebase  there we can see 'Add Firebase to your iOS app'.

'Add Firebase to your iOS app'.

Tap on that it will show a pop up. Here we need to add 'iOS bundle ID'. This id we will get from Xcode project.

Adding Firebase To iOS Project  pop up

Copy Bundle Id and Paste in the Firebase page. Then App Nickname & Store Id are optional. Then tap on 'Register App' button. Next it shows as following :


Next step download the the plist file as shown in above picture.

Drag the downloaded plist file to our Xcode project. And name it as 'GoogleService-Info.plist'.

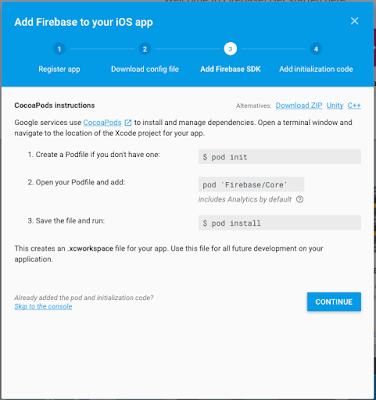
Then tap to continue. It will go to next step for adding 'Firebase SDK' to our project using CocoaPods instructions.

CocoaPods Official Tutorial

adding 'Firebase SDK' to our project using CocoaPods instructions.

Close Xcode project then open terminal and go to the project directory by using commands.

Then enter the following command in terminal
pod init

Next add the following command in terminal
open -a Xcode Podfile

It open podfile there some code already exists. Add the following code after '# Pods for Firebase-Demo' line.
pod 'Firebase/Core'

Then save and run the following command.
pod install

It installs all the required pods to our projects as following:

Firebase pods intsllling in terminal

Next close Xcode and open 'Firebase-Demo.xcworkspace' file.

To connect Firebase when your app starts up, add the initialization code below to your main AppDelegate class.
import UIKit
import Firebase

@UIApplicationMain
class AppDelegate: UIResponder, UIApplicationDelegate {

  var window: UIWindow?

  func application(_ application: UIApplication,
    didFinishLaunchingWithOptions launchOptions: [UIApplicationLaunchOptionsKey: Any]?)
    -> Bool {
    FirebaseApp.configure()
    return true
  }
}

Open Firebase we will see like following:

Firebase iOS Project Looks like

That's it we finished setting up the Firebase.

Now we can integrate storage, Database etc..

Next Steps:

Authenticate with Firebase using Facebook Login


Firebase Authentication using Email & Password


Authenticate with Firebase Anonymously on iOS

Read More

21 Sept 2017

iOS 11[Swift 4] Navigation Bar With Large Titles and LargeTitleTextAttributes - Color & Font Customization

9/21/2017 05:33:00 am 2
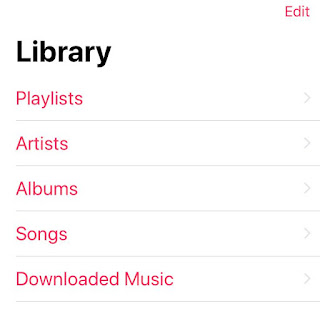
From iOS 11, Apple has changed Navigation Bar Titles to Large text.
   
Use a large title when you need to provide extra emphasis on context.

See Music app in iOS 11 Devices. Music uses large titles to differentiate content areas like albums, artists, playlists, and radio.

Large titles don't make sense in all apps and should never compete with content.

Navigation Bar With Large Titles and LargeTitleTextAttributes color & font change - Swift 4, iOS 11


Getting Started :

First create single View Application.

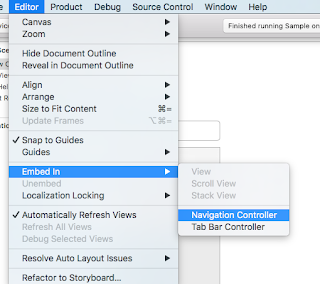
Open Main.storyboard, then tap on ViewController and go to Editor -> Embed In -> Navigation Controller.

Editor -> Embed In -> Navigation Controller.

It will add navigation Controller.

Next open ViewController.swift file.

PrefersLargeTitles :

For setting Large Text as title to the navigation bar we need to use prefersLargeTitles property.

When set to YES, the navigation bar will use a larger out-of-line title view when requested by the current navigation item.

Before that we need to tell to navigation item about LargeTitleDisplayMode. Use automatic mode it will set automatically based on parent View Controller.

Add the following code inside ViewDidLoad() method :
navigationController?.navigationBar.prefersLargeTitles = true
navigationController?.navigationBar.topItem?.title = "Hello"
navigationController?.navigationItem.largeTitleDisplayMode = .automatic

Build and Run, Great we see Large title 'Hello'.

prefersLargeTitles = true

Good, how to change title color and font etc.. For that we have LargeTitleTextAttributes.

LargeTitleTextAttributes :

For changing the color of the Title and Font size we need to set Attributes.

So add the following code next to previous code :
let attributes = [
    NSAttributedStringKey.foregroundColor : UIColor.red
]

navigationController?.navigationBar.largeTitleTextAttributes = attributes

Build and Run, we see title with Red Color.

Navigation large title with Red Color.


For changing the font add font attribute to the attribute dictionary like follow :
NSAttributedStringKey.font : UIFont.preferredFont(forTextStyle: .title1)

Download sample project with examples :


Read More

20 Sept 2017

iOS 11 Officially Released By Apple. What's new in iOS 11 & Features.

9/20/2017 01:00:00 am 0
For Download Settings -> General -> Software Update -> Download and Install.

iOS 11 is performance optimised for 64-bit apps. 32-bit apps will need
to be updated by the app developer to work with this version of iOS.


iOS 11 Ofiicially Released By Apple. What's new in iOS 11 & Features.


Supported Devices :


iPhone
  • iPhone 7 Plus
  • iPhone 7
  • iPhone 6s
  • iPhone 6s Plus
  • iPhone 6
  • iPhone 6 Plus
  • iPhone SE
  • iPhone 5s
iPad
  • 12.9-inch iPad Pro (first-generation)
  • 12.9-inch iPad Pro (second-generation)
  • 9.7-inch iPad Pro
  • 10.5-inch iPad Pro
  • iPad (fifth-generation)
  • iPad Air 2
  • iPad Air
  • iPad mini 4
  • iPad mini 3
  • iPad mini 2
iPod touch
  • iPod touch (6th generation)


iOS 11 brings hundreds of new features to iPhone and iPad including following :

App Store:

All-new App Store designed for discovering great apps and games every day.

New Games tab to find new games and see what’s most popular with top game charts.

New Today tab helps you discover new apps and games with stories, how-to guides and more.

All-new App Store designed for discovering great apps and games every day.


Siri :

New Siri voice is more natural and expressive.

Translate English words and phrases into Chinese, French, German, Italian or Spanish (beta)

Siri suggestions based on your usage of Safari, News, Mail and Messages.

Works with banking apps for account transfer and balances.

Works with apps that display QR codes.

Hindi and Shanghainese dictation.


New Siri voice is more natural and expressive


Camera :

Portrait mode now supports optical image stabilisation, HDR and True Tone flash.

Photos and videos will take up half the space with the new HEIF and HEVC image and video formats.

Redesigned set of nine filters optimised for natural skin tones.

Automatically identify and scan QR codes.
 

Photos :

Loop, Bounce and Long Exposure Live Photo effects.

Mute, trim or choose a new key photo for Live Photos.

Memory Movies automatically adapt content for portrait and landscape orientation.

More than a dozen new memory types including pets, babies, weddings and sporting events.

People album is more accurate and stays up to date across devices with iCIoud Photo Library.

Animated GIF support.


Maps :

Indoor maps for major airports and shopping centres.

Lane guidance and speed limit information with Turn-by-turn directions.

One-handed zoom with double tap and swipe.

Interact with Flyover by moving your device.

Do Not Disturb While Driving :

Automatically silences notifications while driving and keeps iPhone.

Optional Message auto-reply to alert selected contacts that you're driving.


New features designed for iPad :

An all-new Dock provides quick access to your favourite and recently used apps and can even be shown on top of active apps.

    Dock resizes so you can add all your favourite apps
    Recently used and Continuity apps are available on the right

Enhanced Slide Over and Split View

    Apps can be easily started in Slide Over and Split View from the Dock
    Slide Over and background apps now run simultaneously
    Apps in Slide Over and Split View can now be placed on the left side of the screen.

Drag and drop

    Move text, images and files between apps on iPad
    MuIti-Touch to move multiple items at the same time
    Spring-loading to move content between apps

Markup

    Markup works across documents, PDFs, web pages, photos and more
    Instantly mark up anything in iOS - just place Apple Pencil on what you want to mark up.

Notes

    Instantly create a new note by tapping the Lock screen with Apple Pencil.
    Inline drawing available by simply placing Apple Pencil in the body of a note.
    Search handwritten text.
    Document scanner auto-corrects for skewing and uses image filters to remove shadows.

Files

    AII-new Files app to browse, search and organise files.
    Works with iCIoud Drive and third-party cloud file providers.
    Recents view for quick access to recently used files across all apps and cloud services.

QuickType :

Flick down on letter keys to enter numbers, symbols and punctuation marks on iPad.

One-handed keyboard support on iPhone.

New keyboards for Armenian, Azerbaijani, Belarusian, Georgian, Irish, Kannada, Malayalam, Maori, Odia, Swahili and Welsh
.

Augmented Reality :

Augmented reality technologies that apps from the App Store can use to deliver content on top of real-world scenes for interactive gaming, immersive shopping experiences, industrial design and more.

Augmented reality technologies that apps from the App Store


sample projects on Augmented reality. 

Machine Learning :

Core machine learning technologies that apps from the App Store can use to deliver intelligent features with machine learning data processed on device for high performance and user privacy.

Core machine learning technologies that apps from the App Store


 sample project on Machine Learning.

Accessibility :

VoiceOver description support for images.

VoiceOver table and list support in PDFs.

Type to Siri support for basic search queries.

Spoken and braille caption support for videos.

Dynamic Type increases text and app UI to larger sizes.

Redesigned Invert Colours makes media content easier to view.


Some features may not be available in all countries or all areas
.
Read More

19 Sept 2017

Color Literals & Image Literals Tutorial in Swift - iOS

9/19/2017 04:48:00 am 4
Swift supports Both Color Literals & Image Literals. In this we will see how to use these literals.

This Article Covers Following Related questions  :

how to add image literal to an array and show them?
swift #imageliteral
color literals xcode 8
swift #colorliteral
image literal swift 3
xcode 8 image literal not working
color literal swift
imageliteral swift 3
#imageliteral(resourcename:"image-name")


Color Literals & Image Literals.

Color Literals :

Normally we write colors as follow :
let color = UIColor(
    red     : 200.0/255.0,
    green   : 200.0/255.0, 
    blue    : 200.0/255.0,
    alpha   : 1.0
)

That's too long for writing and time taking one.

We can do easily by using Color Literal.

The following image will show how to add color using Color Literals.

Color Literals example


On Start typing Color Literals we will see list of all colors as above then we can select easily by visualizing.

This is of type UIColor.

Whenever you want to select another color, just double-click inside any of those rects and the color picker will open again.

Like that we can store in arrays also.
Color Literals Array example

Image Literals :

Image Literals are as same as color literals. when ever we start typing Image Literals we will see list of images that are present in your project. That's really cool.

The following image will show how to add color using Color Literals.

Image Literals Example


This is of type UIImage.

Whenever you want to change image, just double-click inside any of those rects and the image picker will open again.

Like that we can store in arrays also.

Image Literals Array Example

Conclusion :

Color and image literals are really great. It reduces verbosity in the code and are much more visual.
Read More

17 Sept 2017

Scan BarCode & QRCode With iPhone Camera Using Swift 4(AVFoundation) - iOS 11

9/17/2017 03:42:00 am 2
Hello Guys! In this article we will dive in to Bar Code & Qr Code Scanner App. Here we doing both code scanning in single App.

Apple introduced Av Foundation from iOS 7 to support reading bar codes. Apple supports all types of following codes:

AVMetadataObjectTypeUPCECode
AVMetadataObjectTypeCode39Code
AVMetadataObjectTypeCode39Mod43Code
AVMetadataObjectTypeEAN13Code
AVMetadataObjectTypeEAN8Code
AVMetadataObjectTypeCode93Code
AVMetadataObjectTypeCode128Code
AVMetadataObjectTypePDF417Code
AVMetadataObjectTypeQRCode
AVMetadataObjectTypeAztecCode

This Article Covers Following Related questions  :

xcode barcode scanner tutorial
swift barcode scanner github
avfoundation barcode tutorial
ios barcode scanner sdk open source
barcode scanner ios github
swift barcode generator
swift qr code scanner
swift 3 qr code reader
Building a Barcode and QR Code Reader in Swift 3 and Xcode 8
Barcode Scanning in iOS8 With Swift AVFoundation Class


Getting Started :

Create a new project -> open Xcode -> File -> New -> Project -> Single View App, then tap next button. Type product name as 'BarCode&QRCode' then tap next and select the folder to save project.

Firstly for scanning code we need to access device camera's. For that open info.plist and add "Privacy - Camera Usage Description" key with a description "To read BarCode & QRCode".


Privacy - Camera Usage Description
Next import the following framework:
import AVFoundation

Add the following properties before viewDidLoad() function :
var videoCaptureDevice: AVCaptureDevice = AVCaptureDevice.defaultDevice(withMediaType: AVMediaTypeVideo)
var device = AVCaptureDevice.defaultDevice(withMediaType: AVMediaTypeVideo)
var output = AVCaptureMetadataOutput()
var previewLayer: AVCaptureVideoPreviewLayer?

var captureSession = AVCaptureSession()
var code: String?

var scannedCode = UILabel()

Add the following two methods:
private func setupCamera() {
    
    let input = try? AVCaptureDeviceInput(device: videoCaptureDevice)
    
    if self.captureSession.canAddInput(input) {
        self.captureSession.addInput(input)
    }
    
    self.previewLayer = AVCaptureVideoPreviewLayer(session: captureSession)
    
    if let videoPreviewLayer = self.previewLayer {
        videoPreviewLayer.videoGravity = AVLayerVideoGravityResizeAspectFill
        videoPreviewLayer.frame = self.view.bounds
        view.layer.addSublayer(videoPreviewLayer)
    }
    
    let metadataOutput = AVCaptureMetadataOutput()
    if self.captureSession.canAddOutput(metadataOutput) {
        self.captureSession.addOutput(metadataOutput)
        
        metadataOutput.setMetadataObjectsDelegate(self, queue: DispatchQueue.main)
        metadataOutput.metadataObjectTypes = [AVMetadataObjectTypeUPCECode, AVMetadataObjectTypeCode39Code, AVMetadataObjectTypeCode39Mod43Code, AVMetadataObjectTypeEAN13Code, AVMetadataObjectTypeEAN8Code, AVMetadataObjectTypeCode93Code, AVMetadataObjectTypeCode128Code, AVMetadataObjectTypePDF417Code, AVMetadataObjectTypeQRCode, AVMetadataObjectTypeAztecCode]
        
    } else {
        print("Could not add metadata output")
    }
}

private func addLabelForDisplayingCode() {
    view.addSubview(scannedCode)
    scannedCode.translatesAutoresizingMaskIntoConstraints = false
    scannedCode.bottomAnchor.constraint(equalTo: view.bottomAnchor, constant: -20.0).isActive = true
    scannedCode.leadingAnchor.constraint(equalTo: view.leadingAnchor, constant: 20.0).isActive = true
    scannedCode.trailingAnchor.constraint(equalTo: view.trailingAnchor, constant: -20.0).isActive = true
    scannedCode.heightAnchor.constraint(equalToConstant: 50).isActive = true
    scannedCode.font = UIFont.preferredFont(forTextStyle: .title2)
    scannedCode.backgroundColor = UIColor.black.withAlphaComponent(0.5)
    scannedCode.textAlignment = .center
    scannedCode.textColor = UIColor.white
    scannedCode.text = "Scanning...."
}

First method is for adding camera and second is for displaying scanned text.

Call the above methods in viewDidLoad() as follow :

self.setupCamera()
self.addLabelForDisplayingCode()

Add the following delegate to ViewController.swift.

AVCaptureMetadataOutputObjectsDelegate

Add the following methods for starting and stopping captureSession.

override func viewWillAppear(_ animated: Bool) {
    super.viewWillAppear(animated)
    
    if (captureSession.isRunning == false) {
        captureSession.startRunning();
    }
}

override func viewWillDisappear(_ animated: Bool) {
    super.viewWillDisappear(animated)
    
    if (captureSession.isRunning == true) {
        captureSession.stopRunning();
    }
}

Then finally add the delegate method as following:
func captureOutput(_ captureOutput: AVCaptureOutput!, didOutputMetadataObjects metadataObjects: [Any]!, from connection: AVCaptureConnection!) {
    // This is the delegate'smethod that is called when a code is readed
    
    print(metadataObjects)
    for metadata in metadataObjects {
        let readableObject = metadata as! AVMetadataMachineReadableCodeObject
        let code = readableObject.stringValue
        scannedCode.text = code
    }
}

The above method will perform scanning operation and generate the code from the BarCode & QRCodes.


Build and Run, we see camera. Then focus on the barcode, the scanned code will be at the bottom.

Scan BarCode & QRCode With iPhone Camera Using Swift 4(AVFoundation) - iOS 11


You can create your own barcode from here.

Download sample project with example :


Read More

Post Top Ad