In this article we are creating a sample project on how to switch between ListView and GridView.
This Article Covers Following Related questions :
How to Switch Between List View and Grid View in iOS.UICollectionView - ListView and GridView.
Change the flow layout of a collectionView – from grid to list view.
Converting a UICollectionView to a UITableView.
Swift ios switching between listview and gridview
uitableview uicollectionview switch
uicollectionview table layout
In iOS native We call ListView as UITableView and GridView as UICollectionView.
Every one thinks that we need to take both UITableView & UICollectionView to achieve our goal. But that's Wrong.
We can achieve using UICollectionView itself. Let's see how simple to create ListView and GridView with UICollectionView.
Before starting this tutorial please read How to create UICollectionView.
If already done then download the starter project from here.
Open the file UICollectionViewProgramitically-master then open 'UICollectionViewProgramitically.xcodeproj'.
Build and run we can see Collection View or Grid Layout.
We are going to use same project for the ListView also.
Getting Started :
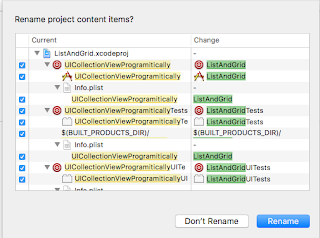
Initially change project name to ListAndGrid.Then a new pop window comes like follow:
Tap on rename, then OK. Build and Run nothing changed.
First step is we need to create List cell and Grid cell. Grid cell already present as Custom Cell. List cell is not exists.
Creating ListCell :
So first create List cell. Add the following code at the end of ViewController.Swift file.class ListCell : UICollectionViewCell {
override init(frame: CGRect) {
super.init(frame: frame)
setUpViews()
}
required init?(coder aDecoder: NSCoder) {
fatalError("init(coder:) has not been implemented")
}
}
Next add imageView, Title Label and Description label to ListCell.
So, add the following code for adding sub views to ListCell :
let imgView : UIImageView = {
    let imageView = UIImageView()
    imageView.image = UIImage(named: "car.jpg")
    imageView.contentMode = .scaleAspectFill
    imageView.clipsToBounds = true
    imageView.translatesAutoresizingMaskIntoConstraints = false
    return imageView
}()

let titleLabel : UILabel = {
    let label = UILabel()
    label.translatesAutoresizingMaskIntoConstraints = false
    label.font = UIFont.preferredFont(forTextStyle: UIFontTextStyle.title2)

    return label
}()

let descriptionLabel : UILabel = {
    let label = UILabel()
    label.translatesAutoresizingMaskIntoConstraints = false
    label.numberOfLines = 0
    label.font = UIFont.preferredFont(forTextStyle: UIFontTextStyle.body)
    return label
}()
After creating sub views we need to add them as sub views with proper layout.
Add the following method to the end of ListCell:
func setUpViews() {
    backgroundColor = UIColor.init(red: 245.0/255.0, green: 245.0/255.0, blue: 245.0/255.0, alpha: 1.0)
    addSubview(imgView)
    addSubview(titleLabel)
    addSubview(descriptionLabel)
    imgView.leadingAnchor.constraint(equalTo: leadingAnchor, constant: 0).isActive = true
    imgView.bottomAnchor.constraint(equalTo: bottomAnchor, constant: 0).isActive = true
    imgView.topAnchor.constraint(equalTo: topAnchor, constant: 0).isActive = true
    imgView.widthAnchor.constraint(equalToConstant: frame.height).isActive = true

    titleLabel.leadingAnchor.constraint(equalTo: imgView.trailingAnchor, constant: 8).isActive = true
    titleLabel.topAnchor.constraint(equalTo: imgView.topAnchor, constant: 4).isActive = true
    titleLabel.setContentCompressionResistancePriority(.defaultHigh, for: .vertical)

    descriptionLabel.topAnchor.constraint(equalTo: titleLabel.bottomAnchor, constant: 4).isActive = true
    descriptionLabel.leadingAnchor.constraint(equalTo: imgView.trailingAnchor, constant: 8).isActive = true
    descriptionLabel.bottomAnchor.constraint(equalTo: imgView.bottomAnchor, constant: -4).isActive = true
    descriptionLabel.trailingAnchor.constraint(equalTo: trailingAnchor, constant: -8).isActive = true
    descriptionLabel.setContentCompressionResistancePriority(.defaultLow, for: .vertical)
}
Great we created ListCell. Next step is we need to add ListCell to UICollectionView.
Before that we need to add some Global variables. Add the following code after Cell Identifier :
let listCellIdentifier = "ListCell"

var isListView = false

var toggleButton = UIBarButtonItem()
Next, register the ListCell to create new cells in collection View and add Toggle Button to Navigation Bar. Add the following code inside viewDidLoad() method :
collectionView?.register(ListCell.self, forCellWithReuseIdentifier: listCellIdentifier)

toggleButton = UIBarButtonItem(title: "List", style: .plain, target: self, action: #selector(butonTapped(sender:)))
self.navigationItem.setRightBarButton(toggleButton, animated: true)
Add the following method that calls when Ever toggle Button has been tapped.
@objc func butonTapped(sender: UIBarButtonItem) {
    if isListView {
        toggleButton = UIBarButtonItem(title: "List", style: .plain, target: self, action: #selector(butonTapped(sender:)))
        isListView = false
    }else {
        toggleButton = UIBarButtonItem(title: "Grid", style: .plain, target: self, action: #selector(butonTapped(sender:)))
        isListView = true
    }
    self.navigationItem.setRightBarButton(toggleButton, animated: true)
    self.collectionView?.reloadData()
}
The above method will check the condition whether to show list or grid then reloads the collection View to show the corresponding view.
Then Replace the code inside cellForItemAt method with the following code:
if isListView {
    let cell = collectionView.dequeueReusableCell(withReuseIdentifier: listCellIdentifier, for: indexPath) as! ListCell
    cell.titleLabel.text = "Ferrari 812 Superfast"
    cell.descriptionLabel.text = "The car has a larger 6.5-liter V12 engine compared to the 6.3-liter used in the F12berlinetta. The engine produces 800 PS (588 kW, 789 bhp) at 8,500 rpm and 718 N·m (530 lbf·ft) of torque at 7,000 rpm. The 812 Superfast's V12 engine is, in 2017, the most powerful naturally aspirated production car engine ever made."
    return cell
}else {
    let cell = collectionView.dequeueReusableCell(withReuseIdentifier: cellIdentifier, for: indexPath) as! CustomCell
    return cell
}
The main and important thing for changing the ListView and GridView is the Size of CollectionViewCell.
So ListCell means the width must equal to the device width. So, replace the code inside sizeForItemAt method with the following code.
let width = view.frame.width
if isListView {
    return CGSize(width: width, height: 120)
}else {
    return CGSize(width: (width - 15)/2, height: (width - 15)/2)
}
Great, Build and Run now we will see GridView. Tap on List button the view changes from grid to list and Vice-versa.
Download sample project with examples :


Hello, How would I add this in a tab bar controller?
ReplyDelete