

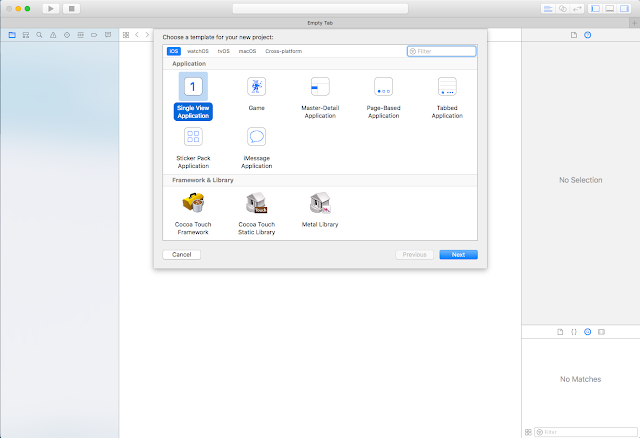
First create a new project -> open Xcode -> File -> New -> Project -> Single View Application, then tap next button. Type product name as Youtube HomeFeed then tap next and select the folder to save project.
Open Main.Storyboard, Drag TableView on to the ViewController and give Autolayouts as mentioned in the following picture. Make sure to uncheck the 'Constraints to margins'.


Add Label to cell and give horizontal spacing to imageView , trailing to container margin, and top to imageView. Change label text alignment to left and text color to dark gray.

Add one more imageView to cell and give leading , trailing, top to container margins and bottom space to thumbnail ImageView.
 Create new swift file by tapping File -> New -> File -> Swift file and name it as 'CustomTableViewCell'. Remove all lines of code and add the following code.


import Foundation
import UIKit

class CustomTableViewCell: UITableViewCell {

    @IBOutlet weak var contentImageView: UIImageView!

    @IBOutlet weak var channelThumbnailView: UIImageView!

    @IBOutlet weak var titleLabel: UILabel!

}

Then open connection inspector and give the links to TableViewCell subviews.

Open ViewController.Swift and this line before viewDidLoad() method and give link in storyboard. Tap tableview and give links to delegate and datasource.
@IBOutlet weak var tableView: UITableView!

Great upto now evrthing is ok. UI part preety much done. The main thing is getting data. For getting data we are going to create model. So again create new class by tapping File -> New -> File -> Swift file and name it as 'DataModel'. Add the follwing code.
class DataModel {

    var originalImageName : String?
    var thumbnailImageName : String?
    var title : String?


    init(originalImage: String, thumbnailImage: String, titleStr: String ) {
        originalImageName = originalImage
        thumbnailImageName = thumbnailImage
        title = titleStr
    }
}
var dataArray = [DataModel]()
let dataModel1 = DataModel.init(originalImage: "Image-1", thumbnailImage: "Thumbnail Image -1", titleStr: "The Avengers")
let dataModel2 = DataModel.init(originalImage: "Image-2", thumbnailImage: "Thumbnail Image -2", titleStr: "Iron Man 3")
let dataModel3 = DataModel.init(originalImage: "Image-3", thumbnailImage: "Thumbnail Image -3", titleStr: "Thor")
let dataModel4 = DataModel.init(originalImage: "Image-4", thumbnailImage: "Thumbnail Image -4", titleStr: "The Incredible Hulk")
let dataModel5 = DataModel.init(originalImage: "Image-5", thumbnailImage: "Thumbnail Image -5", titleStr: "Spider Man 3")

dataArray = [dataModel1 ,dataModel2, dataModel3, dataModel4, dataModel5]
Now it's time to add Tableview Delegate and DataSource methods at the bottom of ViewController.Swift class.
extension ViewController : UITableViewDelegate,UITableViewDataSource {

    func numberOfSections(in tableView: UITableView) -> Int {
        return 1;
    }

    func tableView(_ tableView: UITableView, numberOfRowsInSection section: Int) -> Int {
        return dataArray.count;
    }

    func tableView(_ tableView: UITableView, cellForRowAt indexPath: IndexPath) -> UITableViewCell {
        var cell = CustomTableViewCell()
        return cell
    }
}
 func tableView(_ tableView: UITableView, cellForRowAt indexPath: IndexPath) -> UITableViewCell {
        let cell = tableView.dequeueReusableCell(withIdentifier: "CustomCell", for: indexPath) as! CustomTableViewCell
         let data = dataArray[indexPath.row]
        cell.contentImageView.image = UIImage(named: data.originalImageName!)
        cell.contentImageView.contentMode = .scaleAspectFill
        cell.contentImageView.clipsToBounds = true
        cell.channelThumbnailView.image = UIImage(named: data.thumbnailImageName!)
        cell.channelThumbnailView.contentMode = .scaleAspectFill
        cell.channelThumbnailView.clipsToBounds = true
        cell.channelThumbnailView.layer.cornerRadius = 25
        cell.titleLabel.text = data.title!
        return cell
    }

    func tableView(_ tableView: UITableView, heightForRowAt indexPath: IndexPath) -> CGFloat {
        return 300
    }
Build and run the app, you will see our super heros on our devices.


