
In this article, we are going to learn about Custom Marker and Custom Info Window in Google maps.
First, create a new Xcode project and name it as Custom Marker.
In this example we are going to use completely auto layouts without a storyboard, every constraint is programmatically.
Download the sample project from the bottom of this tutorial.

Here I am integrating using cocoapods.
Open terminal, go the project folder then type follow commands.
Then add pod 'GoogleMaps' below to the # Pods for CustomMarker.
After successful installation close the project and open workspace file.
To use google maps we need a key from google.
If you don't have one, get one from here
Okay, All set.
open AppDelegate.swift and import GoogleMaps then add the following line inside didFinishLaunchingWithOptions method:
open ViewController.swift and import GoogleMaps.
Add the following closure before viewDidLoad():
Add mapView to the view as subview, add the following code inside viewDidLoad():
Don't panic with error, simply add the following extension to remove the error, we will discuss later in this example.
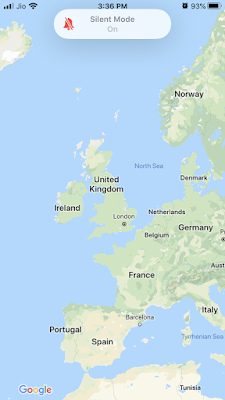
Now run the app, if your API key is valid you will see the map like below
Create array of SSPlaces as follow:
Add some sample data to places array, add the following code to the end of viewDidLoad():
Now it's time to create a custom marker view.
Create a new swift file of type UIView and name it as CustomMarkerView. Replace the whole class with the following code:
Create new array to store all markers:
To add the places as markers on the map add the following method:
Add the following colors before ViewController class:
After adding markers to the map let focus them so that users can look at those places only.
To focus the markers add the following methods:
Finally call the addMarkers() function at the end of viewDidLoad():
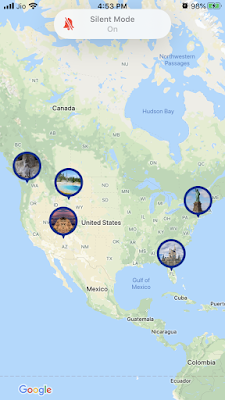
That's it run the app, you can see markers as follows:
Code looks big but that's a simple auto layout.
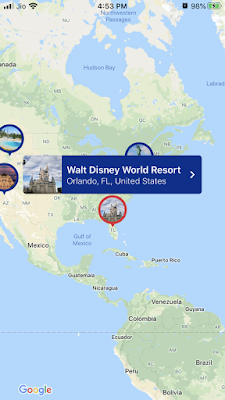
Okay, now whenever user taps on the marker we need to change the border color to red and show info window.
First to change the selected marker color to red add the following delegate method to the extension:
Then to show the Marker info window add the following delegate method:
The getEstimatedWidthForMarker method is to calculate the window size based on the content.
Next after closing the info window you should change marker color is default blue, for that add the following delegate method:
That's it all done, run the code you will see a map with markers then tap any one of the markers you will see the info window opened with marker color changed.
This tutorial looks long, but you can directly download code or check in the Github.


First, create a new Xcode project and name it as Custom Marker.
In this example we are going to use completely auto layouts without a storyboard, every constraint is programmatically.
Download the sample project from the bottom of this tutorial.
Adding Google Map:
The first thing to do is integrate Google Maps SDK either using pod or other alternatives.Here I am integrating using cocoapods.
Open terminal, go the project folder then type follow commands.
pod init
open -a xcode podfile
Then add pod 'GoogleMaps' below to the # Pods for CustomMarker.
pod install
After successful installation close the project and open workspace file.
To use google maps we need a key from google.
If you don't have one, get one from here
Okay, All set.
open AppDelegate.swift and import GoogleMaps then add the following line inside didFinishLaunchingWithOptions method:
GMSServices.provideAPIKey("YOUR API KEY")
open ViewController.swift and import GoogleMaps.
Add the following closure before viewDidLoad():
var mapView: GMSMapView = {
     let v = GMSMapView()
     v.translatesAutoresizingMaskIntoConstraints = false
     return v
 }()
Add mapView to the view as subview, add the following code inside viewDidLoad():
self.view.addSubview(mapView)
mapView.padding = UIEdgeInsets(top: 72, left: 25, bottom: 0, right: 25)
mapView.leadingAnchor.constraint(equalTo: self.view.leadingAnchor).isActive = true
mapView.trailingAnchor.constraint(equalTo: self.view.trailingAnchor).isActive = true
mapView.bottomAnchor.constraint(equalTo: self.view.bottomAnchor).isActive = true
mapView.topAnchor.constraint(equalTo: self.view.topAnchor).isActive = true
mapView.delegate = self
Don't panic with error, simply add the following extension to remove the error, we will discuss later in this example.
extension ViewController: GMSMapViewDelegate {

}
Now run the app, if your API key is valid you will see the map like below

Add Custom Marker:
Before creating a custom marker, first create our model, add the following model:struct SSPlace {
var name: String?
var address: String?
var coordinates: (lat: Double, lng: Double)?
}
Create array of SSPlaces as follow:
var places = [SSPlace]()
Add some sample data to places array, add the following code to the end of viewDidLoad():
places.append(SSPlace(name: "Fremont Troll", address: "N 36th St, Seattle, WA 98103, United States", coordinates: (lat: 47.651105, lng: -122.347347)))
places.append(SSPlace(name: "Grand Canyon National Park", address: "Arizona, United States", coordinates: (lat: 36.099982, lng: -112.123640)))
places.append(SSPlace(name: "Statue of Liberty National Monument", address: "New York, NY 10004, United States", coordinates: (lat: 40.689323, lng: -74.044490)))
places.append(SSPlace(name: "Yellowstone National Park", address: "United States", coordinates: (lat: 44.429311, lng: -110.588112)))
places.append(SSPlace(name: "Walt Disney World Resort", address: "Orlando, FL, United States", coordinates: (lat: 28.385280, lng: -81.563853)))
Now it's time to create a custom marker view.
Create a new swift file of type UIView and name it as CustomMarkerView. Replace the whole class with the following code:
class CustomMarkerView: UIView {

    var imageName: String?
    var borderColor: UIColor!

    init(frame: CGRect, imageName: String?, borderColor: UIColor, tag: Int) {
        super.init(frame: frame)
        self.imageName=imageName
        self.borderColor=borderColor
        self.tag = tag
        setupViews()
    }

    func setupViews() {
        let imgView = UIImageView()
        imgView.translatesAutoresizingMaskIntoConstraints = false
        self.addSubview(imgView)
        imgView.leadingAnchor.constraint(equalTo: leadingAnchor).isActive = true
        imgView.trailingAnchor.constraint(equalTo: trailingAnchor).isActive = true
        imgView.topAnchor.constraint(equalTo: topAnchor).isActive = true
        imgView.heightAnchor.constraint(equalToConstant: 50).isActive = true
        imgView.layer.cornerRadius = 25
        imgView.layer.borderColor = borderColor?.cgColor
        imgView.contentMode = .scaleAspectFill
        imgView.layer.borderWidth = 4
        imgView.clipsToBounds = true
        imgView.image = UIImage(named: imageName!)

        let triangleImgView = UIImageView()
        self.insertSubview(triangleImgView, belowSubview: imgView)
        triangleImgView.translatesAutoresizingMaskIntoConstraints = false
        triangleImgView.centerXAnchor.constraint(equalTo: centerXAnchor).isActive = true
        triangleImgView.topAnchor.constraint(equalTo: imgView.bottomAnchor, constant: -6).isActive = true
        triangleImgView.widthAnchor.constraint(equalToConstant: 23/2).isActive = true
        triangleImgView.heightAnchor.constraint(equalToConstant: 24/2).isActive = true
        triangleImgView.bottomAnchor.constraint(equalTo: bottomAnchor).isActive = true
        triangleImgView.image = UIImage(named: "markerTriangle")
        triangleImgView.tintColor = borderColor
    }

    required init?(coder aDecoder: NSCoder) {
        fatalError("init(coder:) has not been implemented")
    }

}
Here we are adding UIImageView to show the place image and one more UIImageView to show the bottom triangle.Create new array to store all markers:
var markers = [GMSMarker]()
To add the places as markers on the map add the following method:
func addMarkers() {
    markers.removeAll()
    for (index, place) in places.enumerated() {
        let marker = GMSMarker()
        let customMarker = CustomMarkerView(frame: CGRect(x: 0, y: 0, width: customMarkerWidth, height: customMarkerHeight), imageName: place.name, borderColor: primaryColor, tag: index)
        marker.iconView = customMarker
        marker.position = CLLocationCoordinate2D(latitude: place.coordinates!.lat, longitude: place.coordinates!.lng)
        marker.infoWindowAnchor = CGPoint(x: 0.5, y: 0)
        marker.map = self.mapView
        marker.zIndex = Int32(index)
        marker.userData = place
        markers.append(marker)
    }
}
Add the following colors before ViewController class:
let primaryColor = UIColor(red:0.00, green:0.19, blue:0.56, alpha:1.0)

let secondaryColor = UIColor(red:0.89, green:0.15, blue:0.21, alpha:1.0)
After adding markers to the map let focus them so that users can look at those places only.
To focus the markers add the following methods:
func focusMapToShowAllMarkers() {
    if let firstLocation = markers.first?.position {
        var bounds =  GMSCoordinateBounds(coordinate: firstLocation, coordinate: firstLocation)

        for marker in markers {
            bounds = bounds.includingCoordinate(marker.position)
        }
        let update = GMSCameraUpdate.fit(bounds, withPadding: 20)
        self.mapView.animate(with: update)
    }
}

override func viewDidAppear(_ animated: Bool) {
    super.viewDidAppear(animated)
    self.focusMapToShowAllMarkers()
}
Finally call the addMarkers() function at the end of viewDidLoad():
override func viewDidLoad() {
       super.viewDidLoad()
       /***
       self.addMarkers()
}
That's it run the app, you can see markers as follows:

Add Custom Info Window:
Create a new swift file of type UIView and name it as CustomMarkerInfoWindow. Replace the whole class with the following code:class CustomMarkerInfoWindow: UIView {
var txtLabel: UILabel = {
let v = UILabel()
v.translatesAutoresizingMaskIntoConstraints = false
return v
}()
var subtitleLabel: UILabel = {
let v = UILabel()
v.translatesAutoresizingMaskIntoConstraints = false
return v
}()
var chevronButton: UIButton = {
let v = UIButton()
v.translatesAutoresizingMaskIntoConstraints = false
return v
}()
var imgView: UIImageView = {
let v = UIImageView()
v.translatesAutoresizingMaskIntoConstraints = false
return v
}()
override init(frame: CGRect) {
super.init(frame: frame)
backgroundColor = primaryColor
self.addSubview(imgView)
imgView.leadingAnchor.constraint(equalTo: leadingAnchor).isActive = true
imgView.bottomAnchor.constraint(equalTo: bottomAnchor).isActive = true
imgView.topAnchor.constraint(equalTo: topAnchor).isActive = true
imgView.widthAnchor.constraint(equalTo: imgView.heightAnchor, multiplier: 1).isActive = true
imgView.heightAnchor.constraint(equalToConstant: 60).isActive = true
imgView.clipsToBounds = true
imgView.contentMode = .scaleAspectFill
imgView.layer.cornerRadius = 5
imgView.layer.masksToBounds = true
imgView.layer.maskedCorners = [.layerMinXMinYCorner, .layerMinXMaxYCorner]
self.addSubview(chevronButton)
chevronButton.centerYAnchor.constraint(equalTo: centerYAnchor).isActive = true
chevronButton.trailingAnchor.constraint(equalTo: trailingAnchor, constant: -8).isActive = true
chevronButton.widthAnchor.constraint(equalToConstant: 16).isActive = true
chevronButton.heightAnchor.constraint(equalToConstant: 16).isActive = true
chevronButton.setImage(UIImage(named: "chevron"), for: .normal)
chevronButton.tintColor = UIColor.white
chevronButton.isUserInteractionEnabled = false
self.addSubview(txtLabel)
txtLabel.topAnchor.constraint(greaterThanOrEqualTo: topAnchor, constant: 4).isActive = true
txtLabel.leadingAnchor.constraint(equalTo: imgView.trailingAnchor, constant: 8).isActive = true
txtLabel.trailingAnchor.constraint(equalTo: chevronButton.leadingAnchor, constant: -8).isActive = true
txtLabel.bottomAnchor.constraint(greaterThanOrEqualTo: centerYAnchor, constant: 2).isActive = true
txtLabel.font = UIFont.boldSystemFont(ofSize: 16)
txtLabel.numberOfLines = 2
txtLabel.textColor = UIColor.white
txtLabel.text = "dfsdfd"
self.addSubview(subtitleLabel)
subtitleLabel.topAnchor.constraint(equalTo: txtLabel.bottomAnchor, constant: 0).isActive = true
subtitleLabel.leadingAnchor.constraint(equalTo: txtLabel.leadingAnchor).isActive = true
subtitleLabel.trailingAnchor.constraint(equalTo: trailingAnchor).isActive = true
subtitleLabel.font = UIFont.systemFont(ofSize: 14, weight: .light)
subtitleLabel.textColor = UIColor.white
subtitleLabel.text = "55656556"
}
required init?(coder aDecoder: NSCoder) {
super.init(coder: aDecoder)
}
override func layoutSubviews() {
super.layoutSubviews()
layer.masksToBounds = true
layer.cornerRadius = 5
}
}
Code looks big but that's a simple auto layout.
Okay, now whenever user taps on the marker we need to change the border color to red and show info window.
First to change the selected marker color to red add the following delegate method to the extension:
func mapView(_ mapView: GMSMapView, didTap marker: GMSMarker) -> Bool {
    guard let customMarkerView = marker.iconView as? CustomMarkerView else { return false }
    let imgName = customMarkerView.imageName
    let customMarker = CustomMarkerView(frame: CGRect(x: 0, y: 0, width: customMarkerWidth, height: customMarkerHeight), imageName: imgName, borderColor: secondaryColor, tag: customMarkerView.tag)
    marker.iconView = customMarker
    return false
}
Then to show the Marker info window add the following delegate method:
func mapView(_ mapView: GMSMapView, markerInfoWindow marker: GMSMarker) -> UIView? {
     if let place = marker.userData as? SSPlace {
         marker.tracksInfoWindowChanges = true
         let infoWindow = CustomMarkerInfoWindow()
         infoWindow.tag = 5555
         let height: CGFloat = 65
         let paddingWith = height + 16 + 32
         infoWindow.frame = CGRect(x: 0, y: 0, width: getEstimatedWidthForMarker(place, padding: paddingWith) + paddingWith, height: height)
         infoWindow.imgView.image = UIImage(named: place.name!)
         infoWindow.txtLabel.text = place.name
         infoWindow.subtitleLabel.text = place.address
         return infoWindow
     }
     return nil
 }

 func getEstimatedWidthForMarker(_ place: SSPlace, padding: CGFloat) -> CGFloat {
     var estimatedWidth: CGFloat = 0
     let infoWindow = CustomMarkerInfoWindow()
     let maxWidth = (UIDevice.current.userInterfaceIdiom == .pad ? UIScreen.main.bounds.width * 0.7 : UIScreen.main.bounds.width * 0.8) - padding
     let titleWidth = (place.name ?? "").width(withConstrainedHeight: infoWindow.txtLabel.frame.height, font: infoWindow.txtLabel.font)
     let subtitleWidth = (place.address ?? "").width(withConstrainedHeight: infoWindow.subtitleLabel.frame.height, font: infoWindow.subtitleLabel.font)
     estimatedWidth = min(maxWidth, max(titleWidth, subtitleWidth))
     return estimatedWidth
 }

 extension String {
     func width(withConstrainedHeight height: CGFloat, font: UIFont) -> CGFloat {
         let constraintRect = CGSize(width: .greatestFiniteMagnitude, height: height)
         let boundingBox = self.boundingRect(with: constraintRect, options: .usesLineFragmentOrigin, attributes: [NSAttributedString.Key.font: font], context: nil)

         return ceil(boundingBox.width)
     }
 }
The getEstimatedWidthForMarker method is to calculate the window size based on the content.
Next after closing the info window you should change marker color is default blue, for that add the following delegate method:
func mapView(_ mapView: GMSMapView, didCloseInfoWindowOf marker: GMSMarker) {
    guard let customMarkerView = marker.iconView as? CustomMarkerView else { return }
    let imgName = customMarkerView.imageName
    let customMarker = CustomMarkerView(frame: CGRect(x: 0, y: 0, width: customMarkerWidth, height: customMarkerHeight), imageName: imgName, borderColor: primaryColor, tag: customMarkerView.tag)
    marker.iconView = customMarker
}
That's it all done, run the code you will see a map with markers then tap any one of the markers you will see the info window opened with marker color changed.

This tutorial looks long, but you can directly download code or check in the Github.


